You’ll find gallery-ready results don’t need a pro studio or an endless budget — just a few smart tools, a clear plan, and projects that let texture, scale, and restraint do the work. This guide gives 27 approachable ideas—from plaster reliefs and palette-knife abstracts to faux neon and patchwork mirrors—each with time and cost cues, display tips, and styling rules to help you curate a cohesive wall that reads intentional, not cluttered. Keep going to see which ones fit your space.
Quick Start: Tools, Time, and a Gallery-Ready Plan
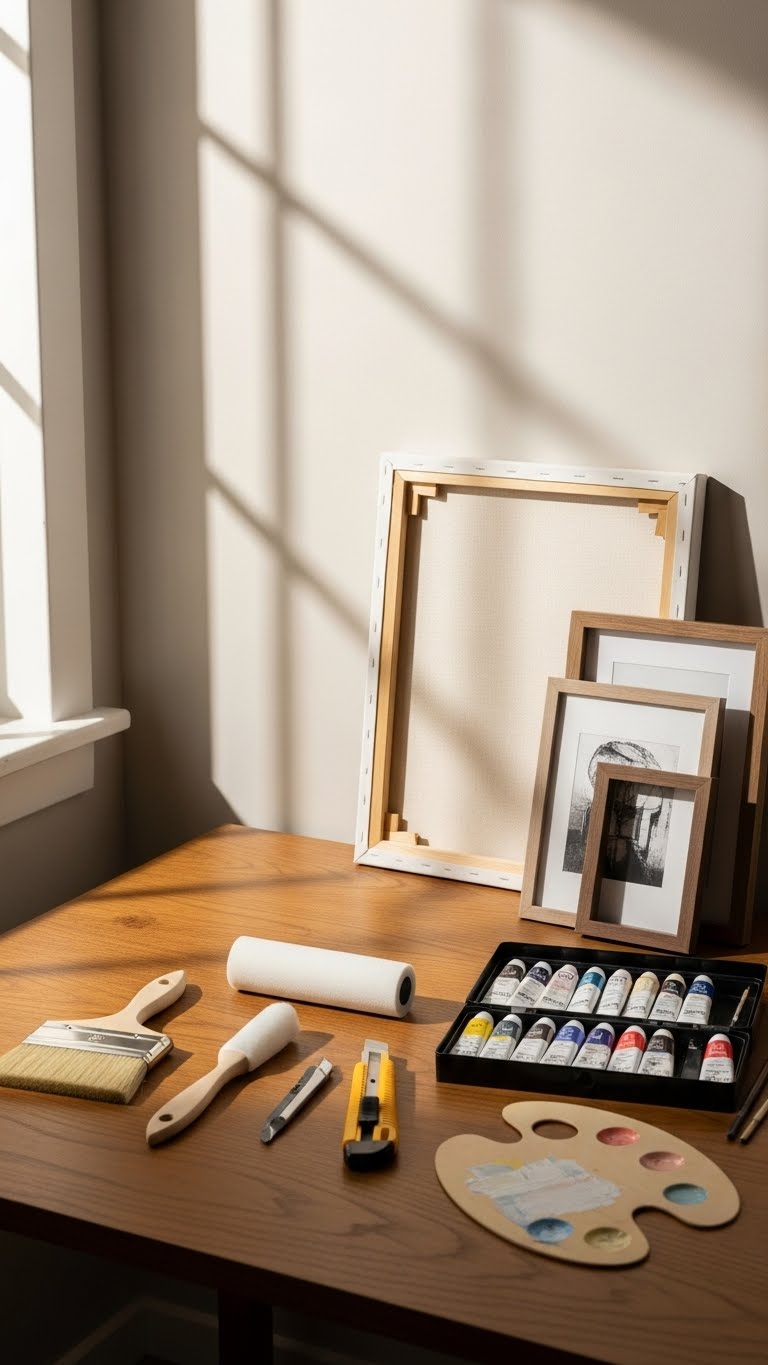
Before you jump in, map out a quick toolkit and timetable so your project looks intentional, not improvised: pick three versatile tools (a quality brush or foam roller, an acrylic set, and a sharp utility knife), set aside two focused sessions (one for creation, one for finishing and framing), and decide the final display size and format—canvas, framed print, or shadow box—so every decision from color mixing to edge treatment supports a gallery-ready result. Embrace a minimalist starter kit, sketch a tight timeline plan, trust instinct, and keep edits deliberate so your aesthetic stays liberated and modern.
Plan: Scale, Theme, Budget, and Difficulty

Once you’ve picked your starter tools, lock down scale, theme, budget, and difficulty so every choice feels intentional: choose a display size that fits your wall and workflow (small 12×12–18×24 for quick series, mid 24×36 for statement pieces, large 36×48+ only if you’ve got space and help), hone a clear theme—color-driven, shape-led, or texture-focused—that guides palette and technique, set a realistic budget that covers canvas/prints, paint, framing, and a small contingency, and rate the difficulty honestly so you plan time and materials (simple monochrome layers vs. multi-medium texturing).
Plan with scale budgeting in mind, prioritize theme accessibility, and keep choices liberating yet practical.
Materials List and Cost/Time Estimates Per Project
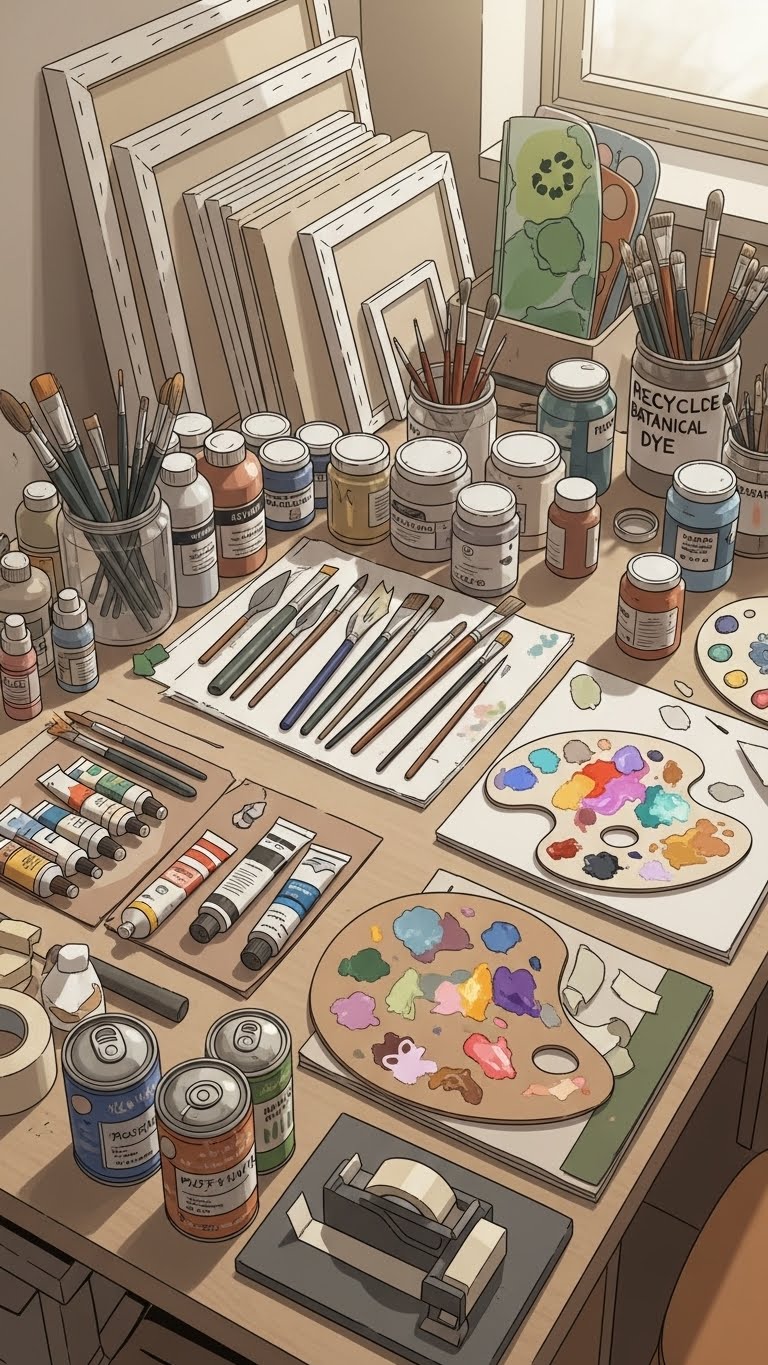
When you map out materials and realistic timeframes, you’ll keep projects on budget and momentum intact: list canvases or paper sizes, paint types (acrylic, oil, gouache), brushes and palette knives, mediums and primers, palettes, masking tape, and protective finishes, then add framing, hanging hardware, and cleaning supplies.
Estimate costs and hours per piece, note sustainable options like recycled plastics and botanical dyes, and plan buffers.
Basic Hanging & Safety: Hardware and Layout Rules
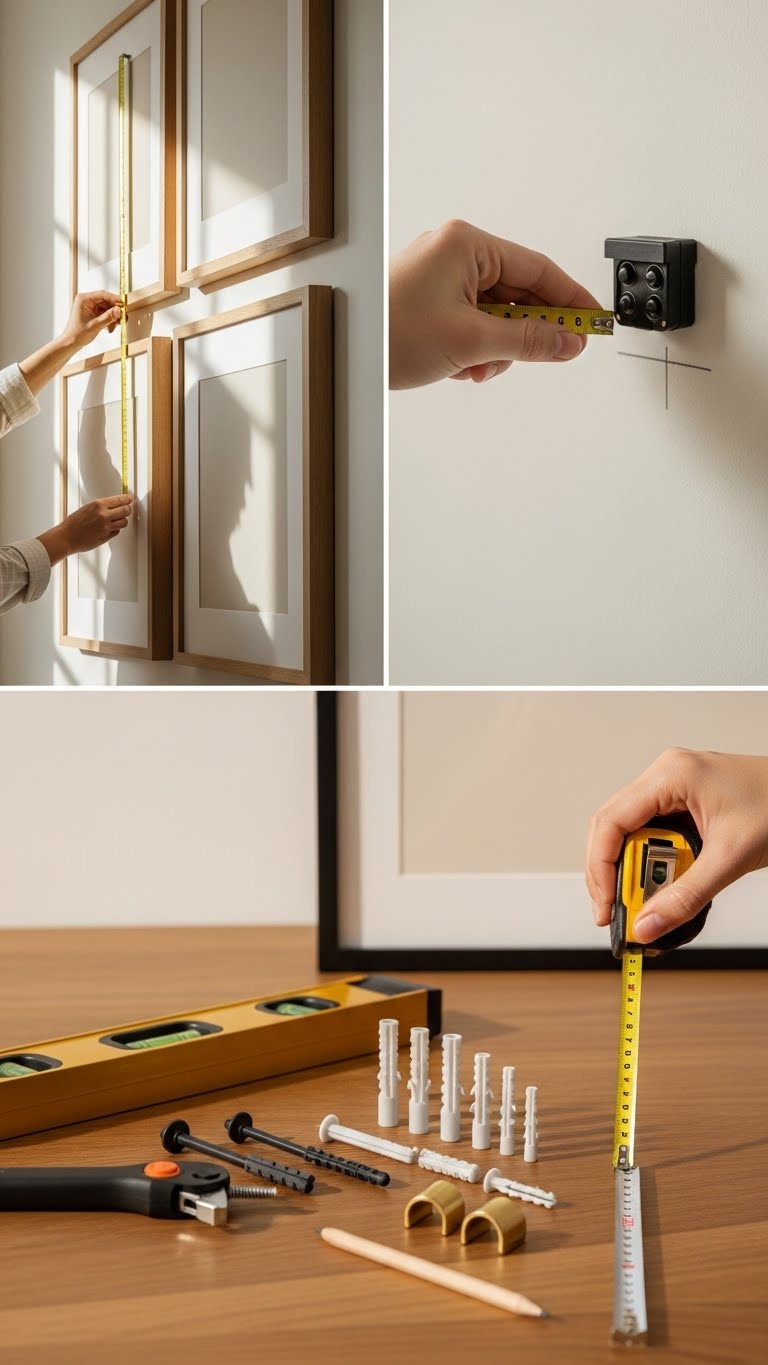
Although you’ll want your work to look effortless on the wall, good hanging starts with the right hardware and a simple layout plan that keeps art secure and visually balanced.
You’ll pick anchors for wall type, check anchor placement aligned with studs, and respect load limits per piece.
Measure eye-level centers, space pieces evenly, and choose hardware that’s both minimal and reliable for carefree, gallery-ready vibes.
DIY Gallery Wall: Layered Frames & Mirrors
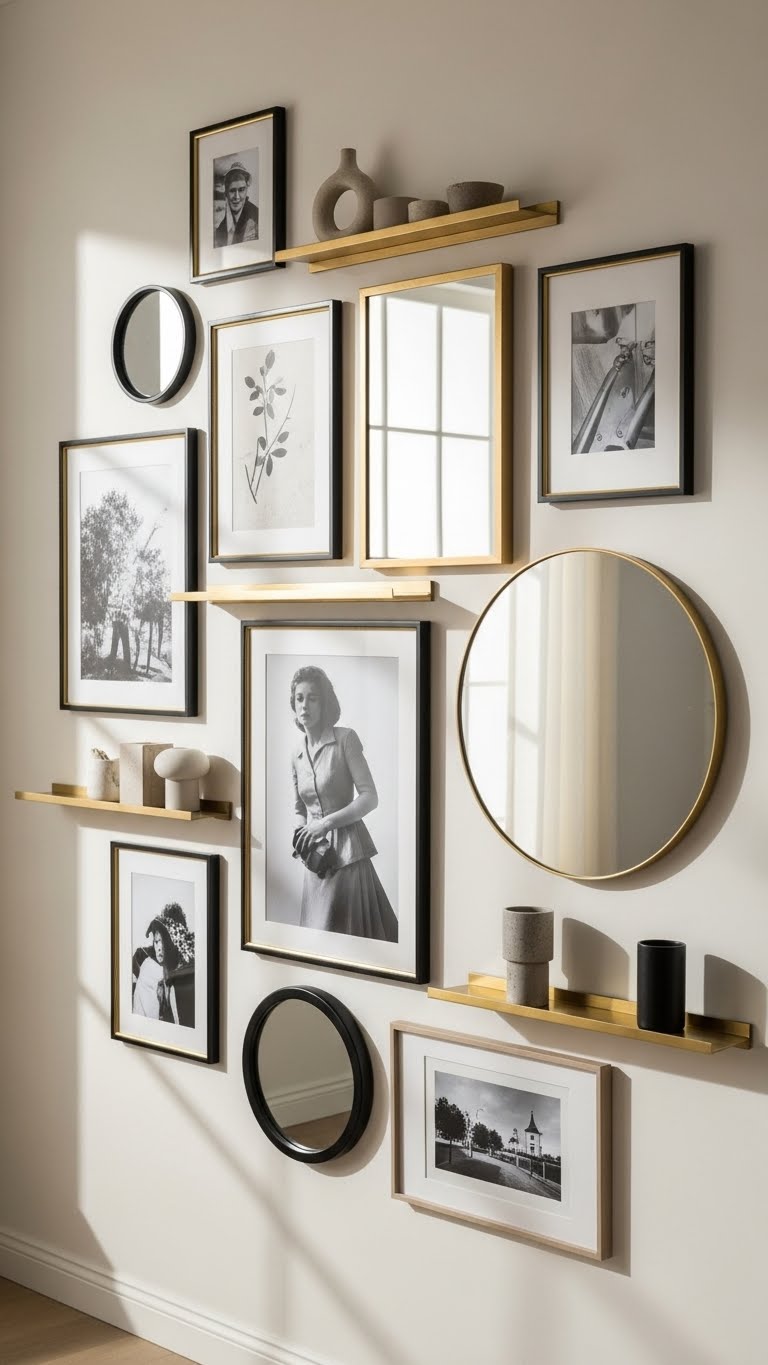
Build a layered gallery wall by mixing framed prints, photos, and mirrors in varied sizes and depths so each piece complements the others while reflecting light and personality. You’ll balance mirror layering with varied frame depth, stagger shelves and thin brass ledges, and float pieces for shadow play. Trust instinctive placement, edit ruthlessly, and let airy, unexpected arrangements celebrate your freedom and modern taste.
Build a Framed-Print Collage With Downloadable Art
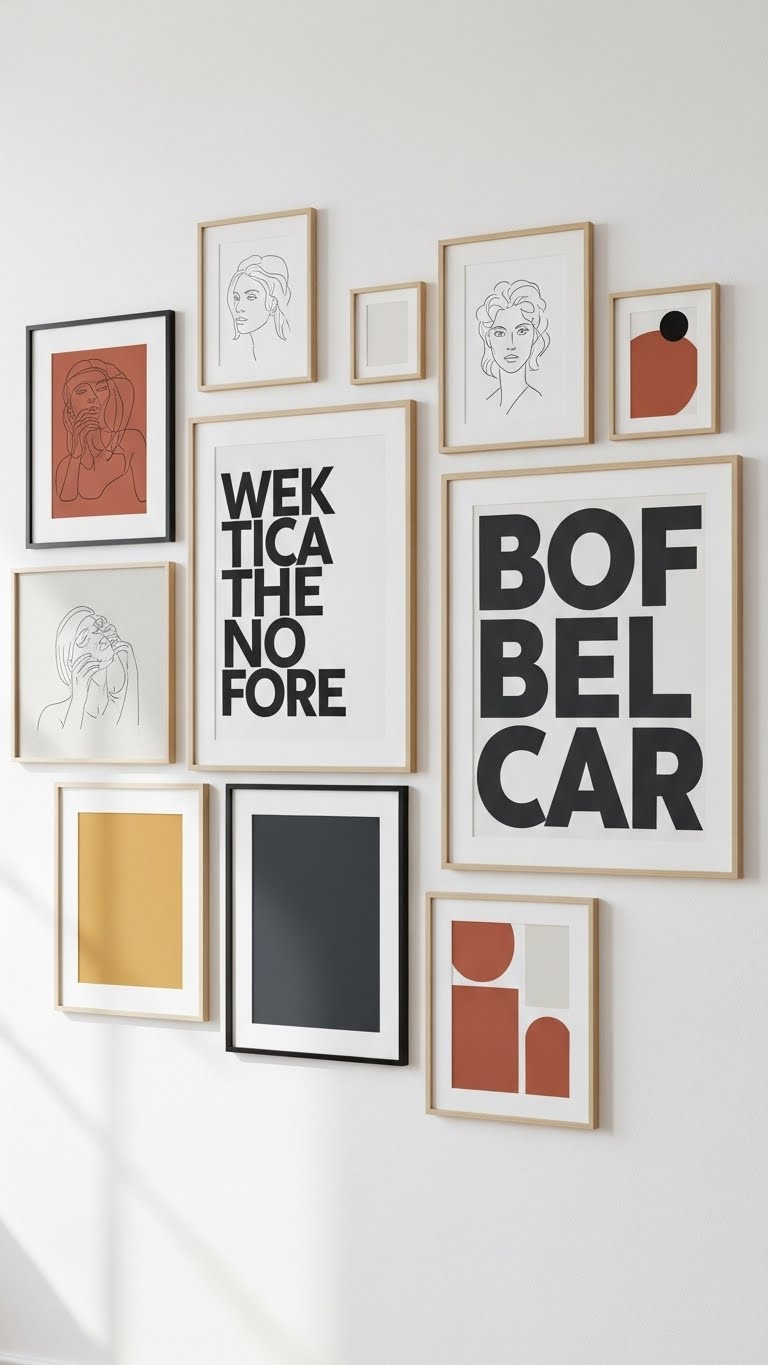
Plunge into a framed-print collage by curating downloadable art that speaks to your aesthetic—mix minimal line drawings, bold typographic pieces, and a few color-block prints to create contrast and cohesion.
You’ll refine download curation, select consistent scales, and map print placement before committing to frames. Choose varied textures, unify with a limited palette, and hang confidently to express liberated, gallery-ready style.
Floating Shelf Displays for Easy Swaps
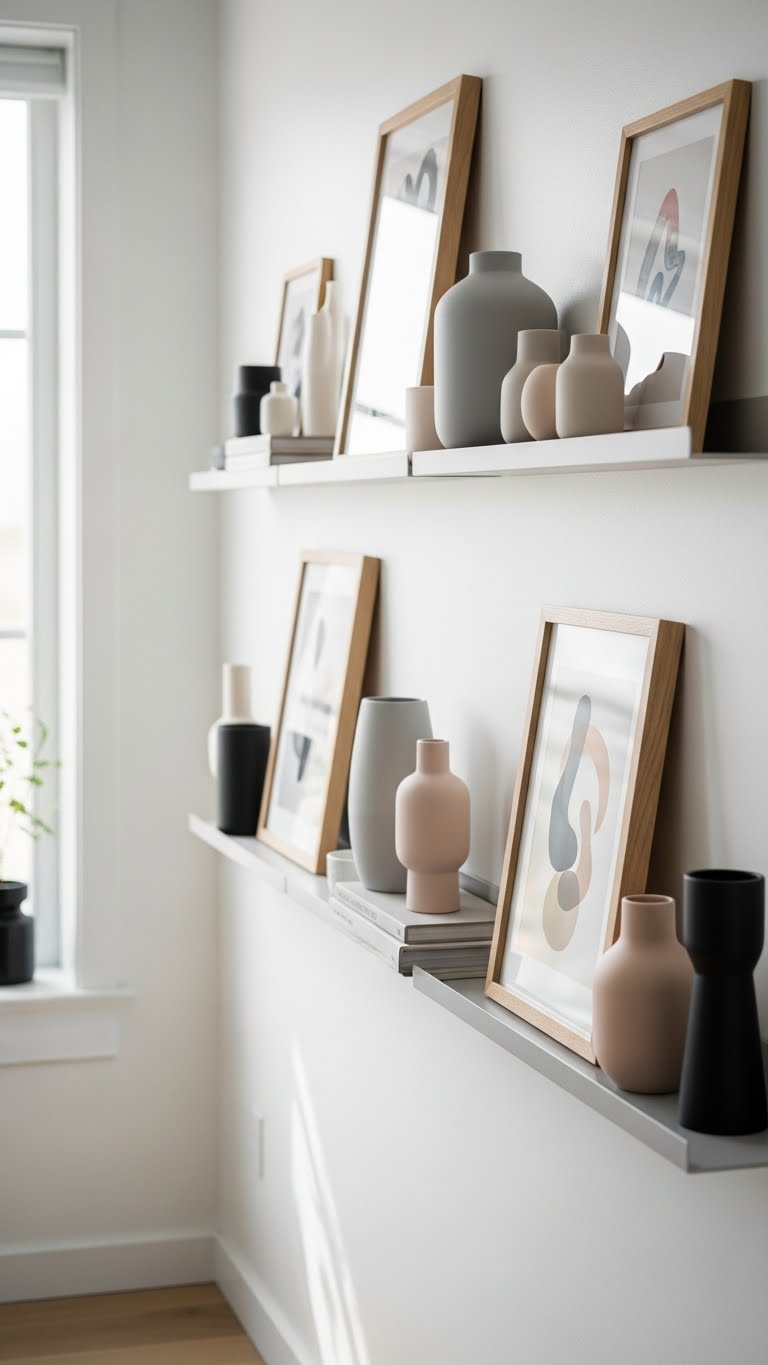
Layer in effortless change with a row of slim floating shelves that lets you swap art and objects without rehanging—just slide pieces in, rearrange, or rotate seasonally to keep the vignette fresh. You’ll mix framed prints, ceramics, and small sculptures on magnetic ledges for secure, fuss-free styling. Create bold, airy seasonal vignettes that let your space breathe and evolve.
Clip-and-String Photo Lines for Rotating Displays
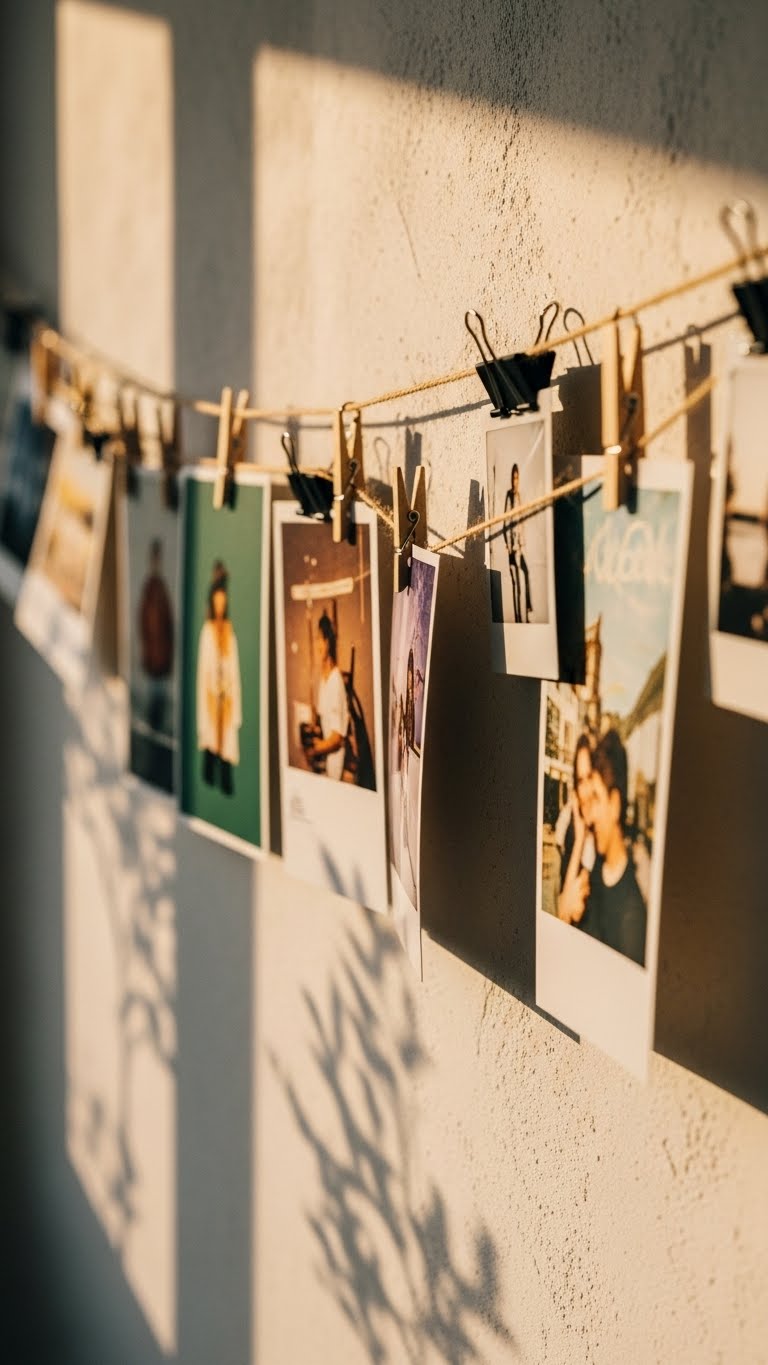
When you want gallery-style rotation without fuss, clip-and-string photo lines give you maximum flexibility with minimal fuss: a taut length of wire or twine anchored to the wall becomes a linear stage where prints, postcards, Polaroids and ephemera hang by clips, ready to swap, layer, or stagger into new compositions. You’ll curate rotating portfolios with clothespin themes, experiment with shadow play lighting, or add magnetic backings for quick shifts.
Layered Gallery With Mixed Frames, Mirrors, and Neon Accents
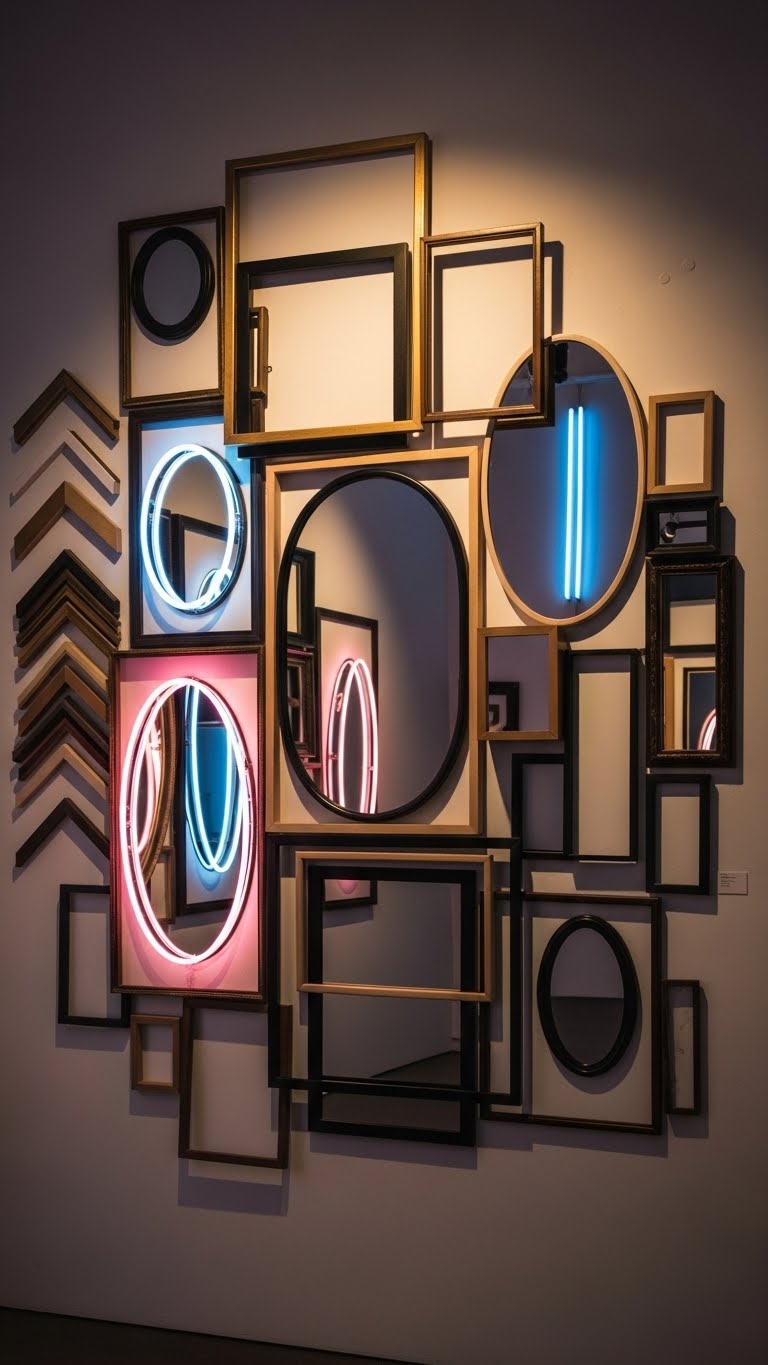
Create a curated wall that feels like a living exhibit by mixing frames, mirrors, and a few strategic neon accents—each element should play off the others to build depth, light, and personality.
You’ll arrange frame juxtaposition deliberately, alternating sizes and materials, and place mirrors to amplify neon reflections.
Keep negative space, let pieces breathe, and trust intuitive placement for a liberated, gallery-ready look.
Upcycle Vintage Frames With Modern Matting
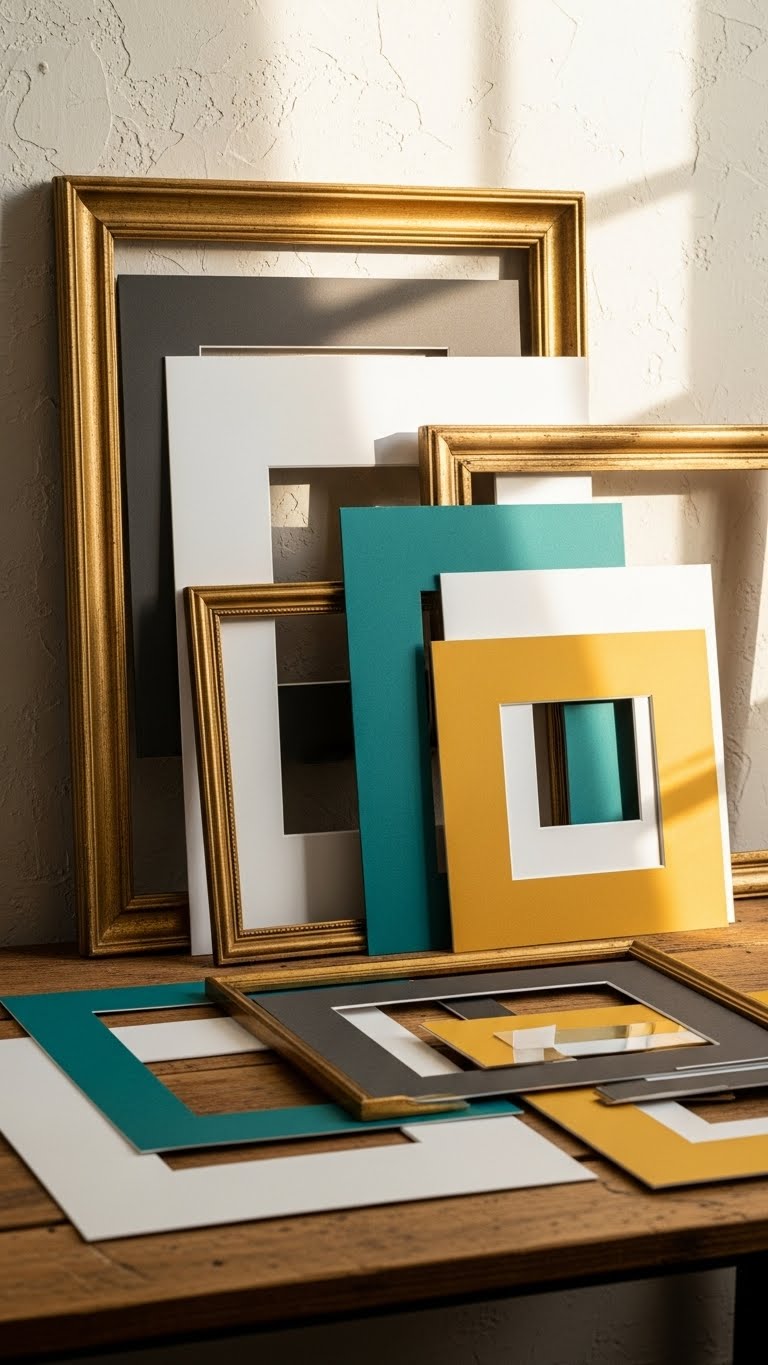
Give old frames new life by pairing their vintage charm with crisp, contemporary matting—you’ll get instant contrast that reads modern without erasing history.
You’ll love hunting thrift shops for frames, doing gentle frame restoration, then cutting sleek mats in unexpected proportions.
Mix neutral and bold colors, crop prints dramatically, and hang asymmetrically so each piece feels liberated, curated, and utterly now.
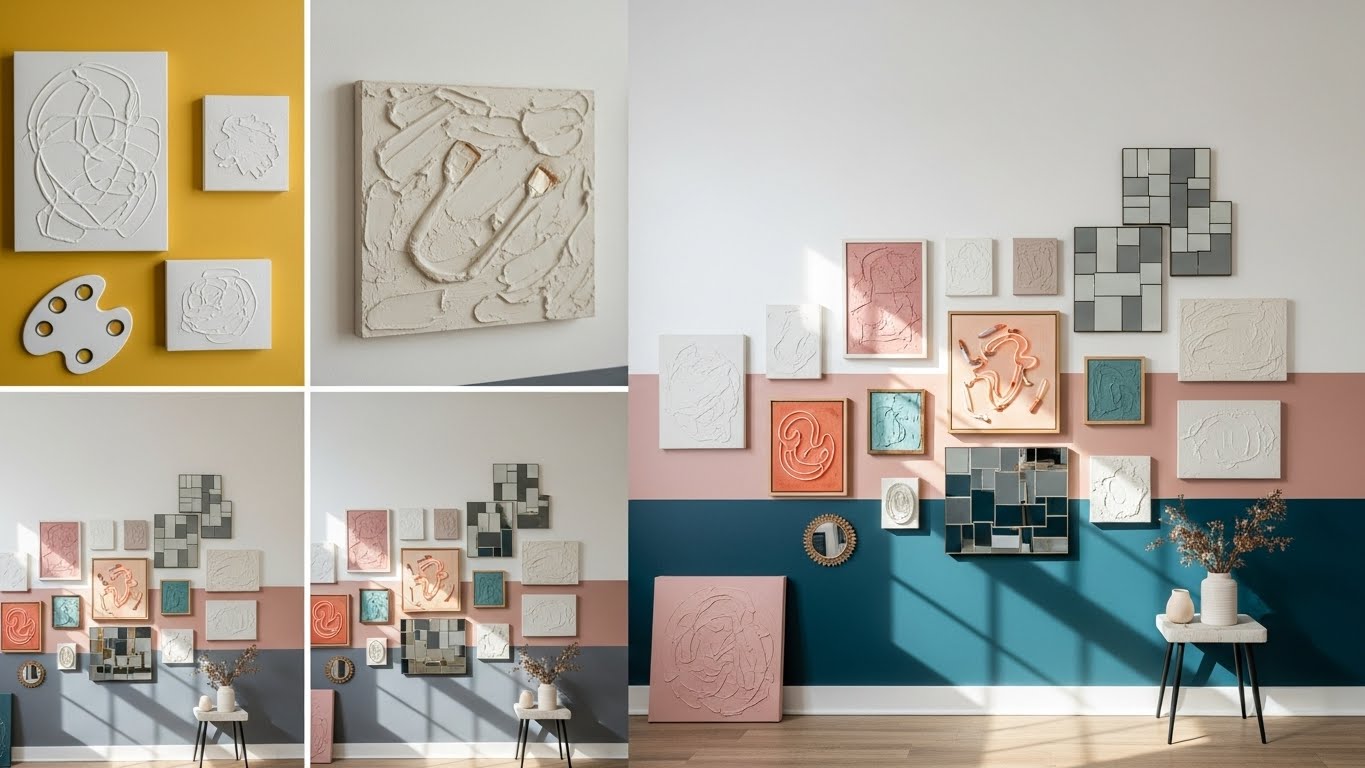
Make a Large Abstract With a Palette Knife
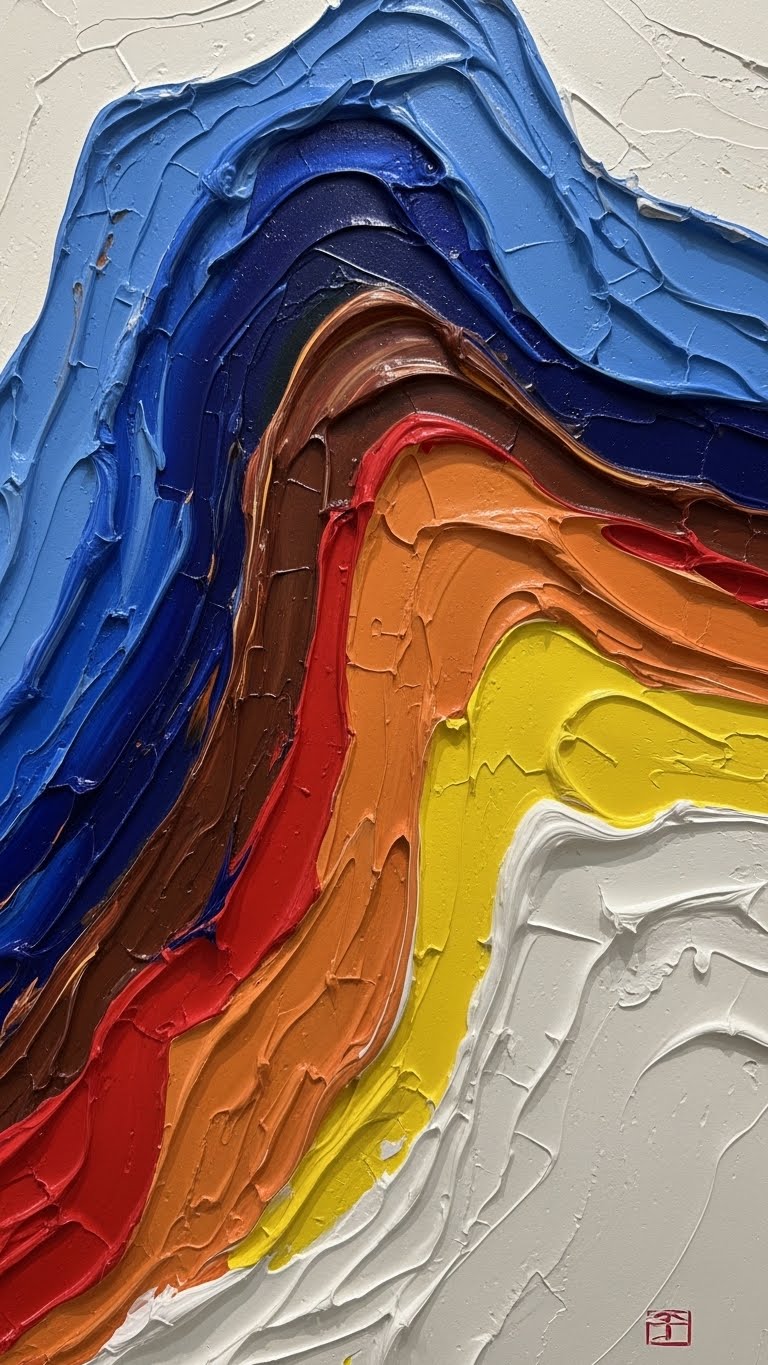
With a few bold swipes of a palette knife you can turn a blank canvas into a modern statement piece that reads raw, tactile, and utterly current.
You’ll embrace texture experiments, carving peaks and valleys, letting color collide through confident palette layering. Work large, trust gesture over perfection, scrape, lift, and reveal layers until the surface sings — expressive, free, and undeniably now.
Modular Multi-Panel Canvases: Repeat a Motif
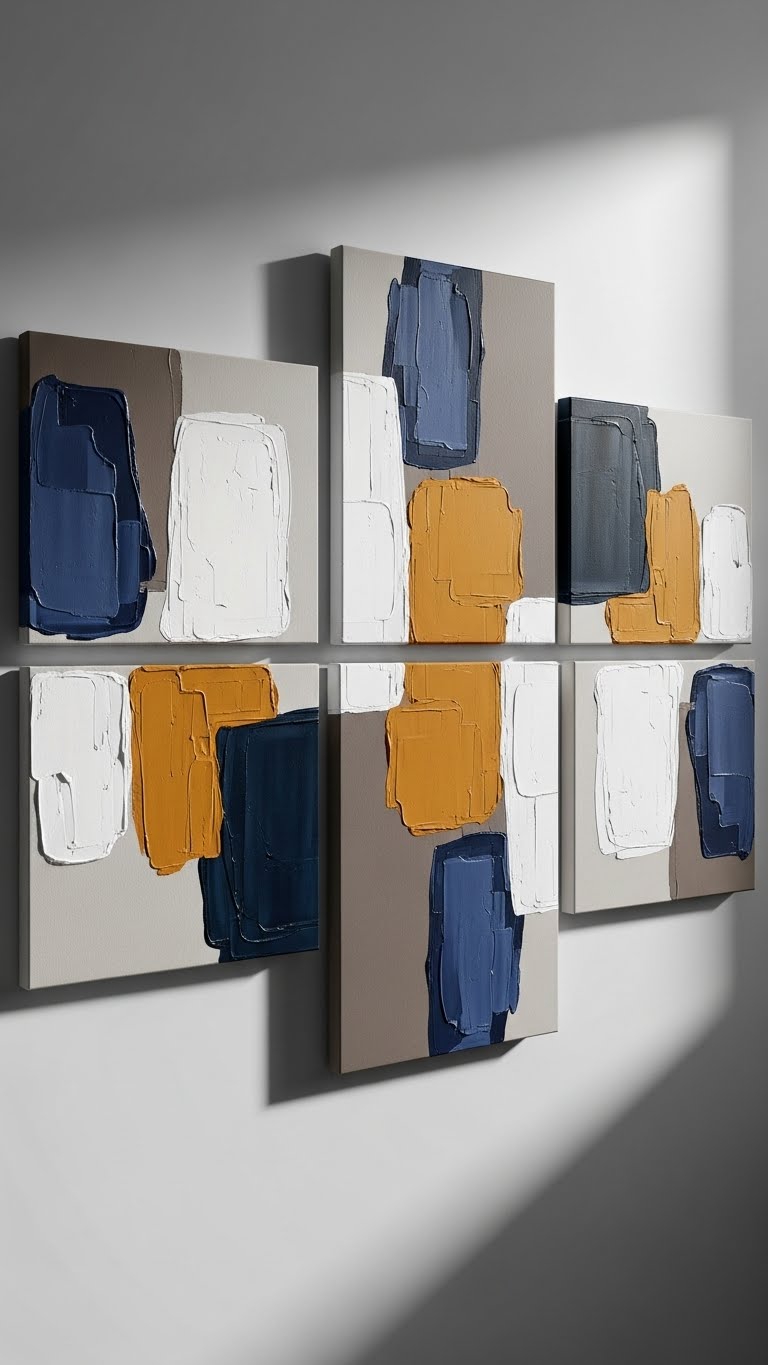
If you love the raw energy of a single thickly worked canvas, splitting that impact across multiple panels amps the drama while keeping composition controlled. You’ll design modular motifs that repeat, shift scale, or invert, then plan panel sequencing to guide rhythm and gaze.
Embrace negative space, consistent palette accents, and loose rules so each panel reads alone yet sings together — liberating, polished, gallery-ready.
Acrylic Pour Panels for Bold Color Statements
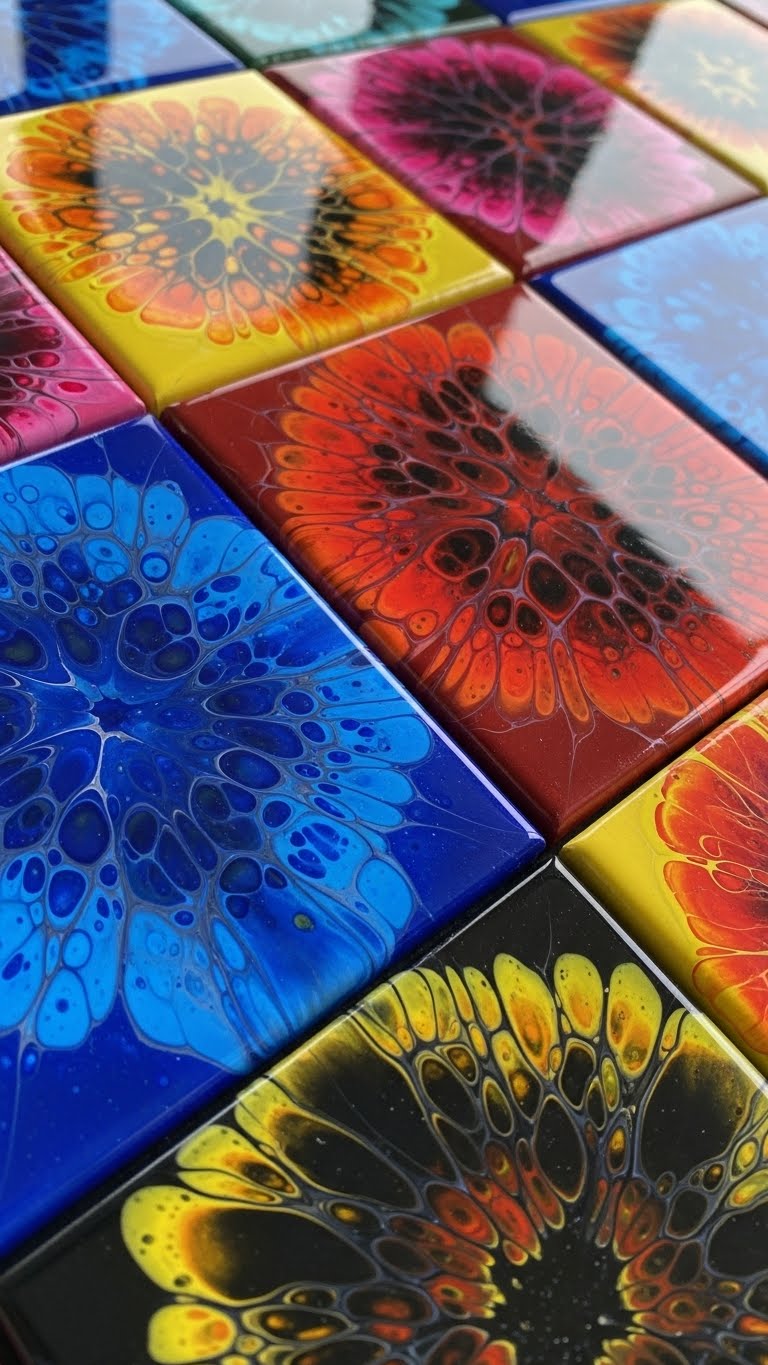
Though acrylic pours can feel spontaneous, you’ll control bold color statements by planning pigments, pour techniques, and panel sequencing from the start.
Embrace high-contrast palettes, deliberate tilt, and swipe methods to create striking cellular blooms.
Work on multiple panels for gallery rhythm, finish with resin sealing for depth and protection, and let intentional accidents and color choreography free your signature, confident work.
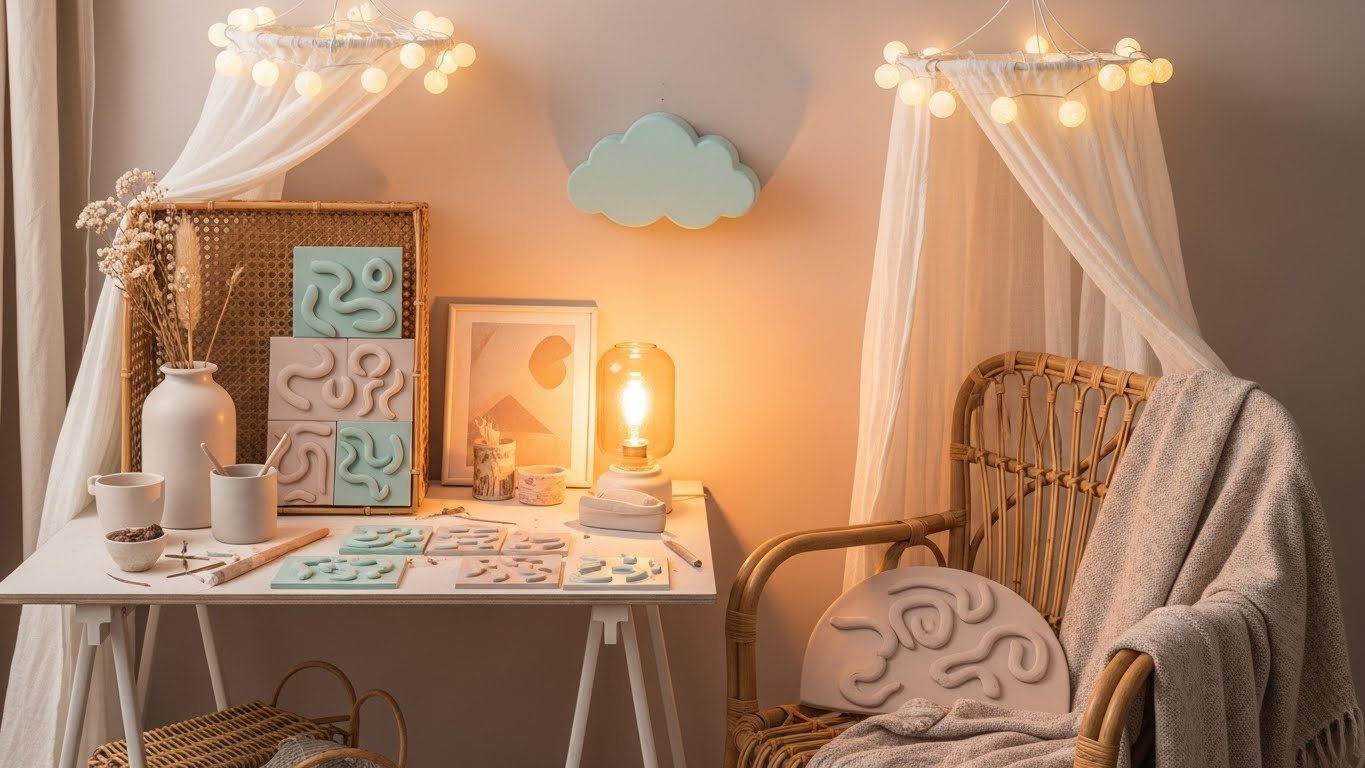
Textured Plaster Relief Panels for Subtle Depth
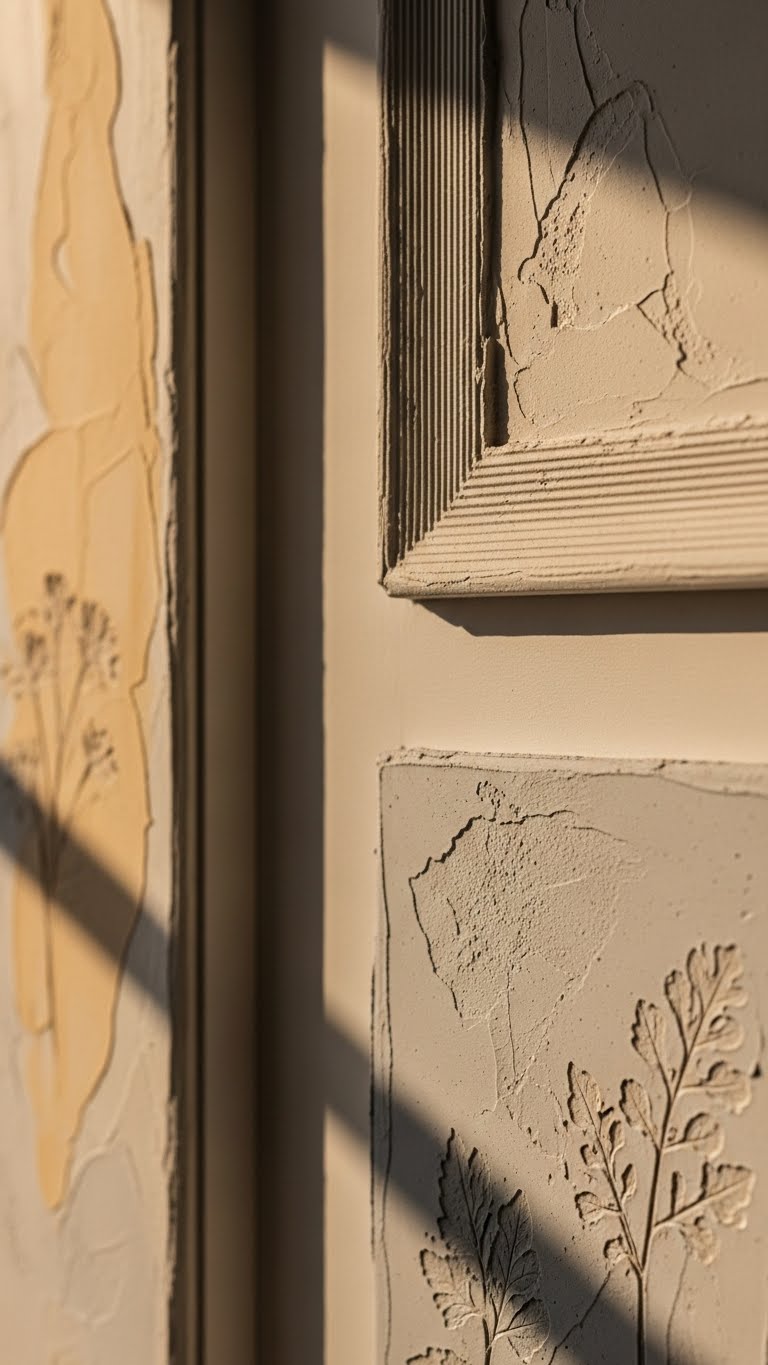
Because texture anchors a room the way a quiet melody anchors a song, plaster relief panels let you introduce subtle depth without shouting for attention.
You’ll sculpt thin layers, carve gentle ridges, and press botanical impressions for organic rhythm.
The finished surface invites tactile shadowplay, catching light across angles.
It’s a restrained, rebellious statement—refined, personal, and utterly free.
Thrifted Textiles: Sew a Textured Wall Hanging
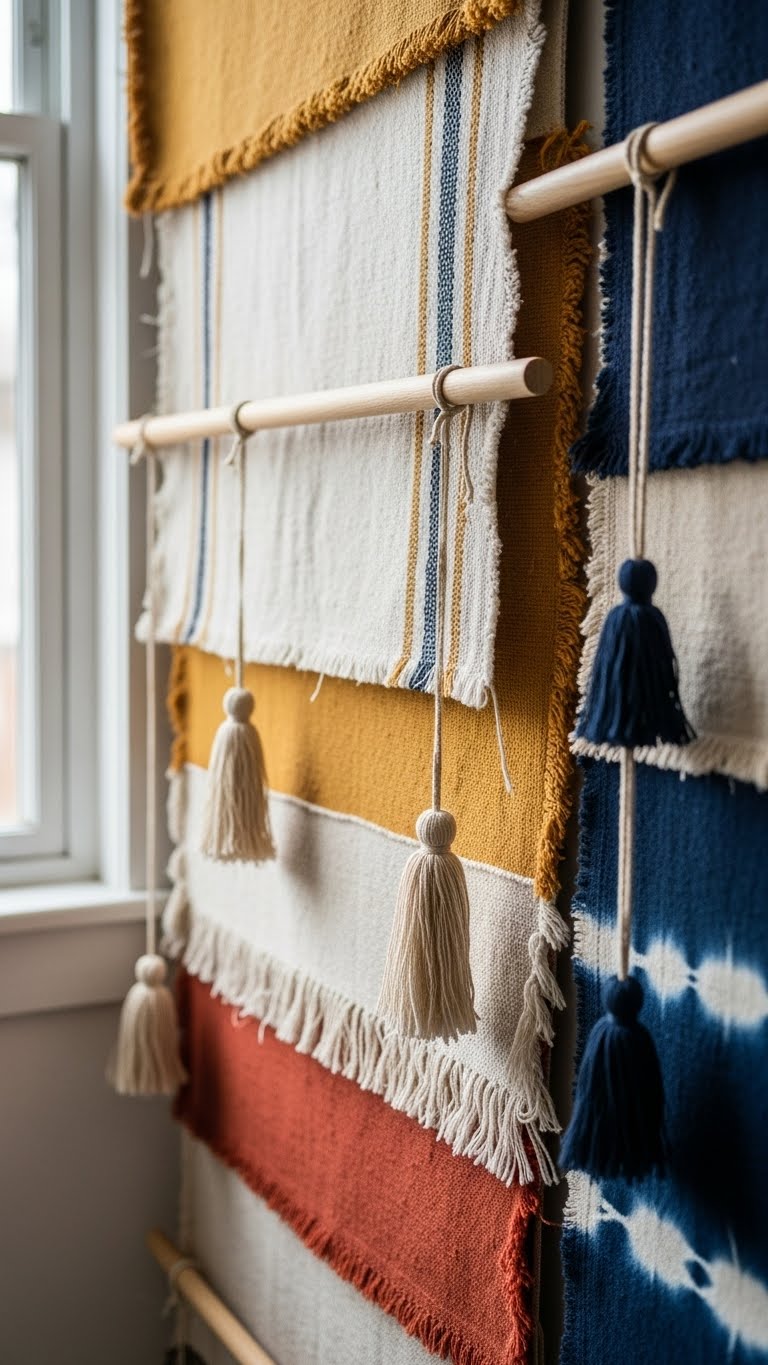
After working with plaster’s quiet relief, turn your attention to thrifted textiles to add warmth and tactile contrast on the same wall.
You’ll curate vintage fabrics, layer raw edges, and sew textured panels that feel effortless. Add woven tassels for movement, try bold dye experiments on linen, and hang with simple rods—this relaxed, curated approach gives your space freedom and intentional, gallery-ready charm.
Reclaimed Wood Geometric Panels for a Feature Wall
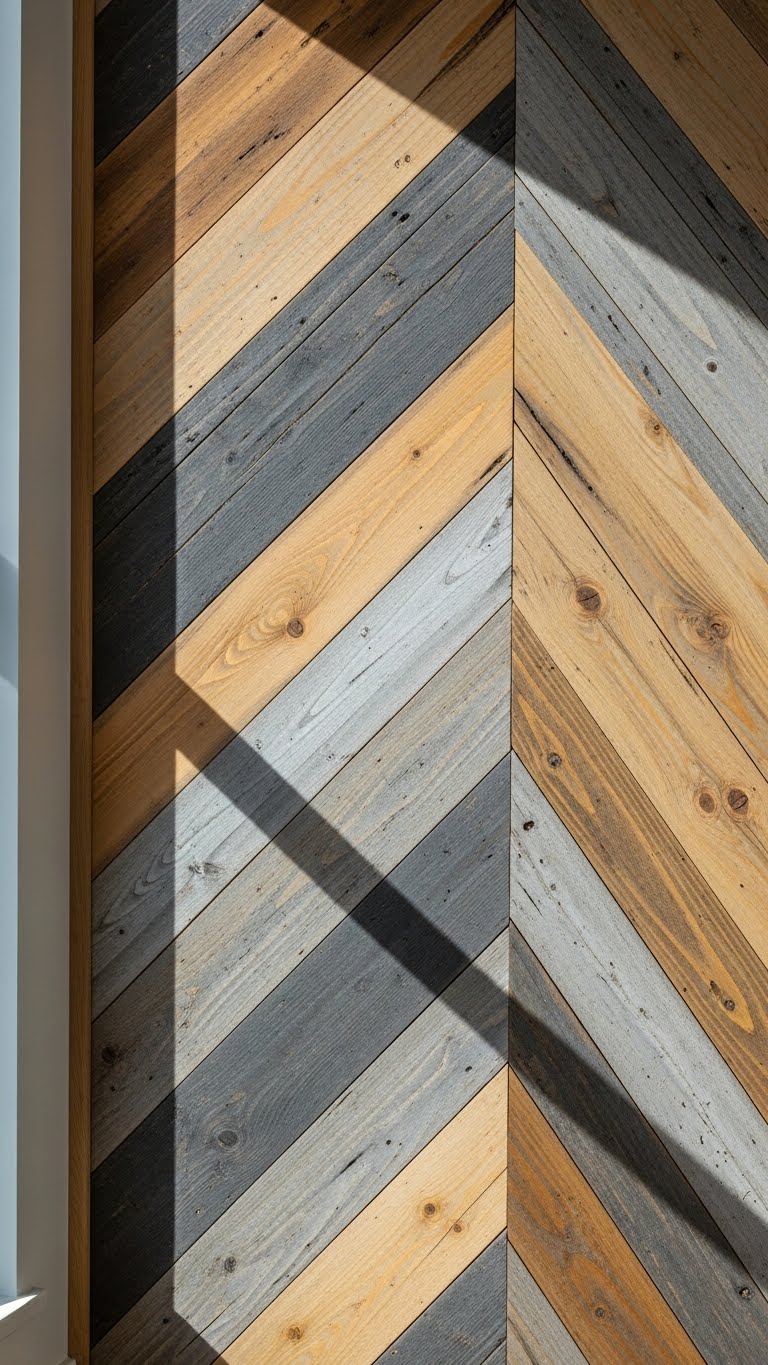
Bring reclaimed wood into the room with crisp geometric panels that read modern but feel lived-in. You’ll plan patterns, mix plank widths, and select pieces with weathered stains for character. Cut precise angles, arrange contrasting tones, and hide fasteners with hidden joinery to keep lines clean.
Mount as a feature wall to anchor a free-spirited space that’s polished yet effortless.
Bold Geometric Tape Art on Wood or Canvas
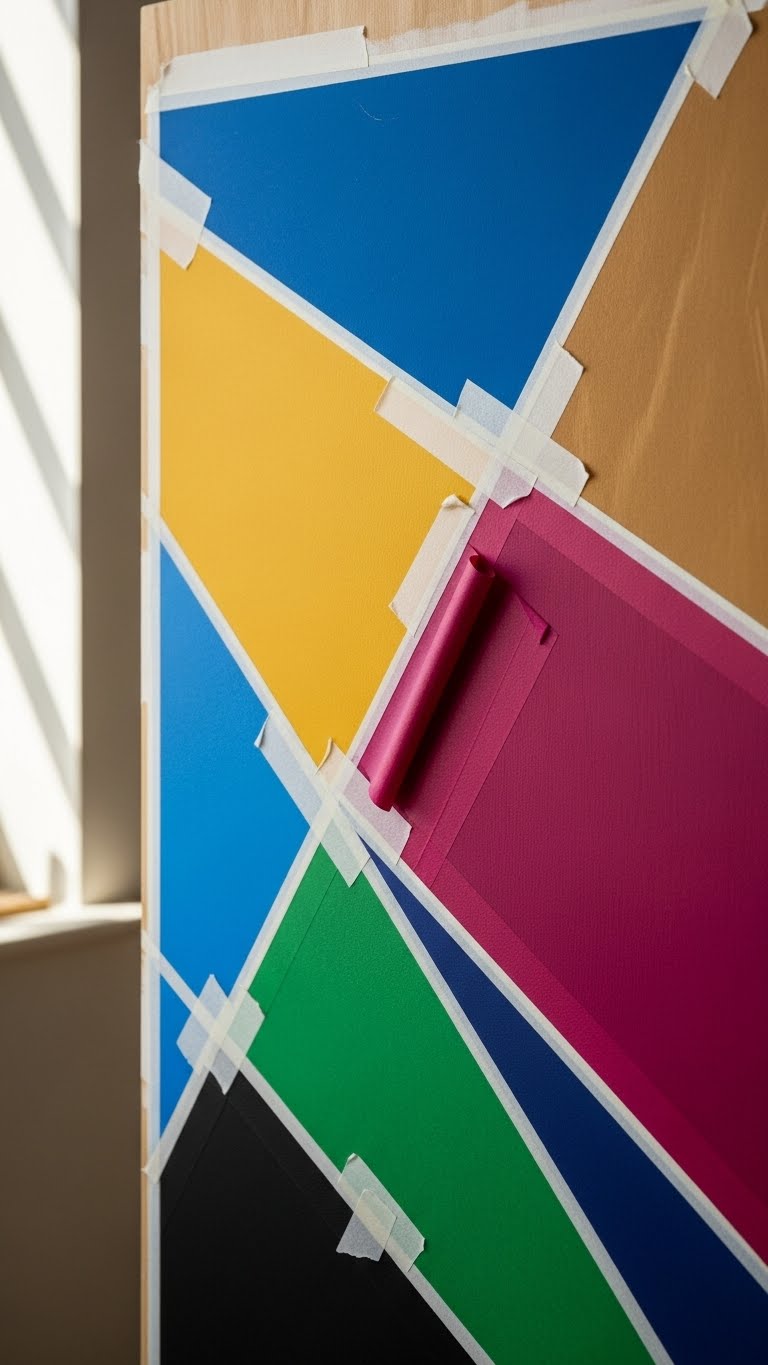
Play with sharp lines and saturated color to create bold geometric tape art that reads modern and graphic whether you work on raw wood or primed canvas. You’ll layer tape textures and experiment with masking patterns to sculpt negative space, crisp edges, and color blocks. Embrace unexpected palettes, clean intersections, and the freedom to peel, revise, and repeat until composition feels right.
Pressed Flowers in Frames for Delicate Botanicals
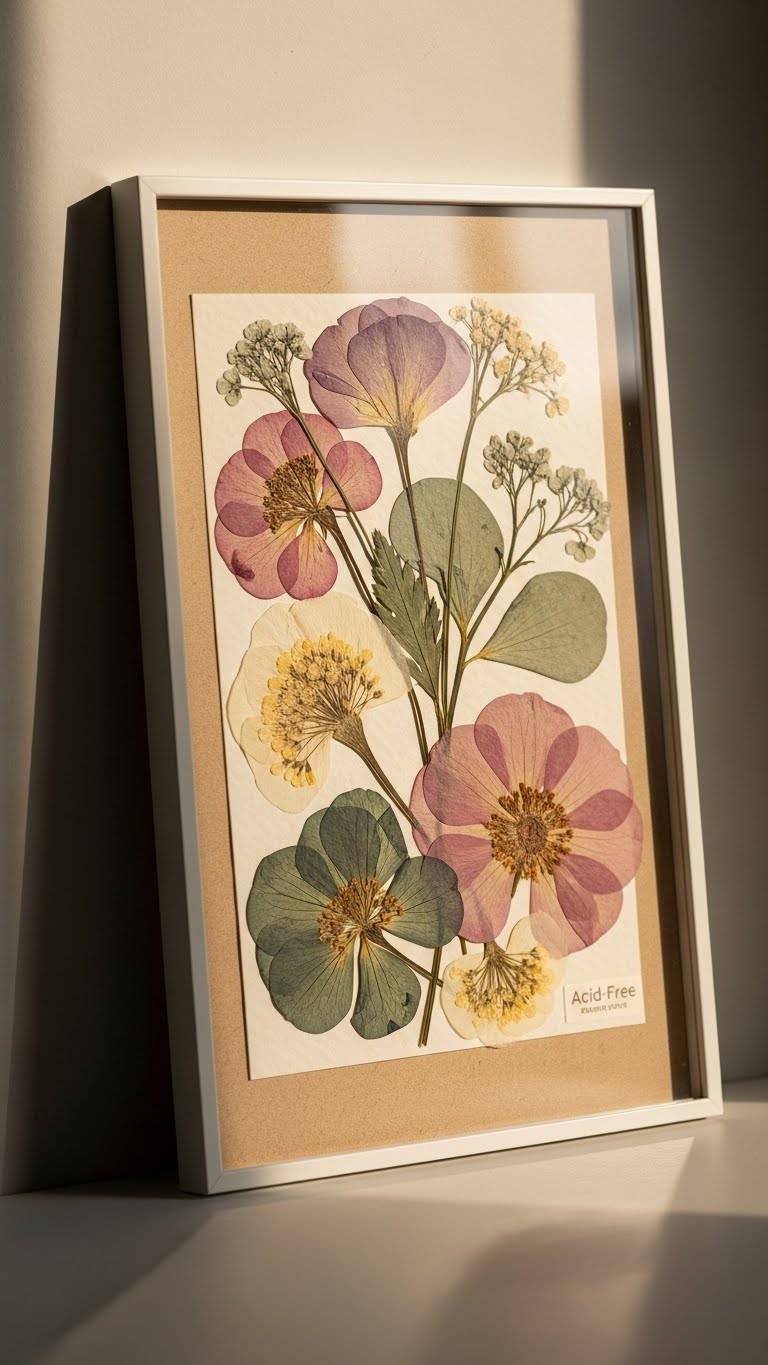
When you press blooms and nestle them behind glass, you turn fleeting petals into timeless, architectural accents that suit minimalist and cottagecore interiors alike.
You’ll arrange pressed petals with careful botanical layering, balancing negative space and scale.
Choose varied translucency, slim frames, and acid-free backing so each specimen reads like a liberated relic—modern, tactile, and quietly gallery-ready on your wall.
Hand-Painted Botanical Prints From Simple Stencils
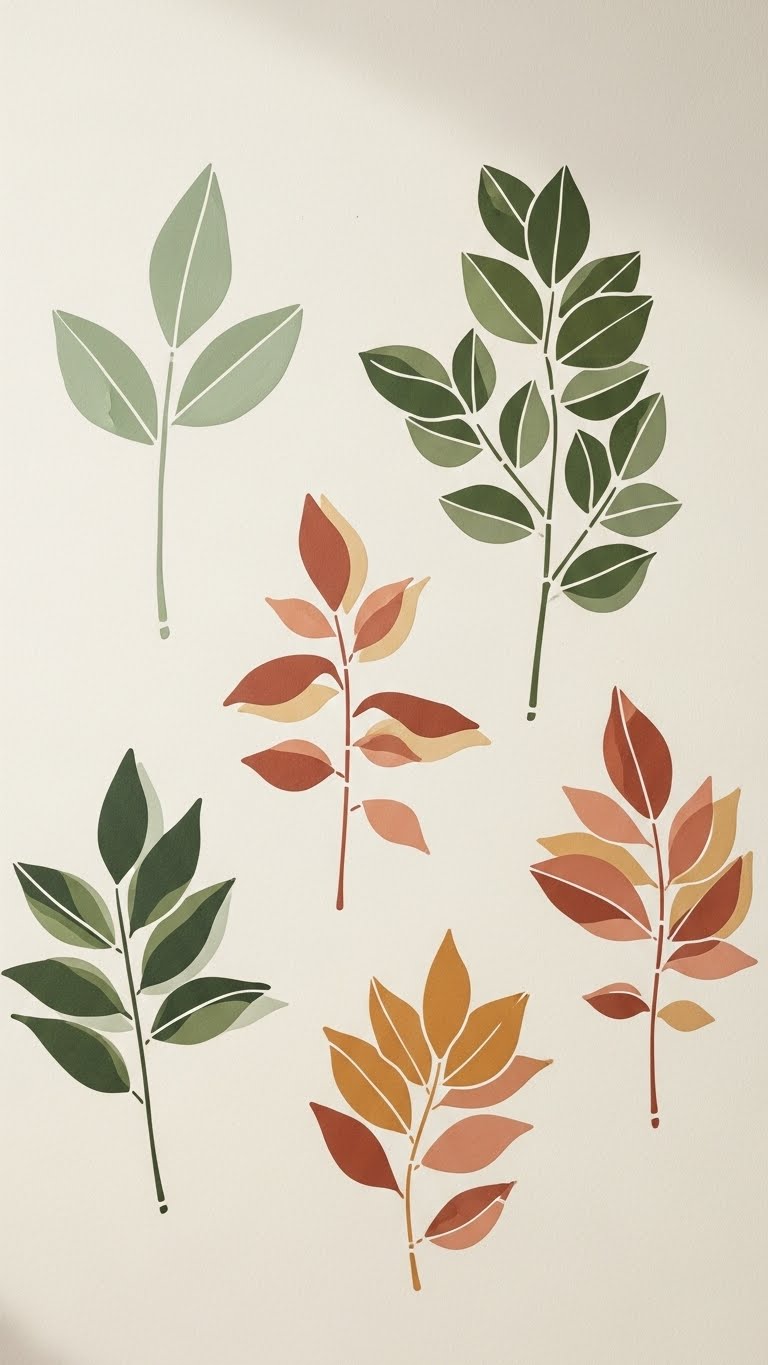
If you want gallery-ready botanical art without complicated techniques, stencils let you paint crisp, repeatable plant forms with an artisanal touch. You’ll choose palettes, experiment with stencil layering to build depth, and hand-brush subtle textures. Focus on clean botanical silhouettes, imperfect edges for character, and liberated composition—arrange multiples or a single striking stem to make a modern, serene wall statement.
Minimalist Single-Line Figure Drawings
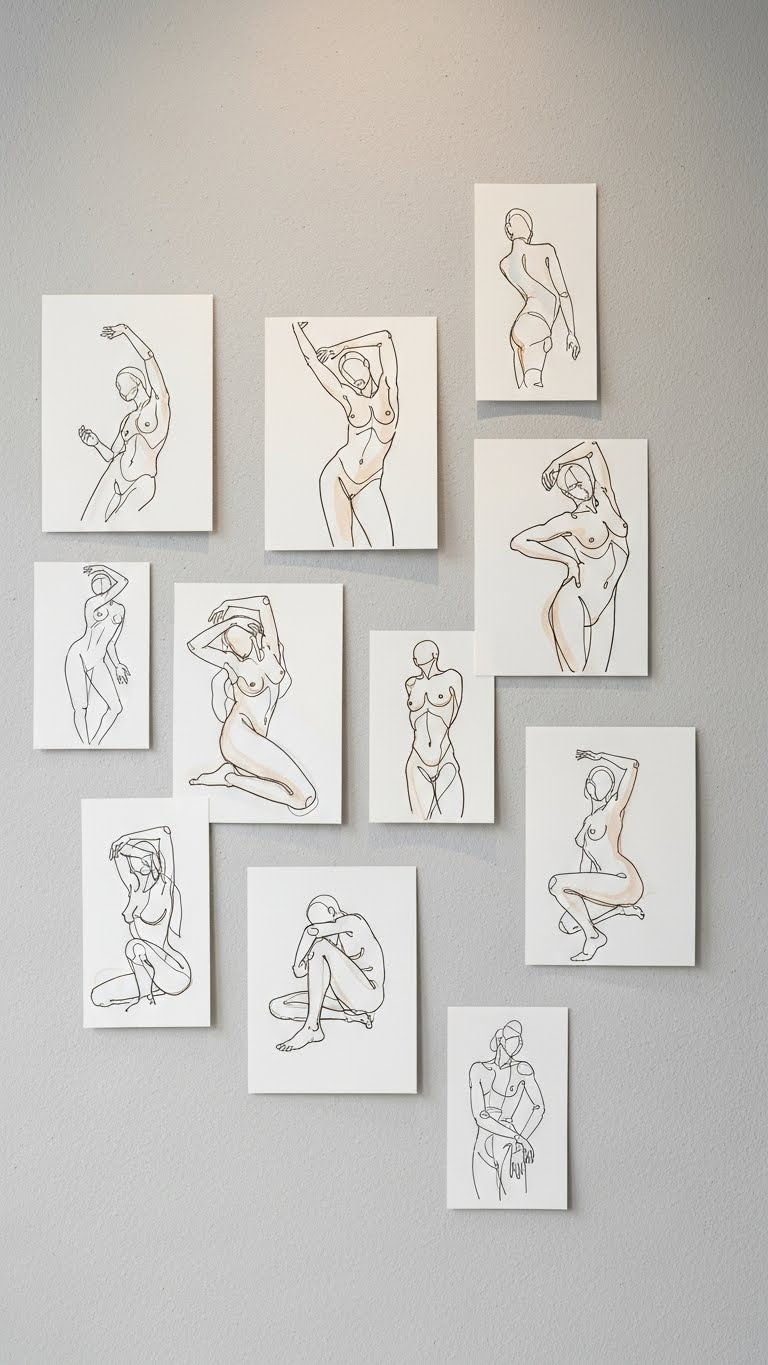
Though deceptively simple, single-line figure drawings let you capture posture, emotion, and movement with a continuous, confident stroke. You’ll embrace continuous contour techniques, tracing bodies in one fluid motion that celebrates spontaneity and restraint. Lean into negative space to define form, choose warm ink or graphite, and hang multiple small pieces for a liberated, gallery-ready set that feels modern and intentional.
Monochrome Charcoal and White-Ink Tonal Studies

Because contrast is everything, monochrome charcoal paired with white ink lets you sculpt light and shadow with striking economy—you’ll think in planes, edges, and the spaces that breathe between them. You’ll explore charcoal portraits with confident smudges and crisp erasures, then flip to white ink landscapes for luminous highlights. The practice feels liberated, intentional, and gallery-ready—minimal palette, maximum presence.
Mixed-Media Collage: Paper, Foil, and Found Objects

Plunge into mixed-media collage and you’ll discover how paper, foil, and found objects can rewire a composition’s energy—think torn magazine fragments layered with crinkled metallic foil, stitched-in receipts, and pocketed pockets of translucent tracing paper that let light and texture converse.
You’ll mix vintage ephemera with shiny accents, prioritize tactile layering, and curate unexpected juxtapositions that feel liberated, polished, and gallery-ready.
Typography Art: Hand-Painted and Laser-Cut Options
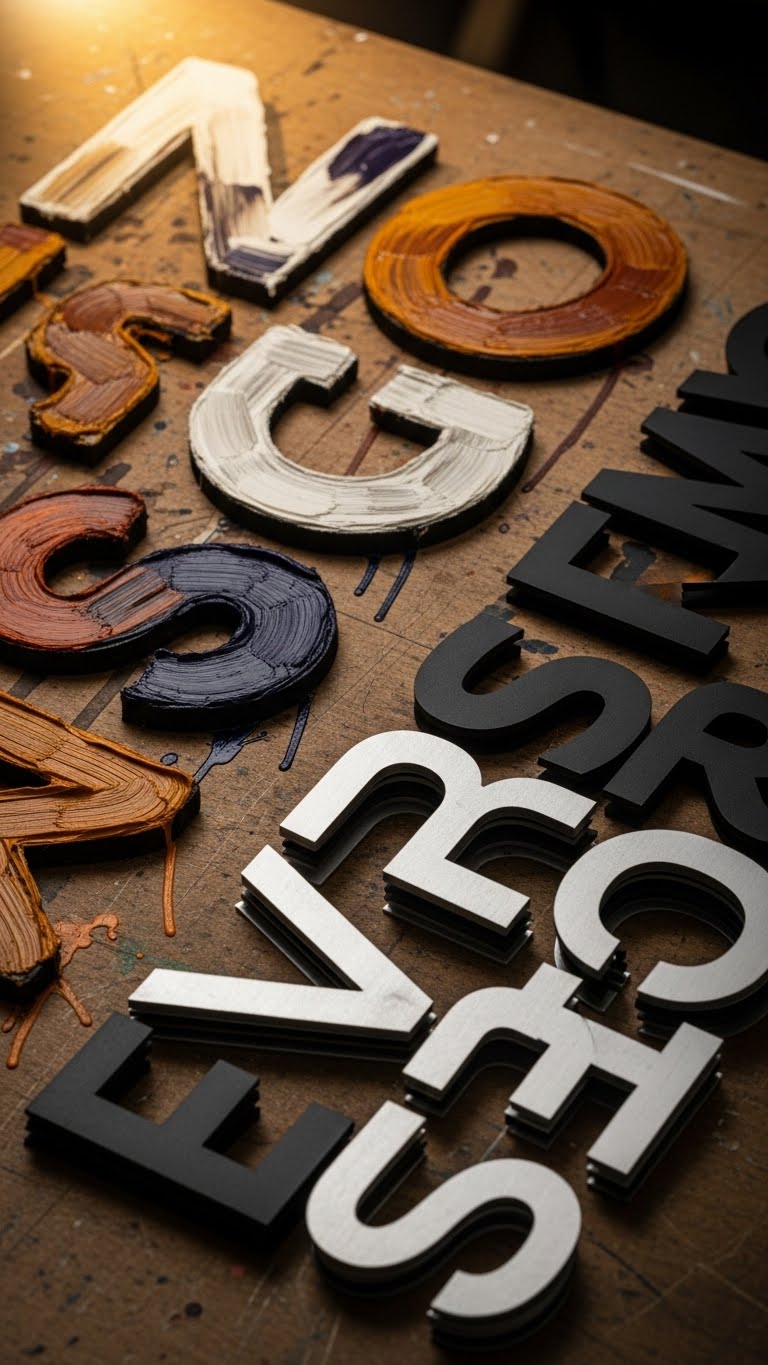
Jump into typography art and you’ll see how type can be sculpted as easily with a brush as with a laser cutter, each method offering a distinct temperament: hand-painted letters bring warmth, irregularities, and painterly gestures that read as intimate and bespoke, while laser-cut forms deliver crisp, architectural precision and the ability to layer negative space like a miniature relief.
You’ll explore hand lettering techniques and stencil layering effects, mixing tactile marks with precise cutaways to craft liberated, gallery-ready statements.
Make Faux Neon Signs With LED Rope

If your typographic experiments have you craving a little nightlife energy, swap brushes and blades for flexible LED rope to get that neon look without the heat or hassle. You’ll sketch with LED scripting, bend letters into liberated shapes, mount on clear acrylic backers, and conceal wiring behind Acrylic diffusers for soft, gallery-ready glow. It’s bold, precise, and instantly portable.
Patchwork Mirror Arrangements to Enlarge Small Rooms
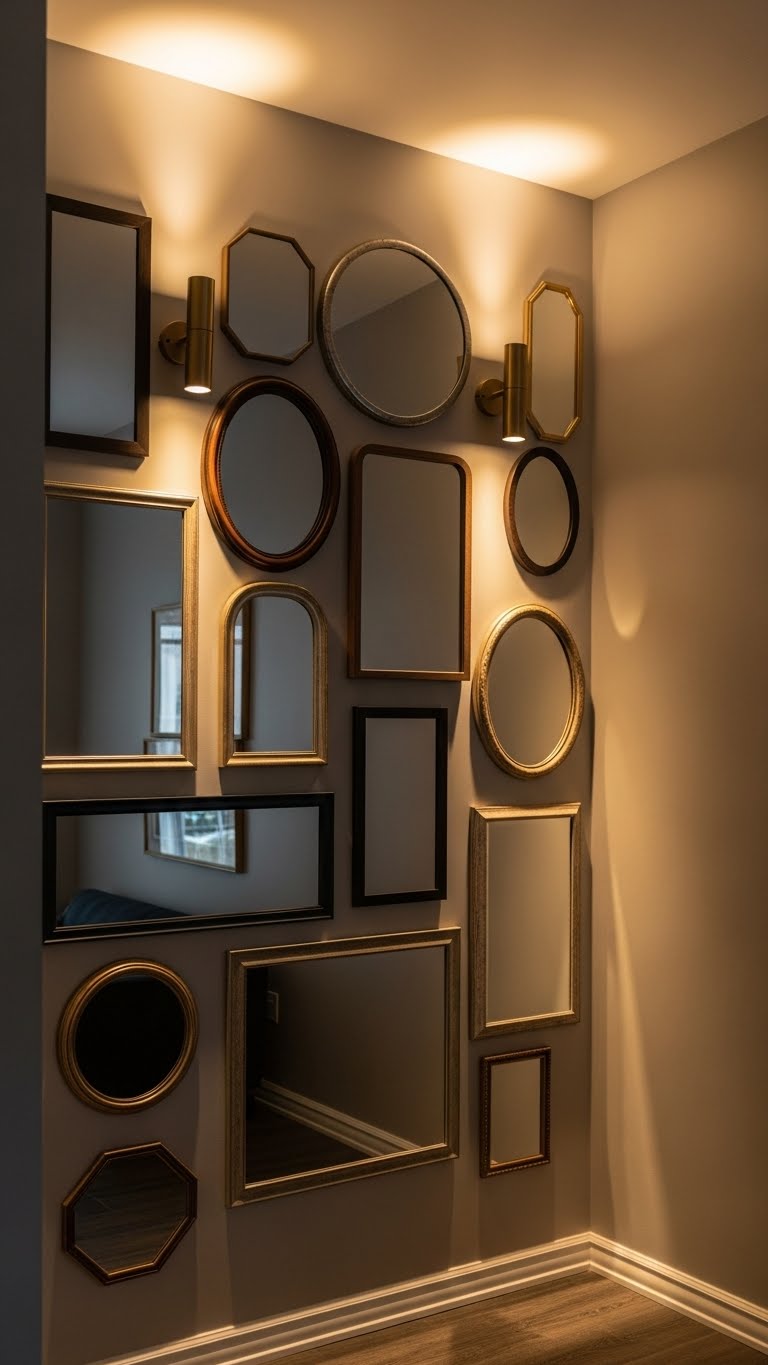
When you arrange a cluster of mismatched mirrors across a wall, you’ll instantly multiply light, depth, and personality in a small room.
You’ll craft mirror mosaics with varied frames, scales, and slight offsets to suggest movement. Position angled sconces to bounce warm beams, highlight edges, and expand sightlines. This curated patchwork feels bold, effortless, and liberating while remaining gallery-ready.
Create Cohesion: Choose Two Colors and One Motif
Anchor your mirror mosaic with just two colors and a single motif to keep the look curated rather than chaotic.
You’ll use a limited palette to guide choices, employ motif repetition for rhythm, and lean into tonal contrast to add depth without clutter.
Respect negative space so each element breathes.
This approach feels intentional, modern, and liberating—design that’s bold but controlled.
Finish: Lighting, Reflective Pieces, Hanging Cadence, and Troubleshooting
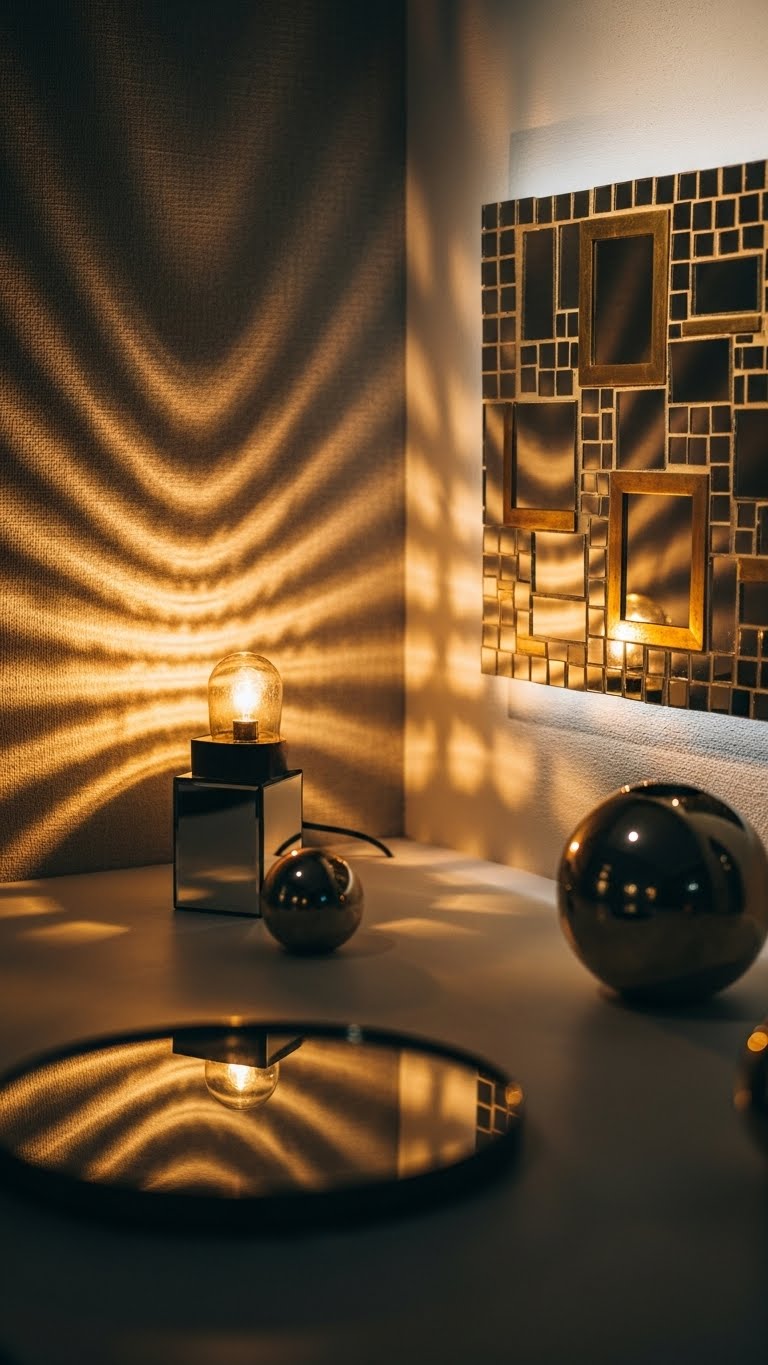
Because lighting and placement transform a mosaic from pretty to purposeful, plan your finish with intention: layer soft directional light to pick out mirror facets, tuck a warm accent lamp nearby to lift the brass tones, and use reflective companions sparingly so they echo rather than compete with the main piece.
Then adjust hanging cadence for rhythm, aim for soft glow and controlled shadow play, and troubleshoot loose tiles quickly.