You’ll love how simple natural elements transform into cozy ornaments for your tree. Start with cinnamon sticks, dried orange slices, pinecones and twigs, and follow clear, step‑by‑step methods that keep things tidy and fragrant. I’ll guide you through cutting, drying, assembling and finishing each piece so they last year after year — and by the time we’re halfway, you’ll already have a few perfect handmade gifts to hang or give away.
Cinnamon Stick Star Ornaments
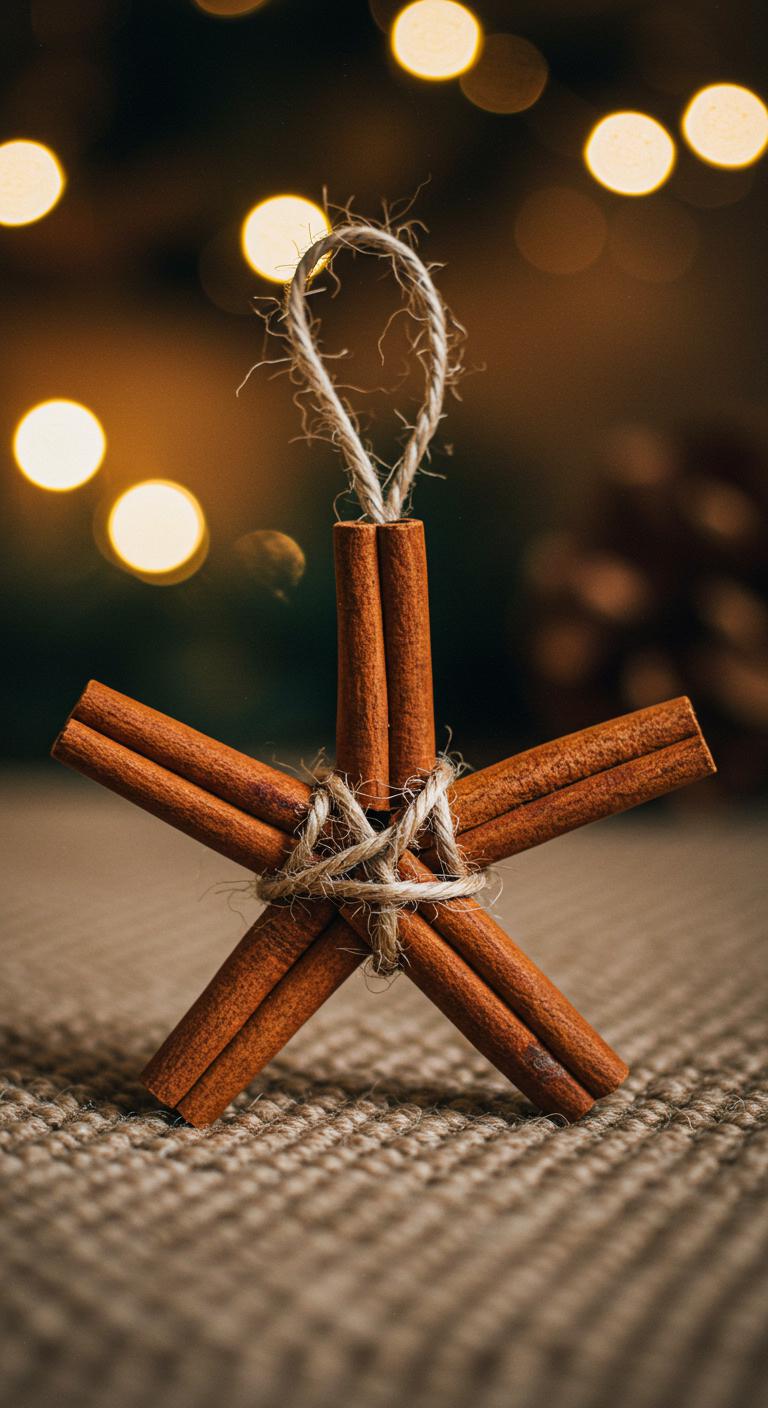
Gather five cinnamon sticks and a bit of twine, and you’re ready to make a rustic star ornament that smells like the holidays; start by laying four sticks in a square, cross a fifth through the center, then wrap twine tightly around the intersection to hold the shape while you adjust the points until the star looks even. Tie a loop, trim ends, and enjoy cinnamon stick scent and simple star ornament designs.
Pinecone Glitter Angels
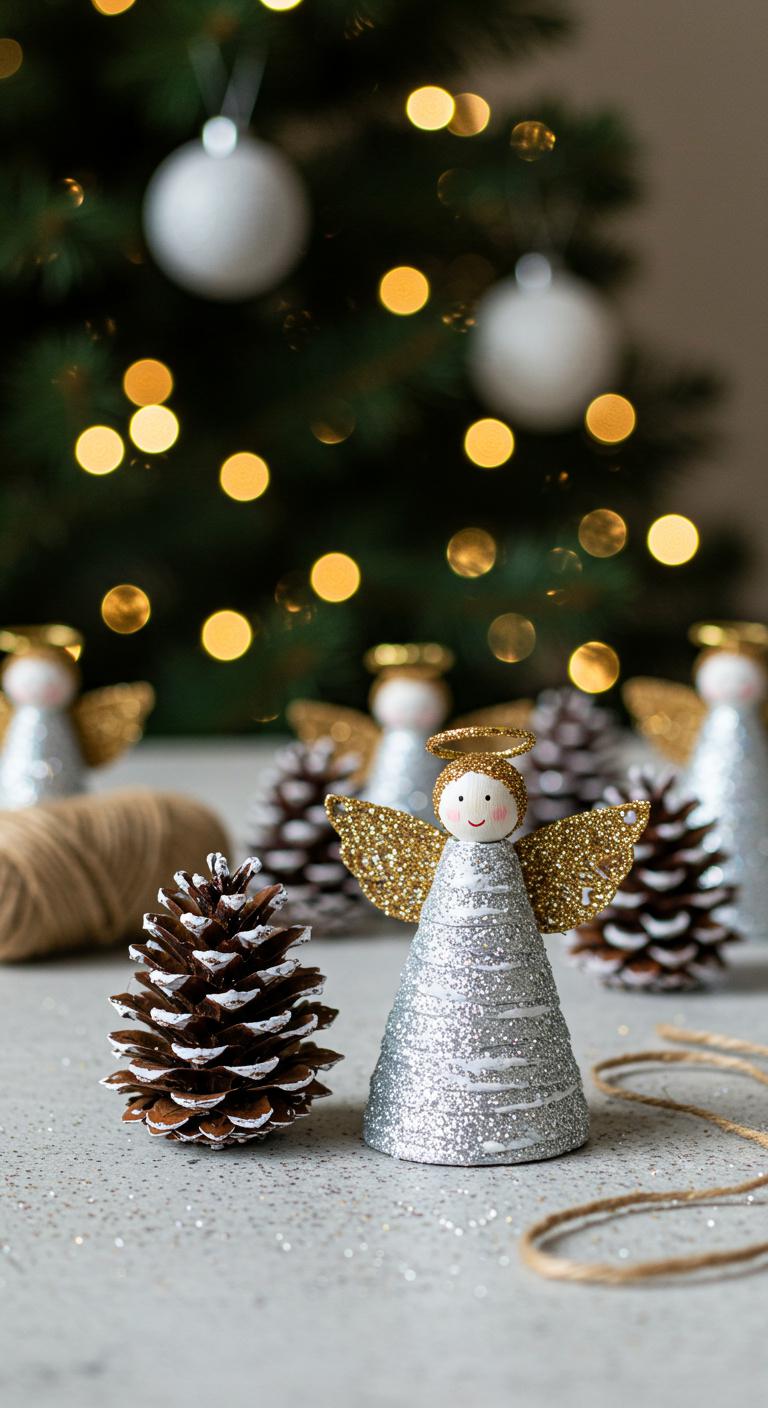
When you pick a few small pinecones and a pot of glue, you’ll find making glitter angels is quick and satisfying: paint tips white, add a fabric or paper cone for a dress, and glue on a wooden bead head. Use simple pinecone painting and glitter techniques—brush adhesive where light hits, sprinkle glitter, tap off excess. Tie a rustic twine loop; they’ll float on your tree.
Dried Orange Slice Garlands
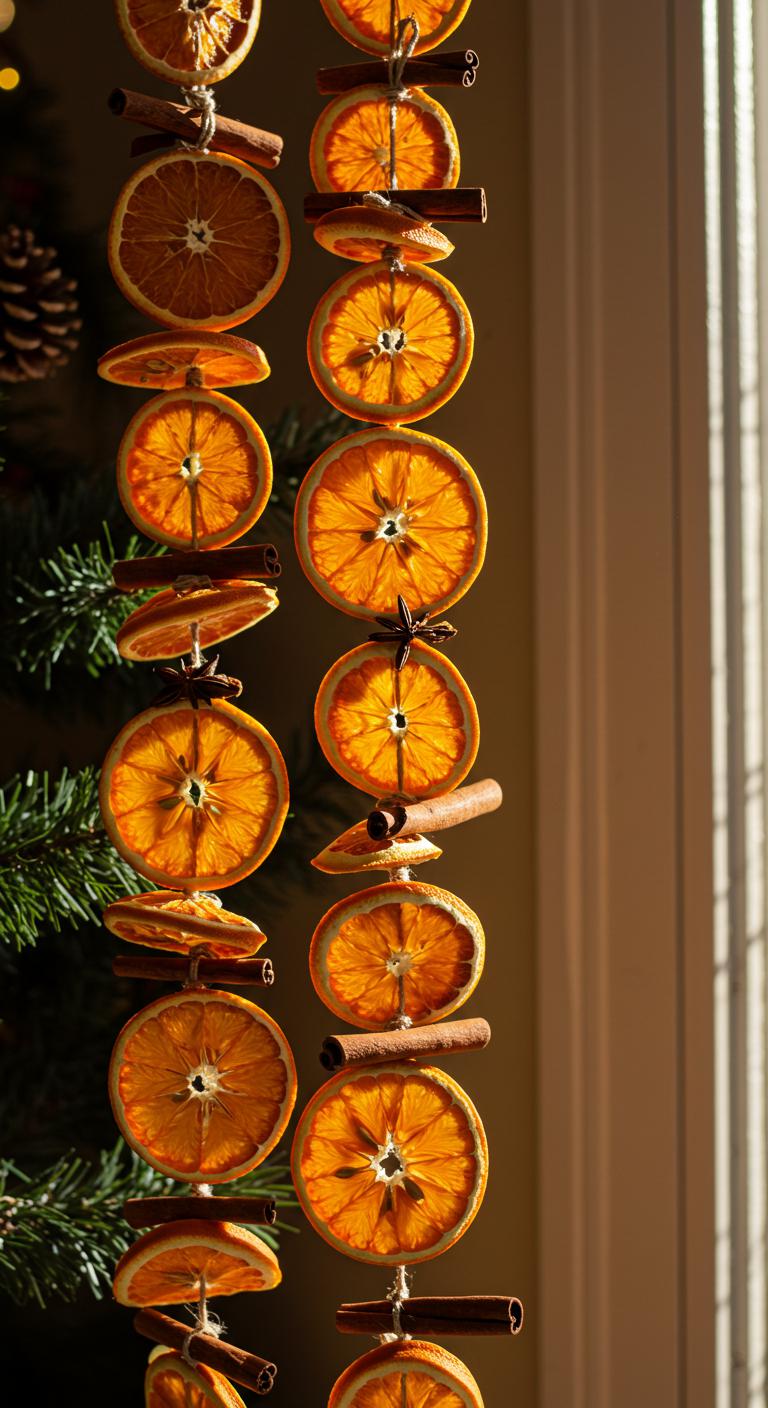
If you want a fragrant, sunlit garland, slice oranges thinly, lay them on a rack, and slowly dry them in the oven or dehydrator so each wheel keeps its translucent, jewel-like center.
Thread twine through centers, spacing pieces, and add cloves or cinnamon sticks.
You’ll savor dried orange slice uses and dried orange slice benefits: scent, color, and sustainable charm that frees your holiday décor.
Twig Miniature Sleighs
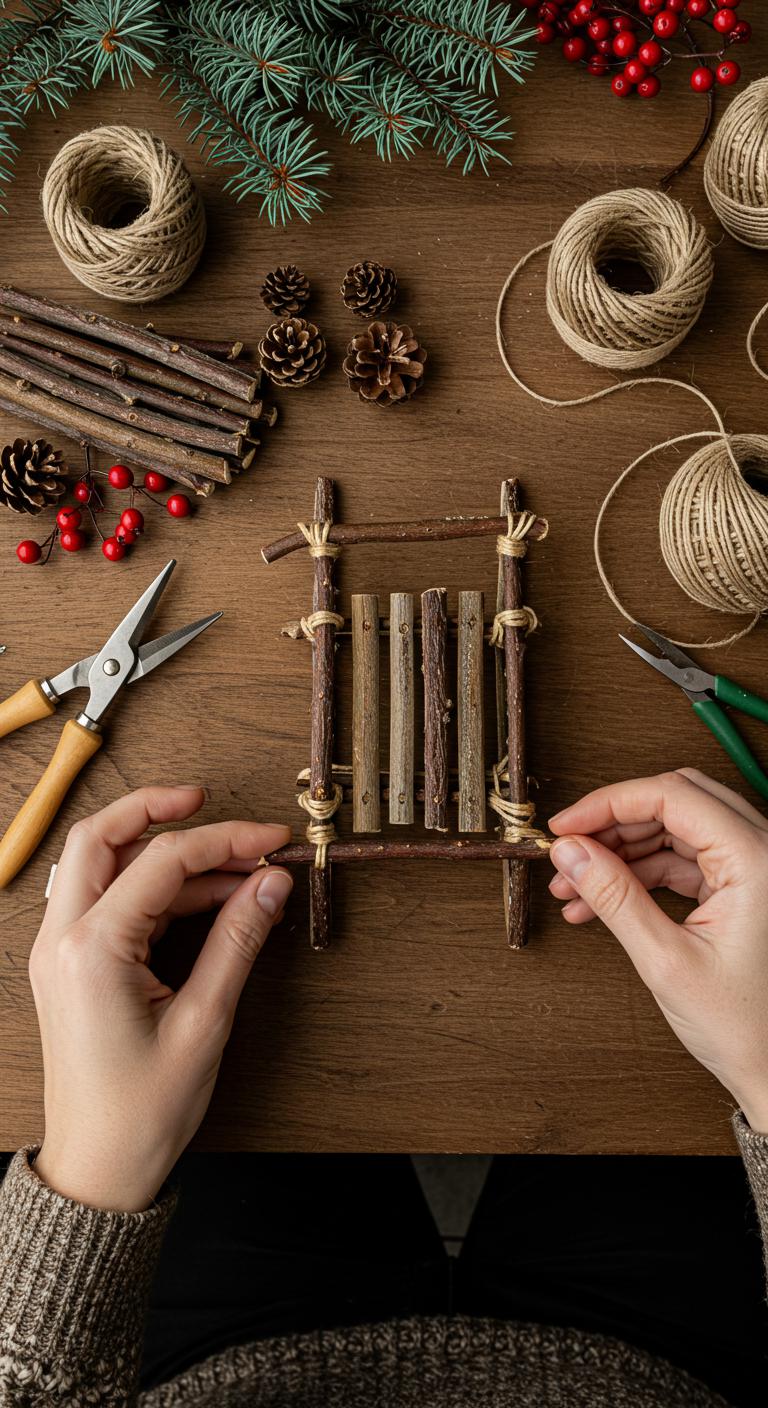
Although they look delicate, twig miniature sleighs come together quickly with just a few simple materials and a steady pair of hands.
You’ll gather short twigs, trim runners, and lash pieces with natural twine accents.
Step by step, you’ll shape seats, secure joints, and add tiny pinecone or berry twig sleigh decorations.
Finish by hanging them to let your free spirit shine.
Salt Dough Leaf Impressions
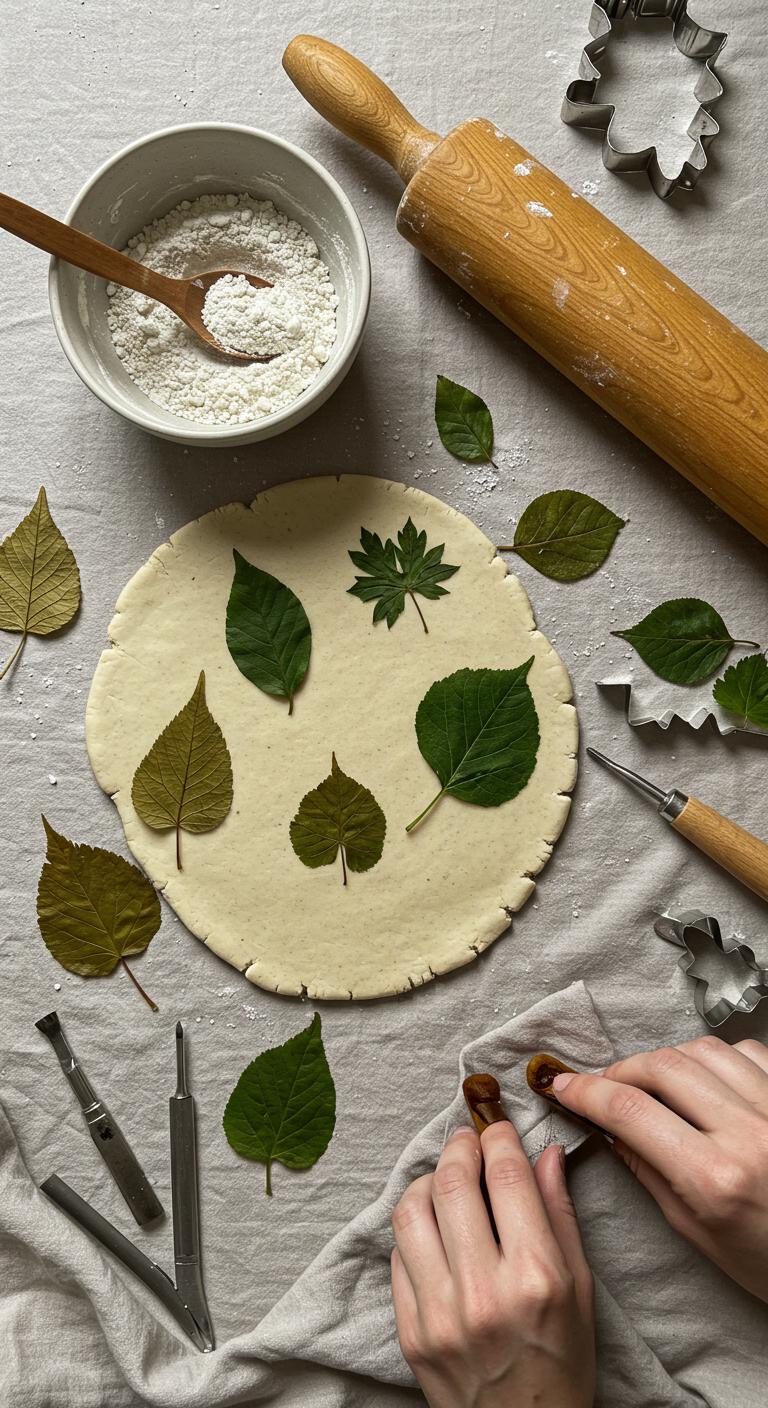
Start by mixing simple pantry ingredients into a soft, workable dough that’ll capture every vein and edge of the leaves you pick. Roll even, press a leaf firmly, lift to reveal crisp detail. Trim shapes, poke a hanging hole, bake or air-dry per your salt dough recipe. Paint lightly, seal, and string—leaf impression techniques that feel freeing and intentional.
Acorn Cap Snowmen
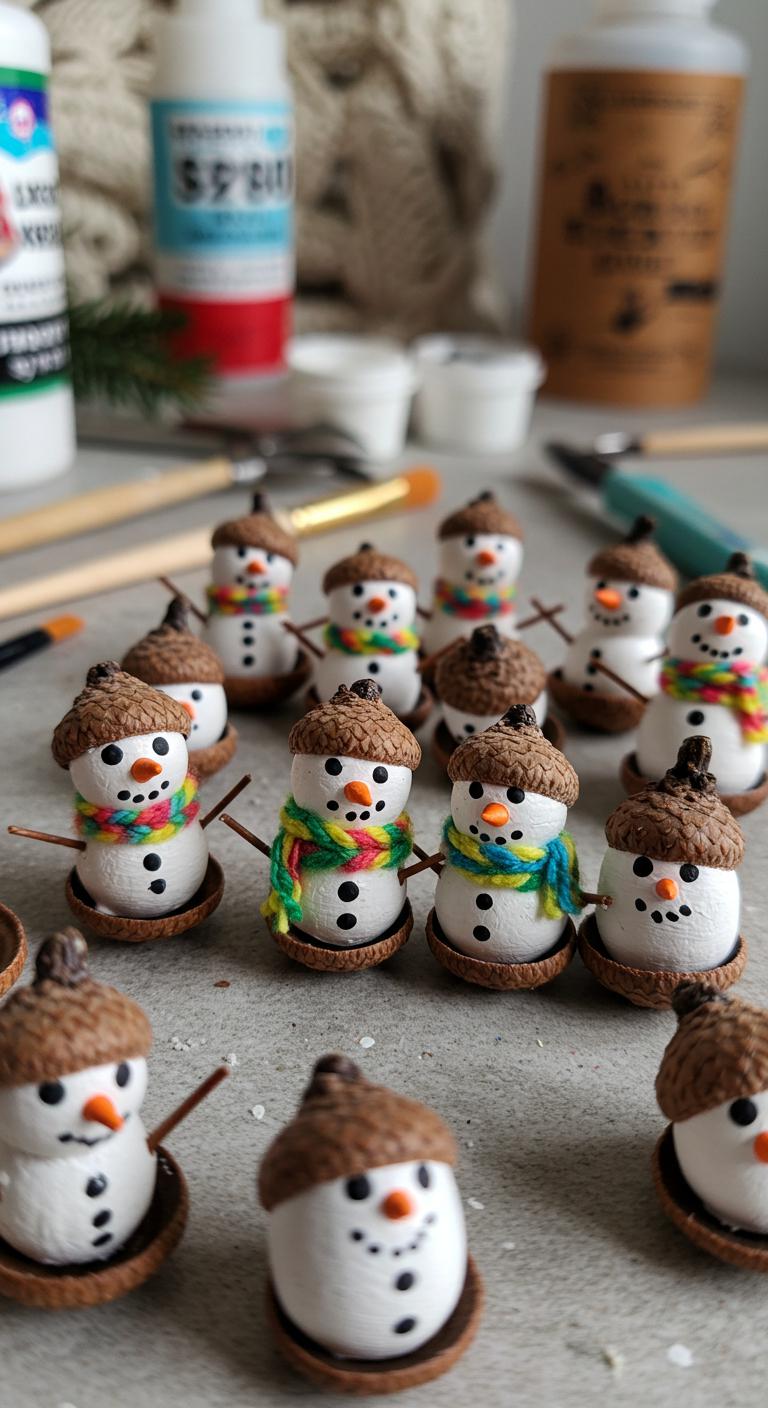
When you gather a handful of tiny acorn caps, you can turn them into the cutest miniature snowmen with just a few careful steps: glue two small white clay beads, paint tiny coal eyes and carrot nose, and seal.
Shape scarves from yarn scraps and punch a hanging hole. This acorn cap crafting yields charming snowman decorations that feel handmade and free.
Rosemary Mini Wreaths
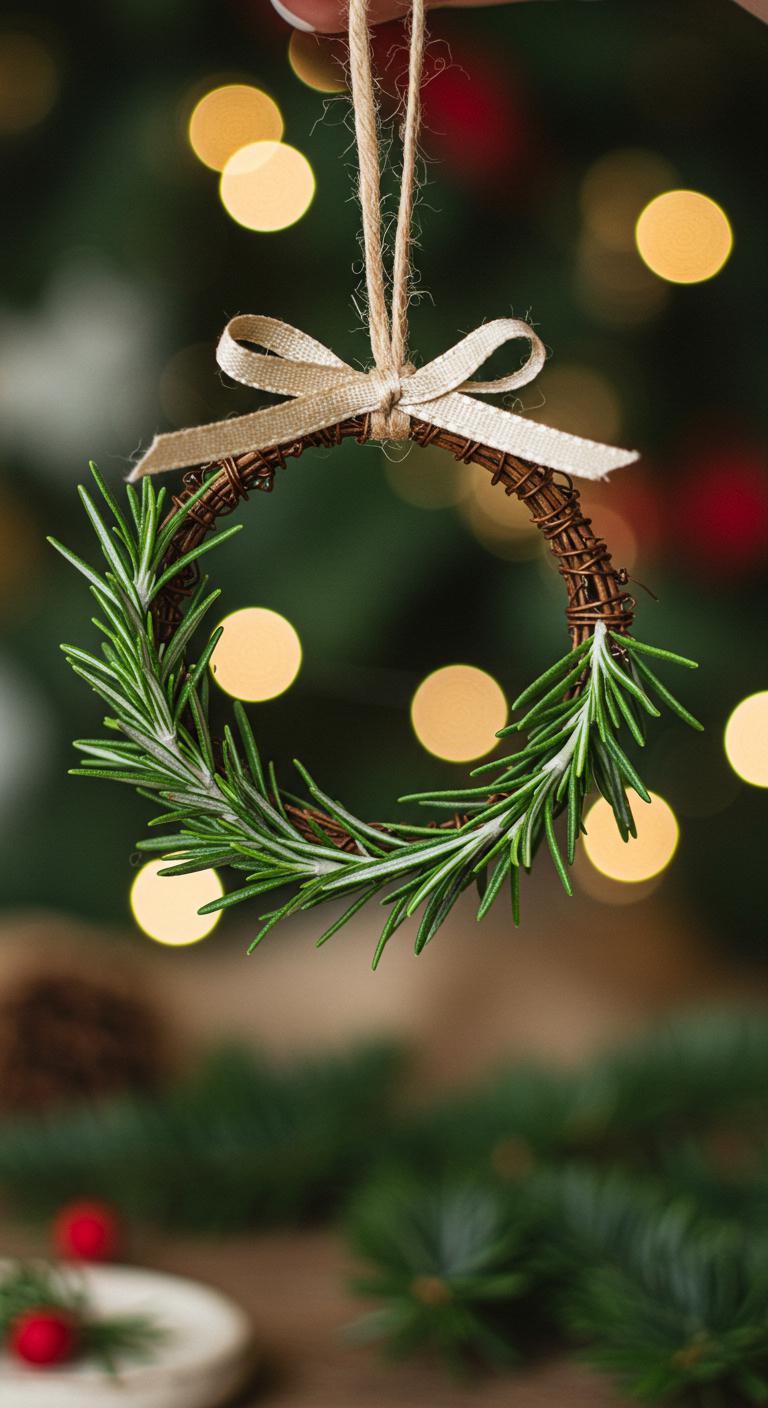
Gather a few sturdy rosemary sprigs and a simple wire ring, and you’ll have everything you need to craft tiny, fragrant wreaths that double as ornaments or napkin rings. Wrap sprigs tightly around the ring, overlap and secure with thin floral wire. Trim ends, fluff greenery, and add a tiny bow. Hang to enjoy festive fragrance during your herbal holiday celebrations.
Burlap and Pine Needle Hearts
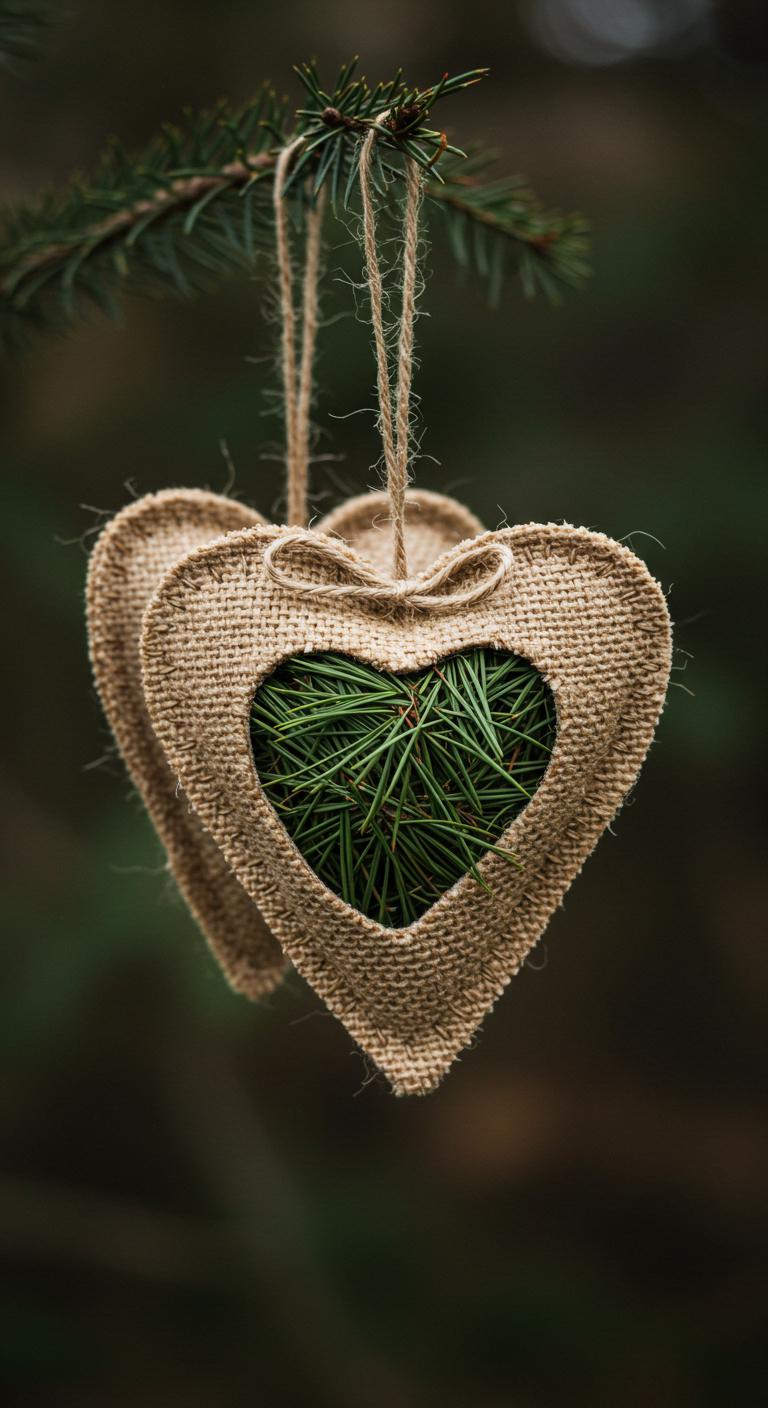
If you want a cozy, homespun ornament that smells faintly of the woods, burlap and pine needle hearts are a perfect quick project.
Cut heart shapes from burlap, enjoying the burlap texture. Layer stitched pine needles inside, using glue sparingly.
Tie with twine loop. Hang to dry; the pine needle benefits—subtle scent and durability—make each heart rustic and free-spirited.
[DIRECTIONS]:
Cedar Bark Lanterns
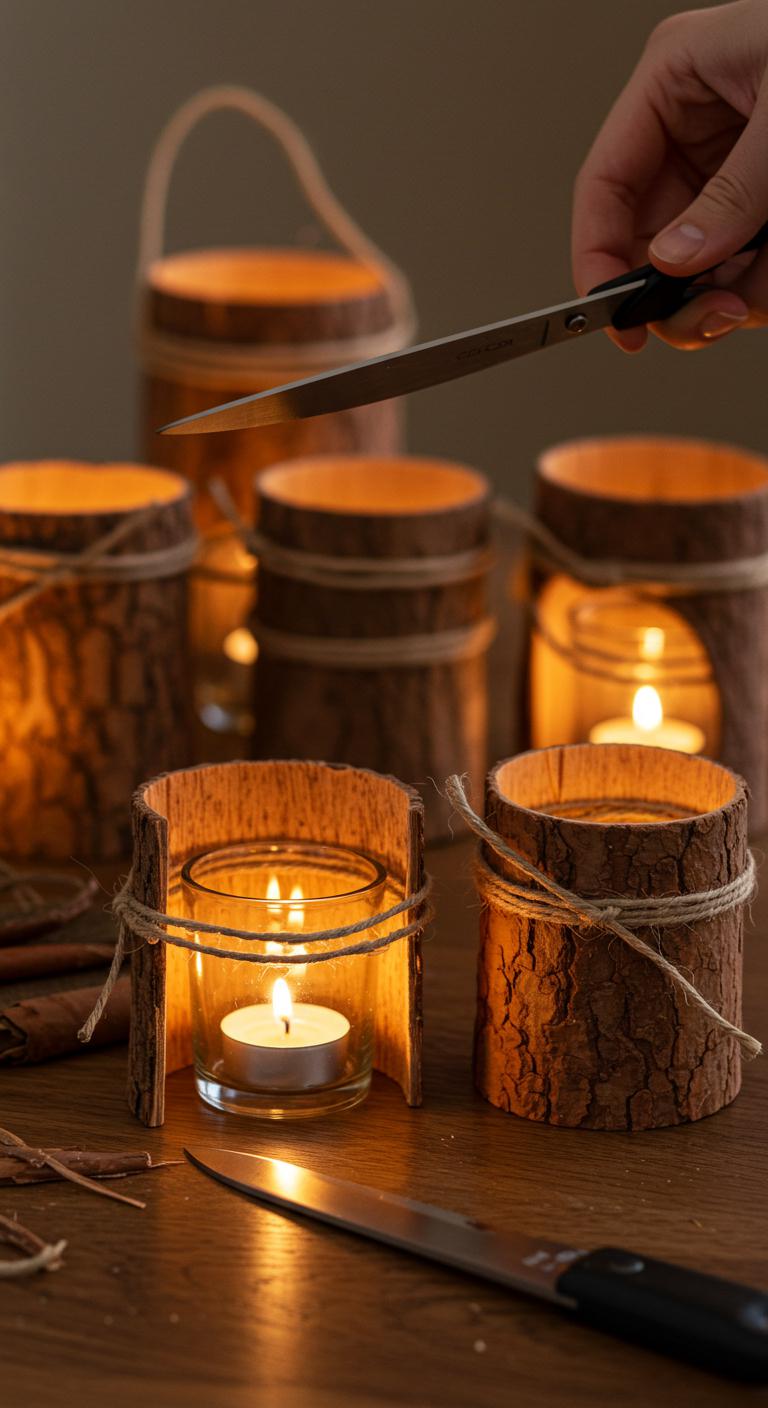
While you work with cedar bark, picture its warm grain curling into a soft, glowing lantern that fills your room with woody fragrance.
You cut a strip, gently bend and overlap edges, and secure with twine. Nest a glass votive inside, trim edges, and hang with a loop.
These cedar bark crafting steps give you simple, freed-up natural lantern ideas for cozy evenings.
Cranberry and Popcorn Stringers
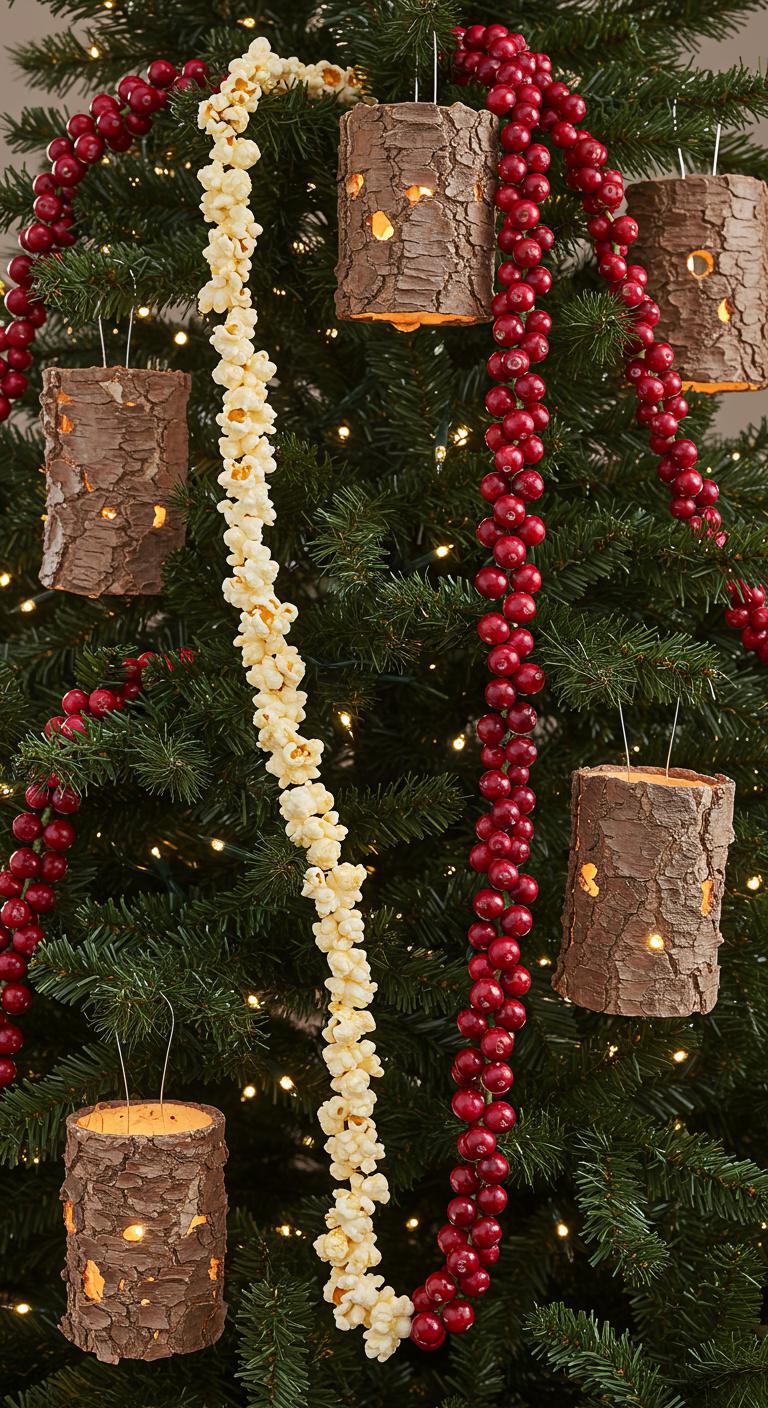
After enjoying the soft glow of cedar bark lanterns, bring that same cozy spirit to your tree with cranberry and popcorn stringers. You’ll pick firm berries—follow cranberry selection tips—then thread with sturdy needle and twine.
Try simple popcorn popping methods for consistent kernels. String alternating colors, spacing loosely. Hang where movement catches light; you’ll love the airy, joyful rhythm they add.
Driftwood Tree Ornaments
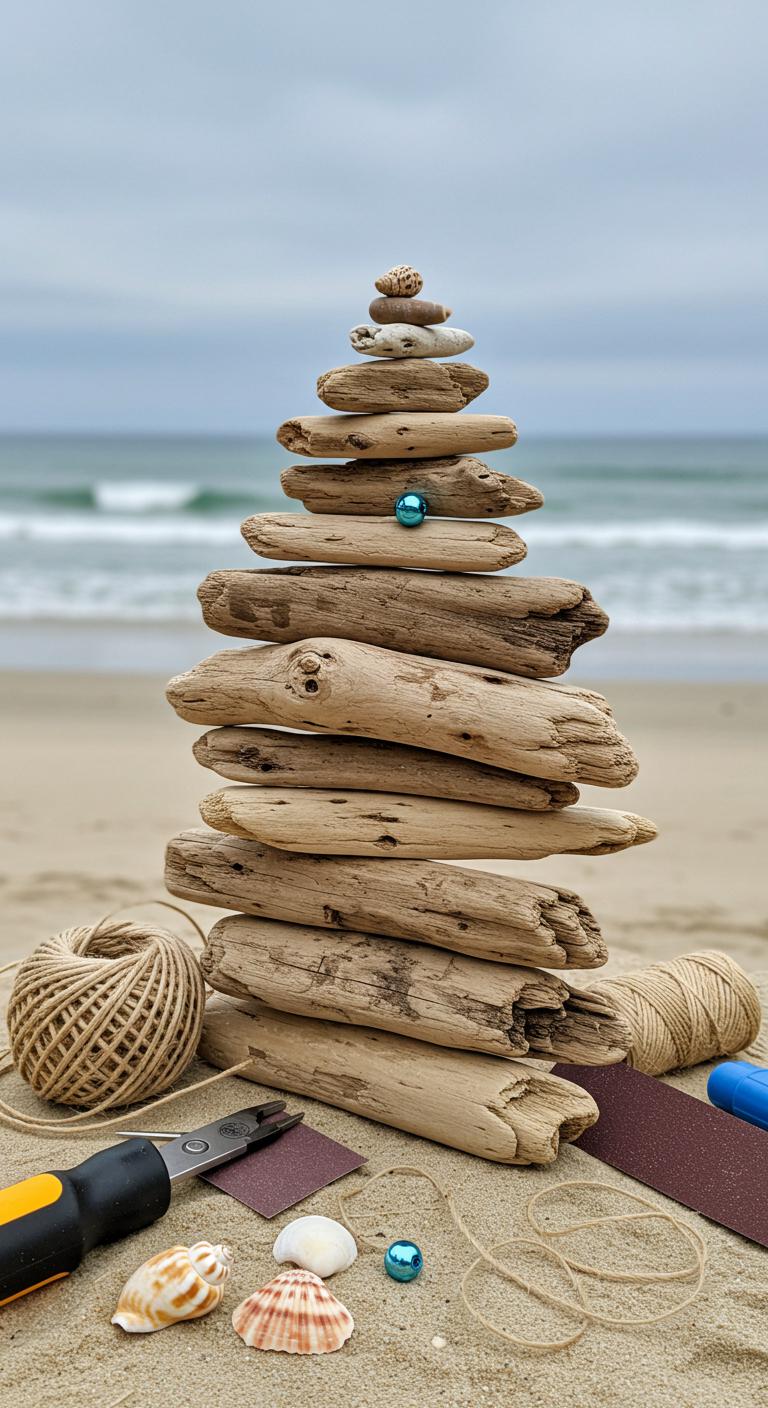
Gather a few sun-bleached driftwood pieces and small tools, and you’re ready to make ornaments that bring beachy calm to your tree.
Lay logs by size, stack like a mini tree, drill a tiny hole through center, and thread twine.
Sand edges, knot securely, add a shell or bead.
You’ll hang proud driftwood art for effortless coastal decor.
Felted Wool Pine Trees With Pine Sprigs
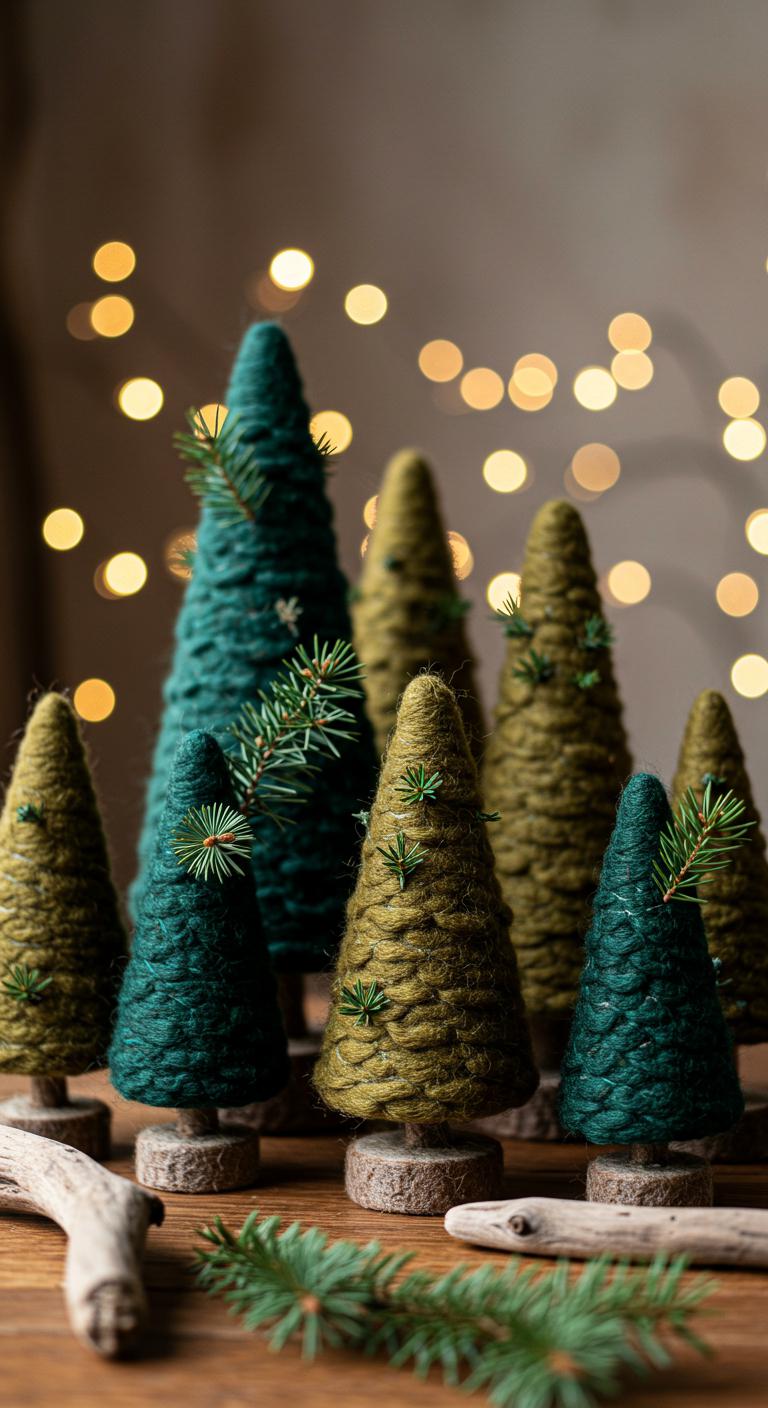
If you loved the relaxed, seaside vibe of driftwood ornaments, try bringing that same handmade charm into a cozier, forest-inspired look with felted wool pine trees accented by tiny real pine sprigs.
You’ll shape cones using wet and needle felted wool techniques, trim layers for texture, then attach pine sprig embellishments with glue or thin wire.
Hang and enjoy a free-spirited, rustic glow.
Pressed Flower Baubles
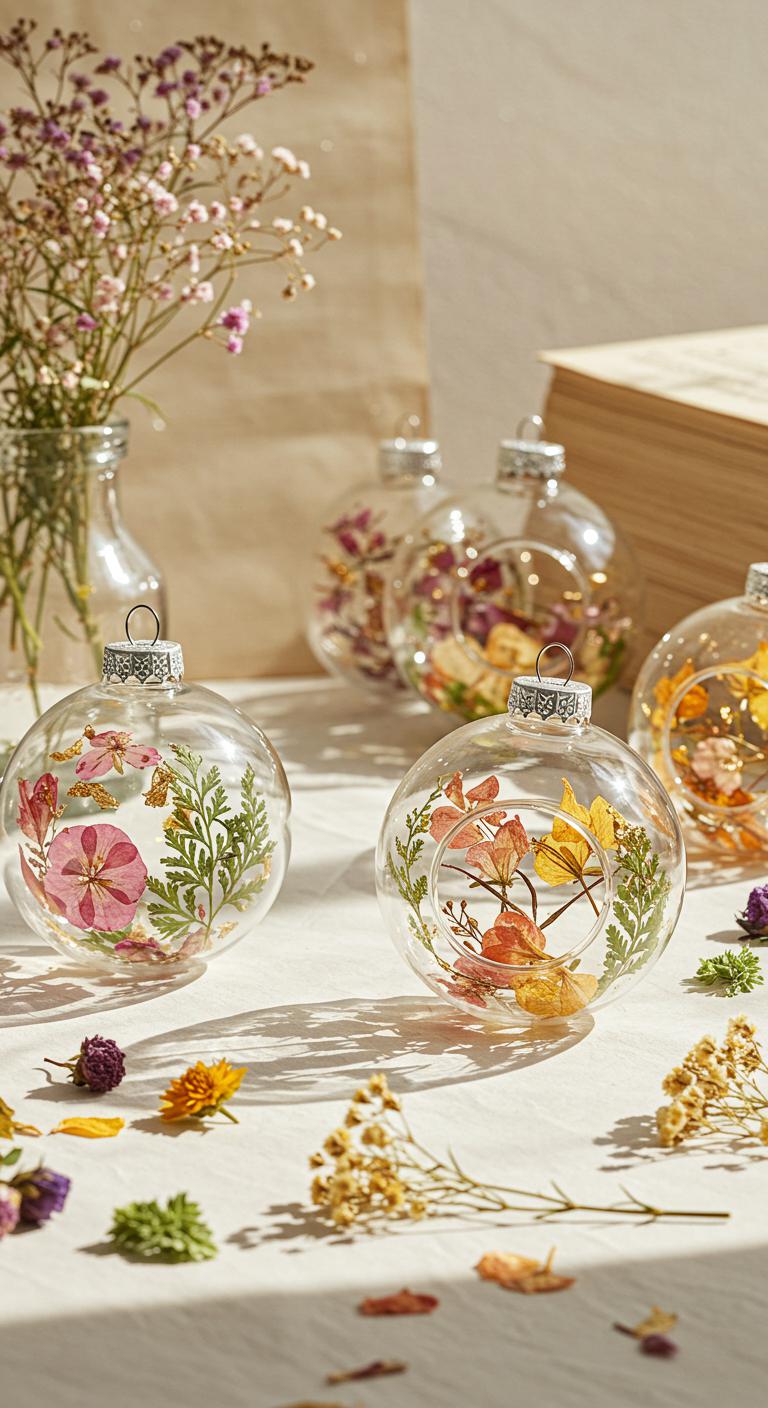
Sunlight-tinted petals look magical when you press them into clear glass baubles, and you’ll enjoy how simple the process is: pick small, flat flowers and leaves, arrange them on a sheet of parchment to dry under a heavy book for a week, then slip the dried blooms into a hollow ornament, layering with tiny sprigs or gold leaf for depth before sealing. Next, use pressed flower techniques to arrange seasonal flower choices, rotate placements until the composition feels free and airy, then hang and celebrate.
Seed Pod Snowflakes
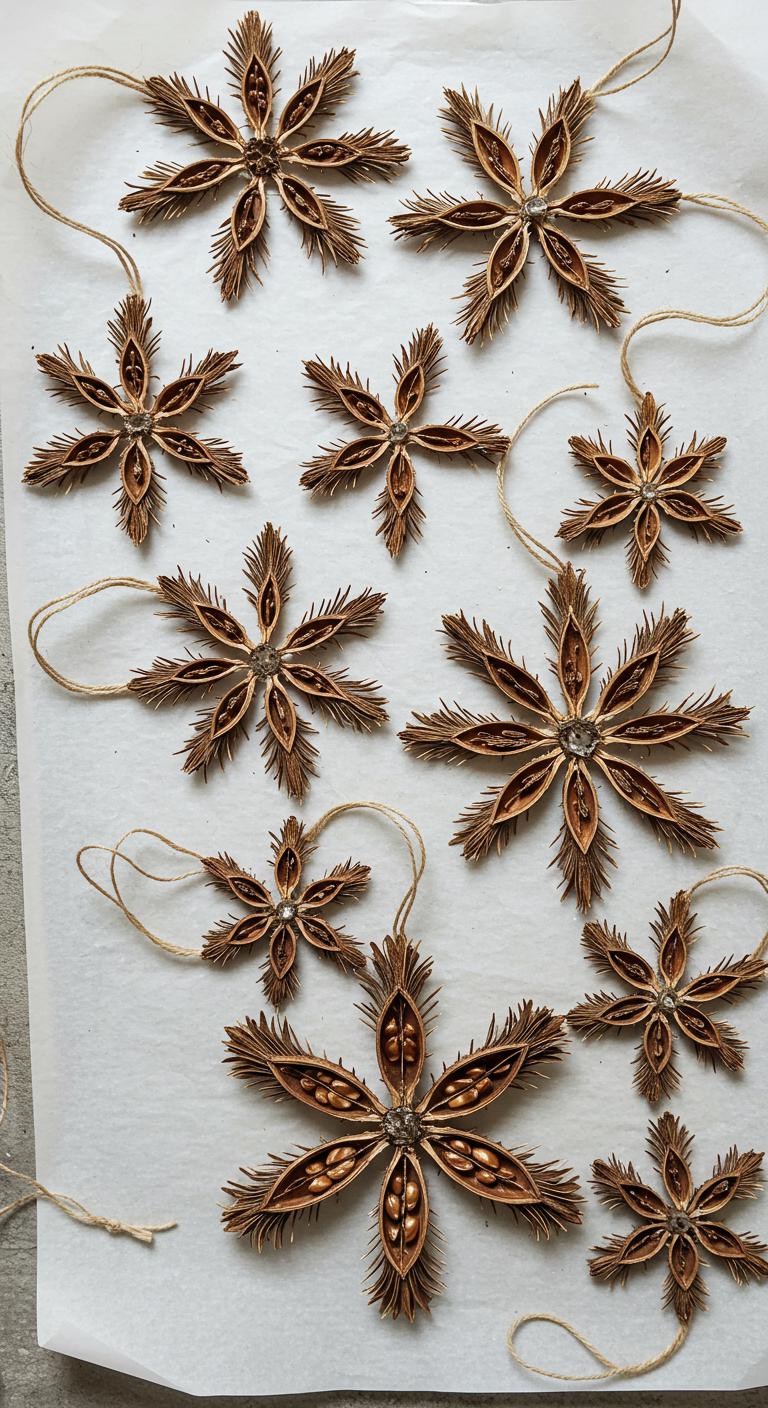
After you’ve filled a few glass baubles with pressed blooms, try making Seed Pod Snowflakes for a rustic, woodland look.
Gather varied seed pod types, dry them, and sort by size.
Lay pods into simple snowflake patterns on wax paper, glue at intersections, and trim edges.
Attach twine loops, paint sparingly if you like, and hang where wind and light can play.
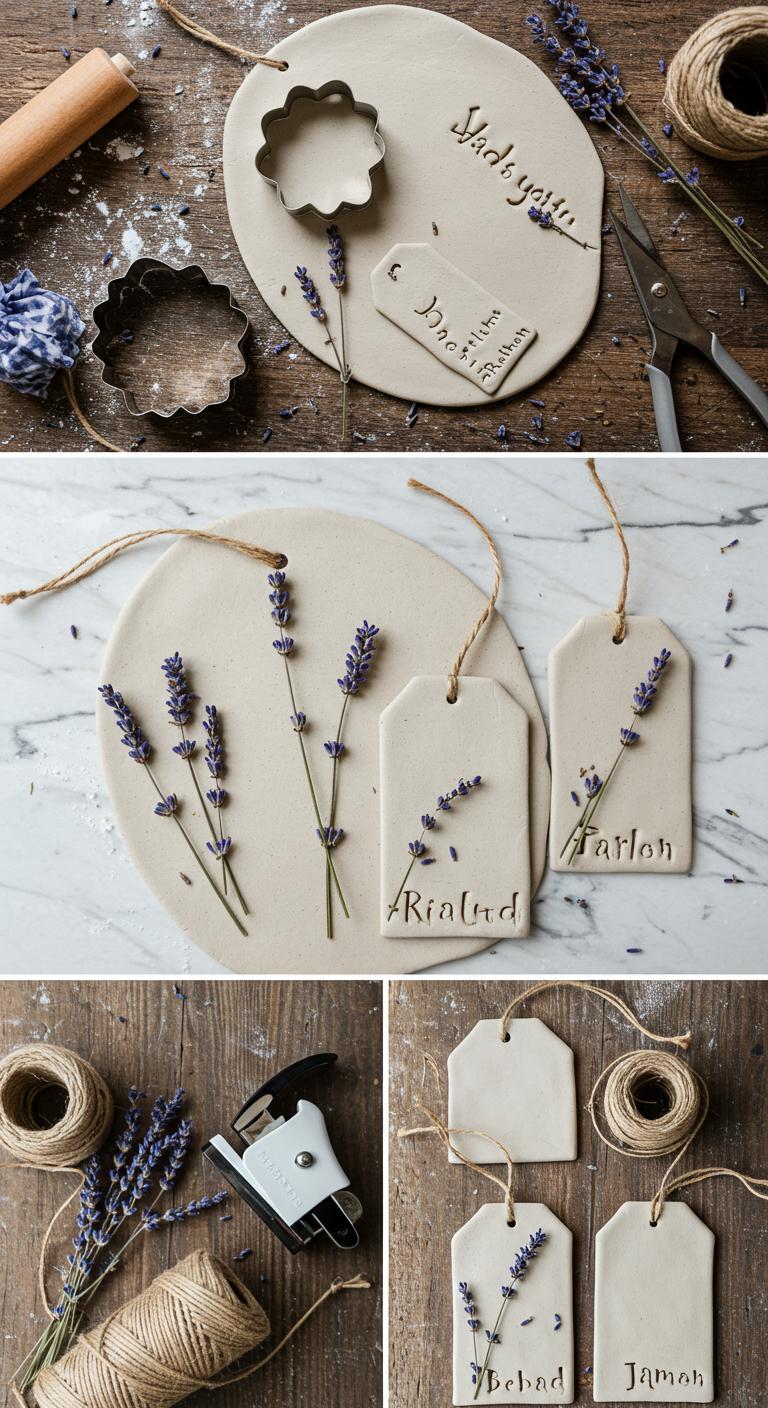
Clay and Lavender Gift Tags
Paragraphs