You’ll find simple, renter-friendly projects that warm a small place without drilling or big spends. Think layered lighting, thrifted-frame galleries, peel-and-stick accents, and no-sew textiles that add texture and personality. Each idea is practical, deposit-safe, and quick enough to finish on a weekend or an afternoon. Keep going to pick the few easy wins that’ll make your apartment feel intentionally lived-in.
Before You Start: Renter Rules, Tools, and Budgets
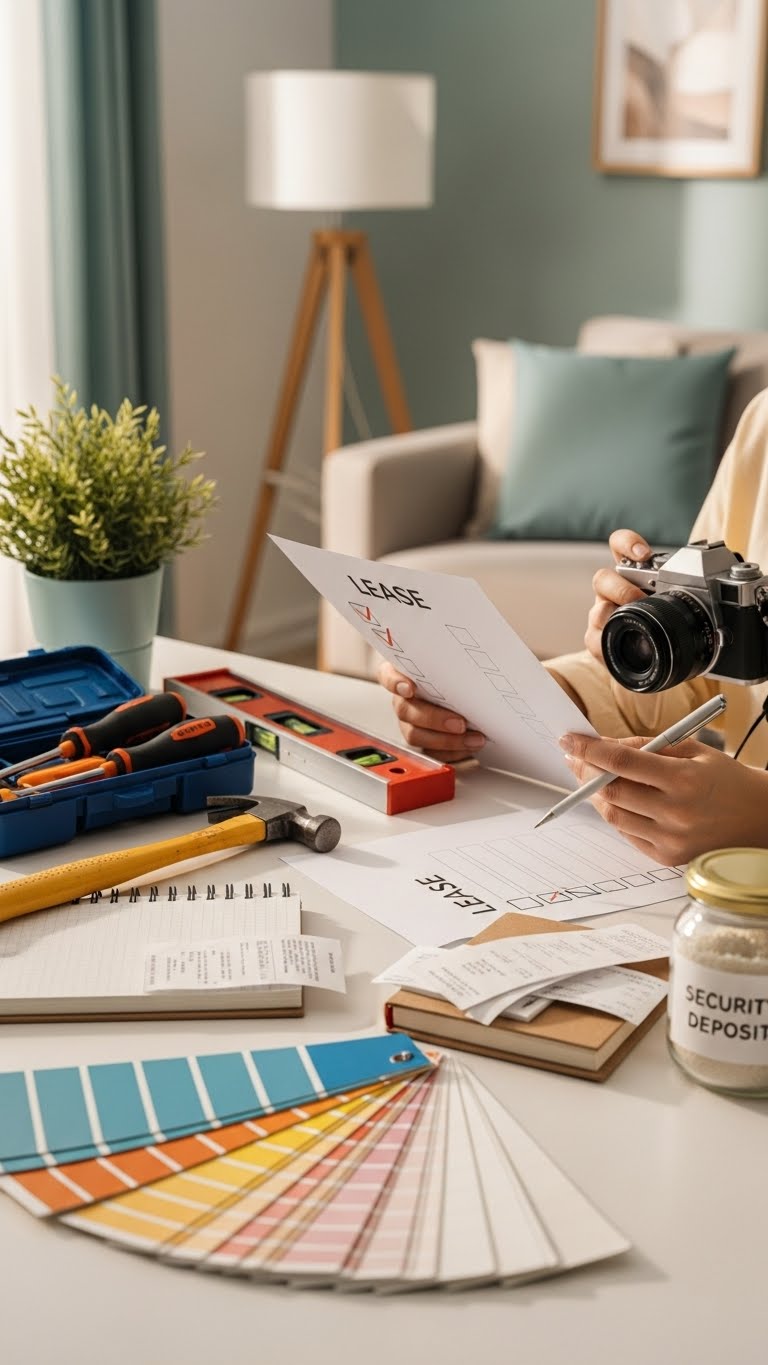
Before you pick a paint swatch or hammer your first nail, check your lease and inventory landlord rules so you won’t accidentally lose a deposit — note limits on painting, hanging hardware, and appliance changes.
You’ll create a simple tool kit, log costs in a budget tracker, and note security deposits and return conditions.
Plan projects that respect lease agreements and your freedom.
5 Quick Cozy Wins You Can Finish This Afternoon
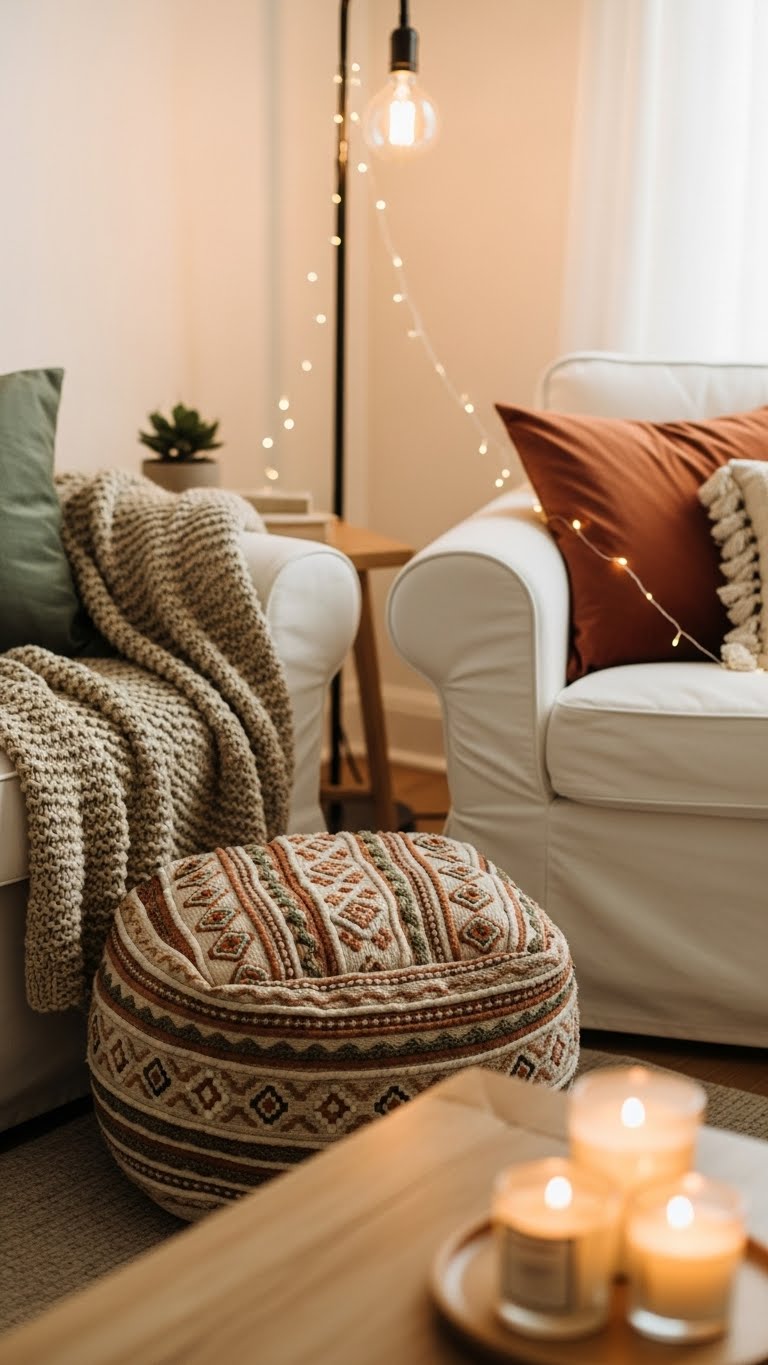
Often you can transform a room in just a few hours with small, renter-friendly changes that add warmth and personality without risking your deposit.
Swap harsh bulbs for soft ambient lighting, string plug-in fairy lights, and add a floor lamp. Layer cozy textiles—throws, poufs, and removable slipcovers—arrange a scented candle cluster, and clear surfaces so the space breathes and feels yours.
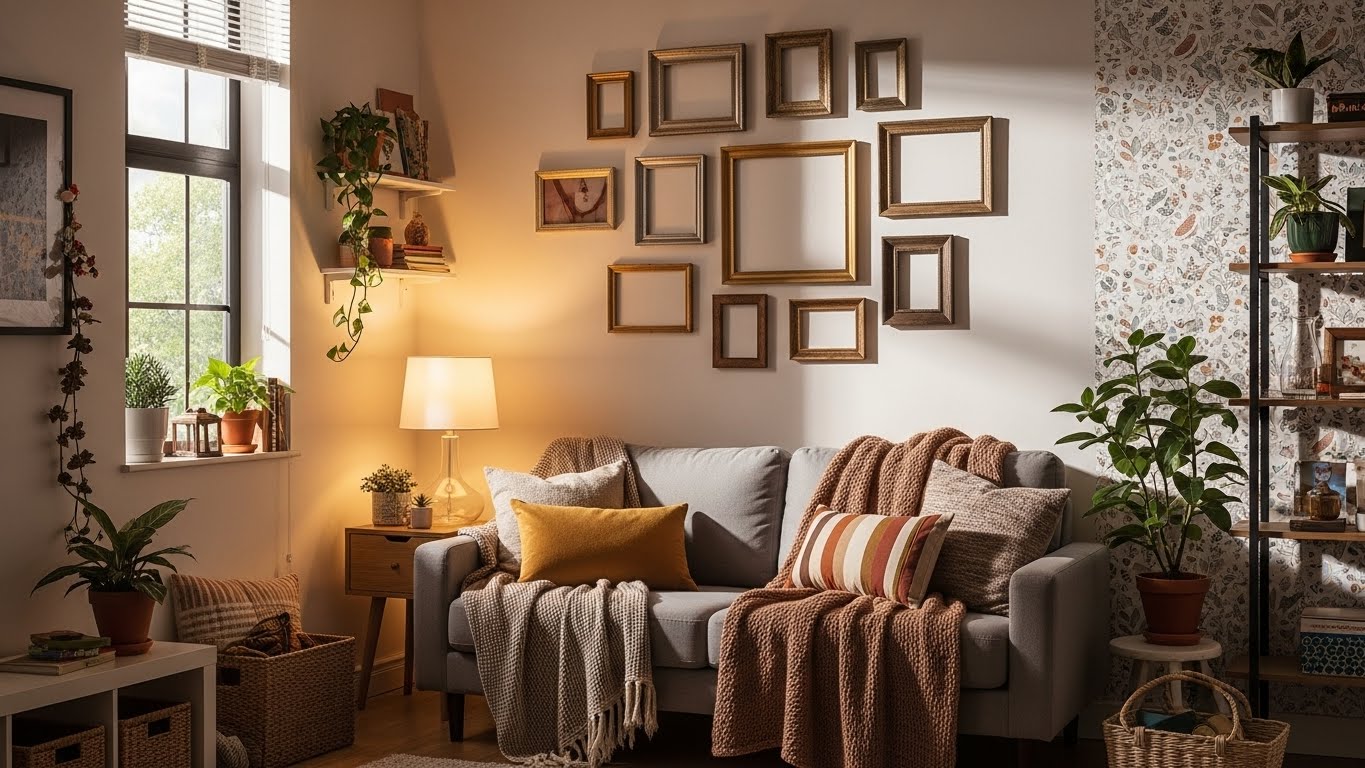
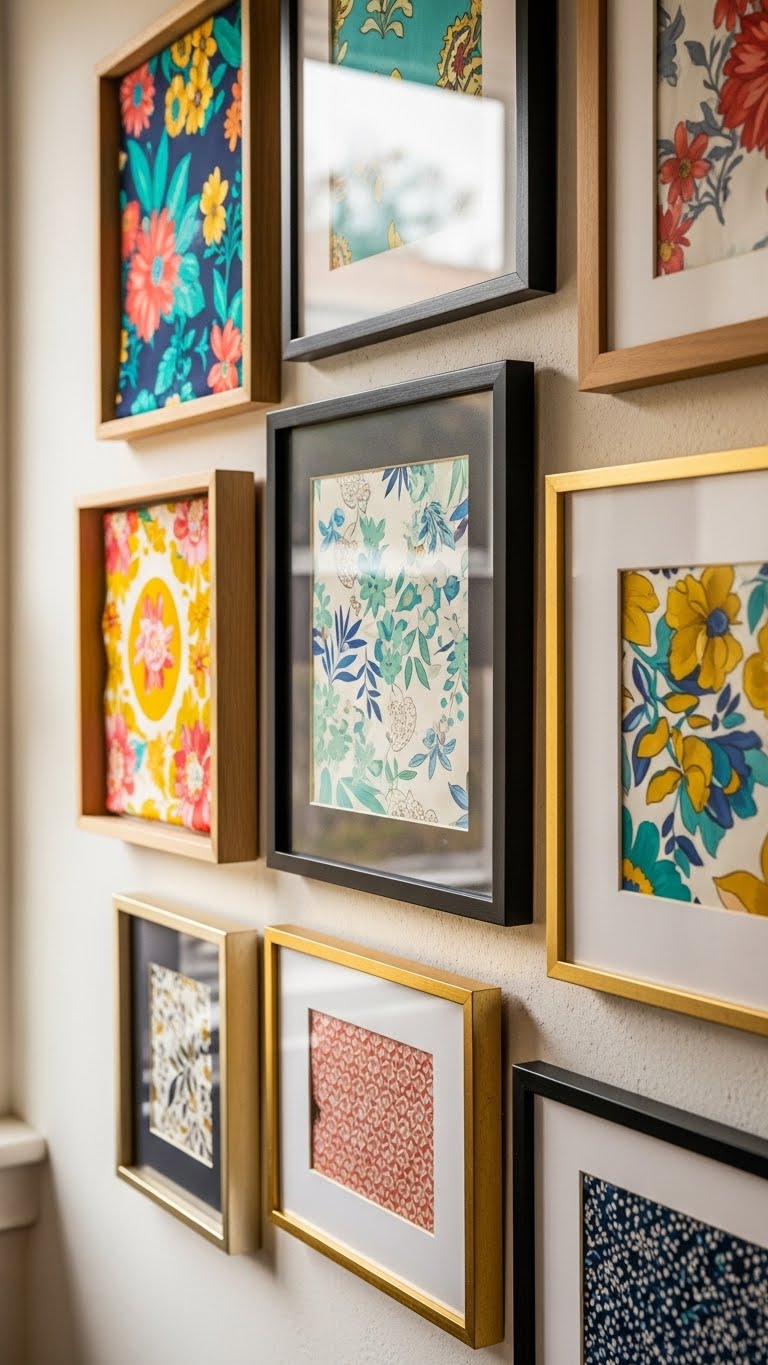
Make a Gallery Wall From Thrifted Frames and Prints
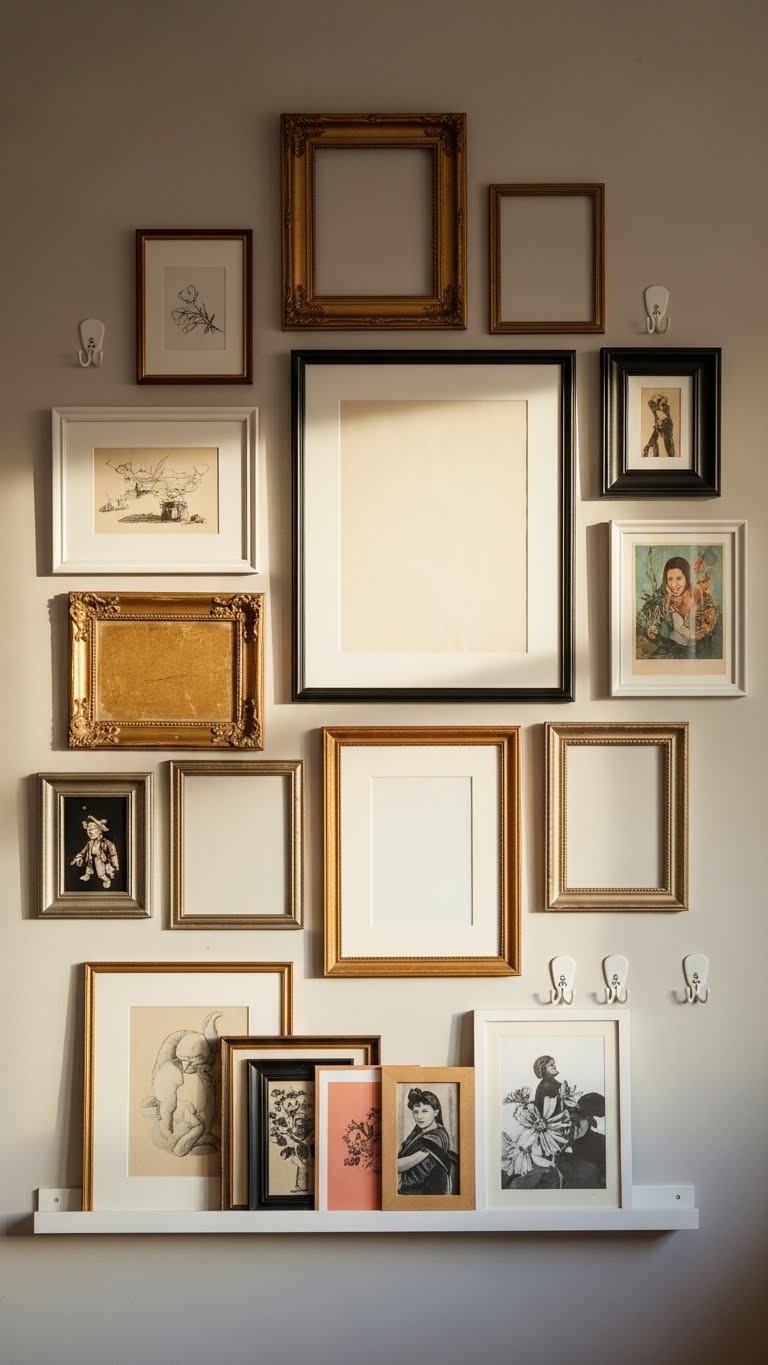
Gather thrifted frames and prints and you’ll have a personalized gallery wall without spending much or damaging rental walls.
Pick a focal piece, test frame arrangement on the floor, and snap photos to visualize.
Swap mats for mat customization that unifies mismatched pieces.
Use removable hooks or picture ledges, stagger heights, and leave breathing space so your wall feels free, intentional, and lived-in.
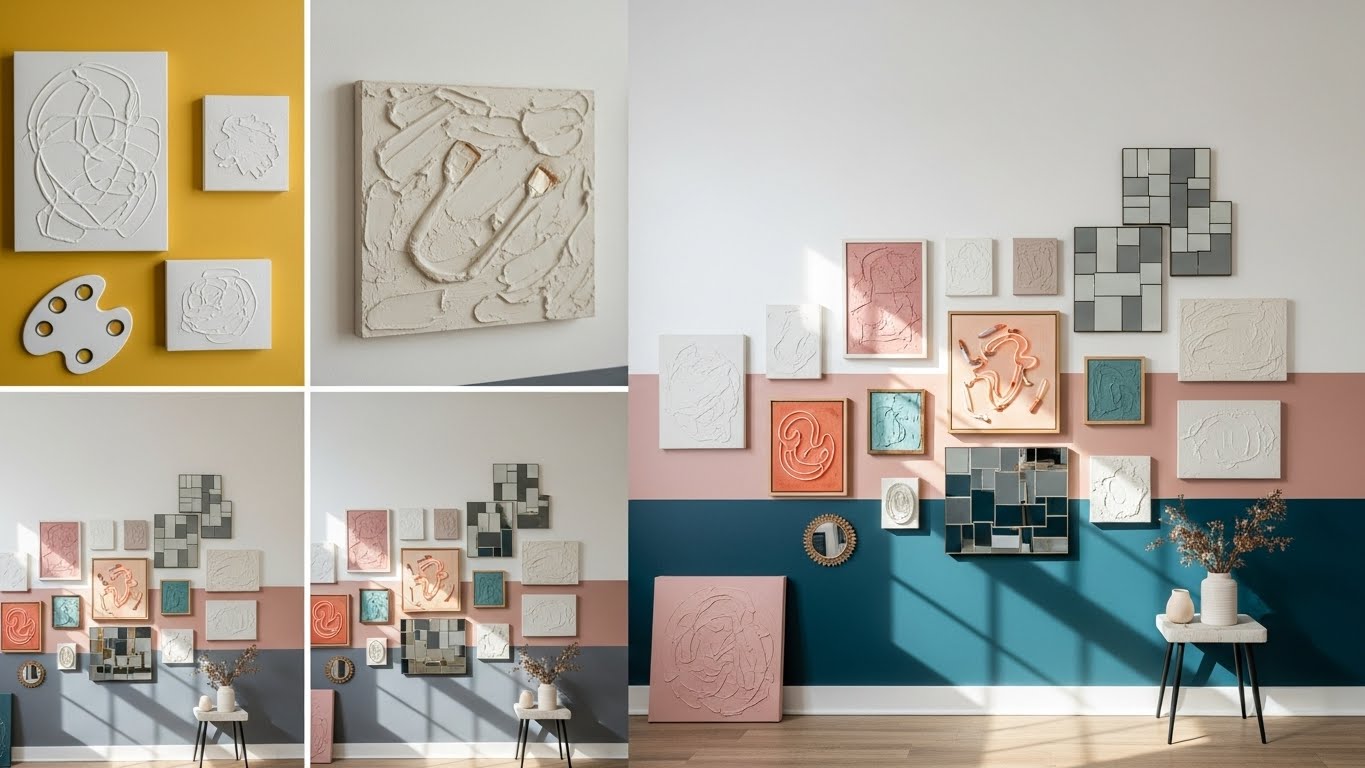
Build Wall Art From Vintage Book Pages
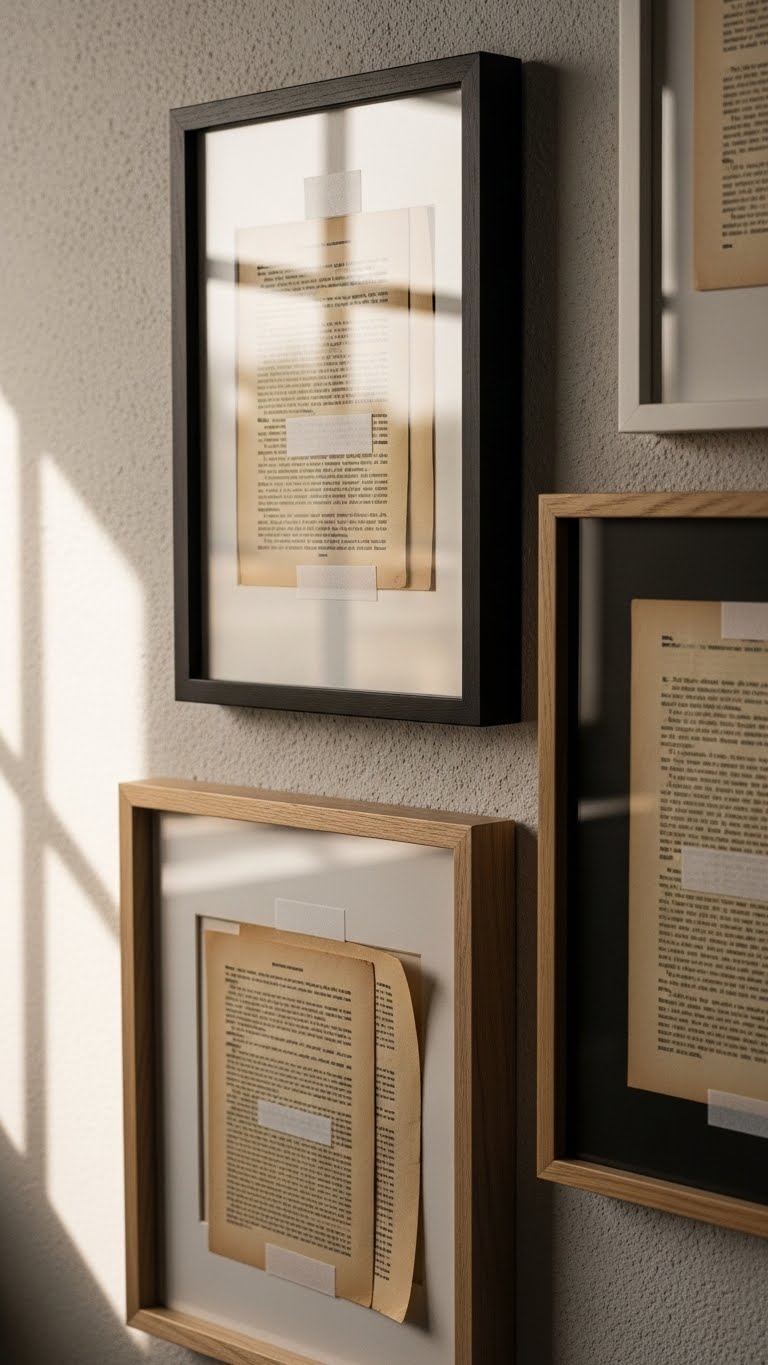
Turn faded pages into striking wall art by arranging vintage book sheets into simple, framed compositions or layered collages. You’ll cut, overlap, and orient type to create a typographic collage that reads like texture. Use acid-free backing, minimal adhesive, and UV-safe frames as paper_conservation tips. Hang pieces at varied heights for freedom of rhythm, and swap pages seasonally to keep your space alive.
Frame Scarves or Fabric as Inexpensive Art
Pick a favorite scarf or a scrap of patterned fabric and frame it to add instant color and texture to your walls. You’ll create inexpensive framed textiles that feel personal and free.
Mix sizes, swap mats, or make fabric collages in varied frames. Hang them salon-style or alone; you’ll refresh a room without commitment, express your style, and change pieces whenever you want.
Peel-and-Stick Accent Wall: Patterns, Placement, and Removal Tips
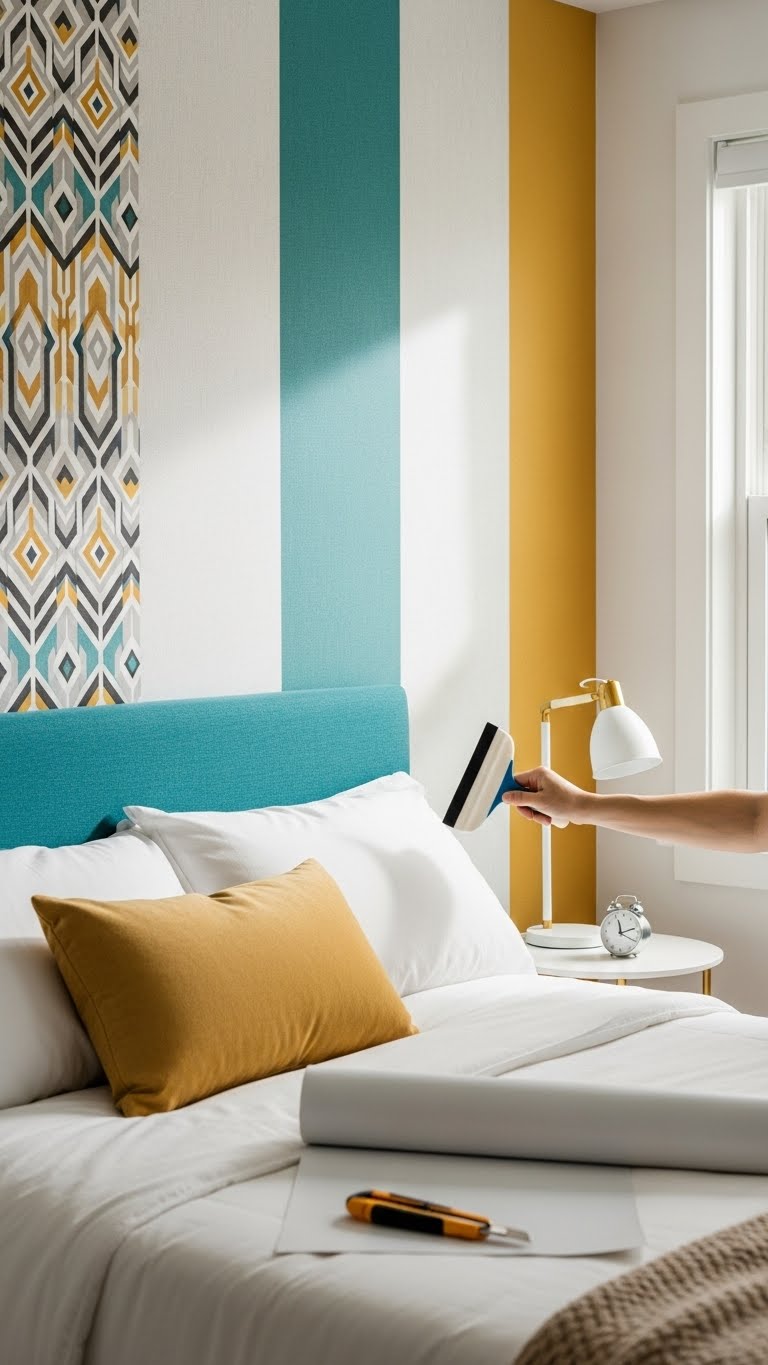
Peel off a strip of self-adhesive wallpaper and you’ll see how quickly a room can change — peel-and-stick accent walls let you add bold patterns or subtle texture without the mess of paste or primer.
Choose placement that frames a bed or entry, match pattern alignment across seams, smooth bubbles with a squeegee, and follow removal care instructions to peel slowly and protect paint.
Make DIY Floating Shelves From Thrifted Wood
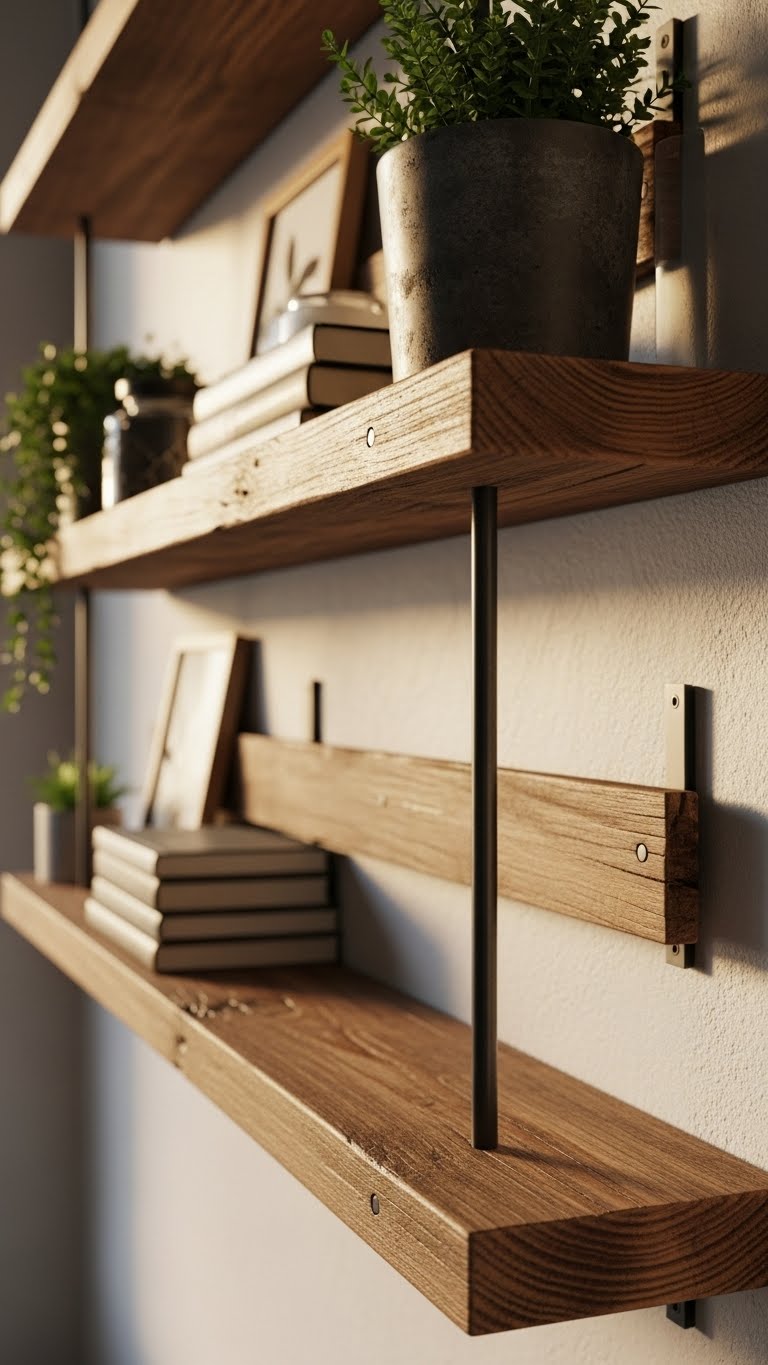
Start by hunting down sturdy, characterful boards at thrift stores, flea markets, or salvage yards—you’ll be surprised how much good wood turns up for cheap.
Sand and cut to size, drill for concealed mounting rods, and attach with hidden brackets so shelves float.
Seal with a weatherproof finish for longevity.
Style them freely with plants, books, and small art to personalize your space.
Build Floating Bedside Shelves in One Afternoon
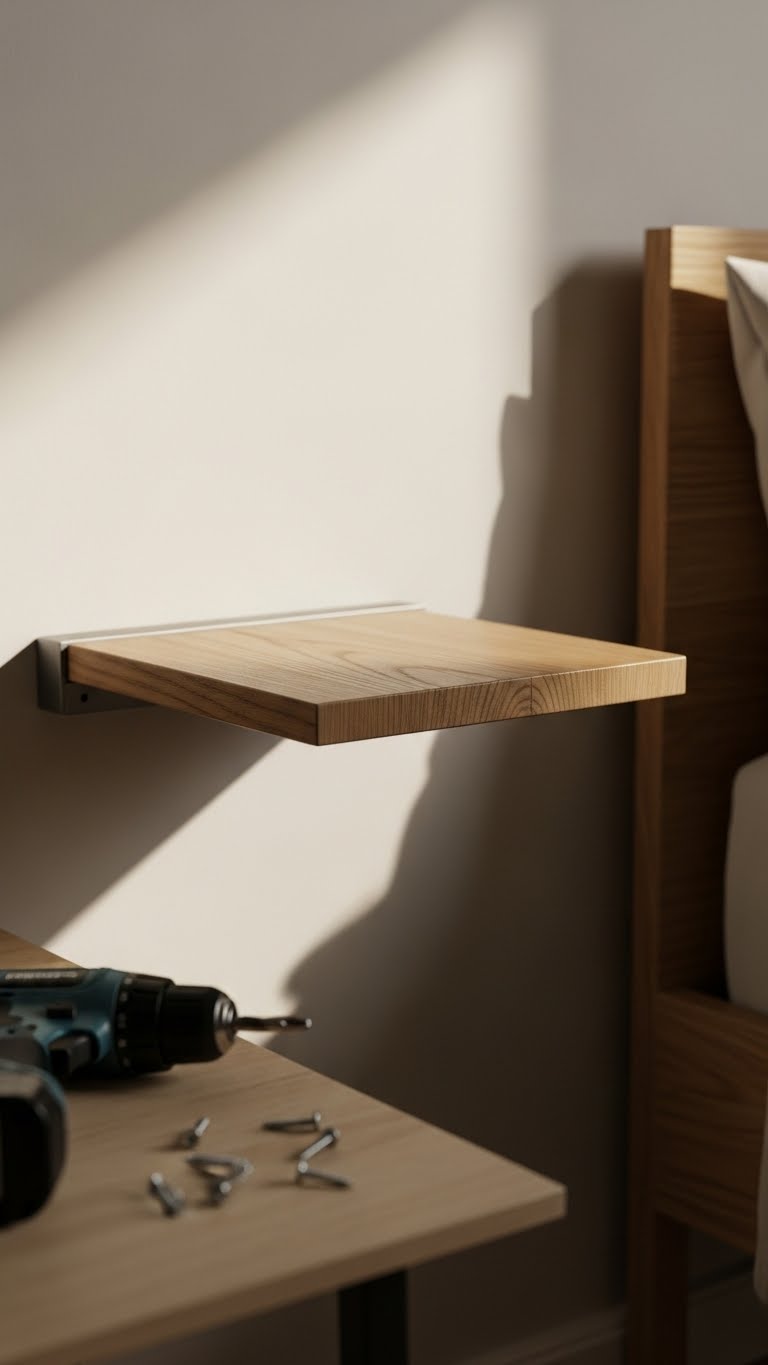
Build a simple floating bedside shelf in an afternoon using only a few tools and materials: a short plank, a metal cleat or hidden bracket, screws, and a drill.
Measure, mark studs, attach minimalist hardware, then slide the plank onto the cleat for a clean, suspended nightstand look.
Seal the wood, mount low-profile hooks if wanted, and enjoy clutter-free freedom.
Upcycle a Dresser With Paint and New Hardware
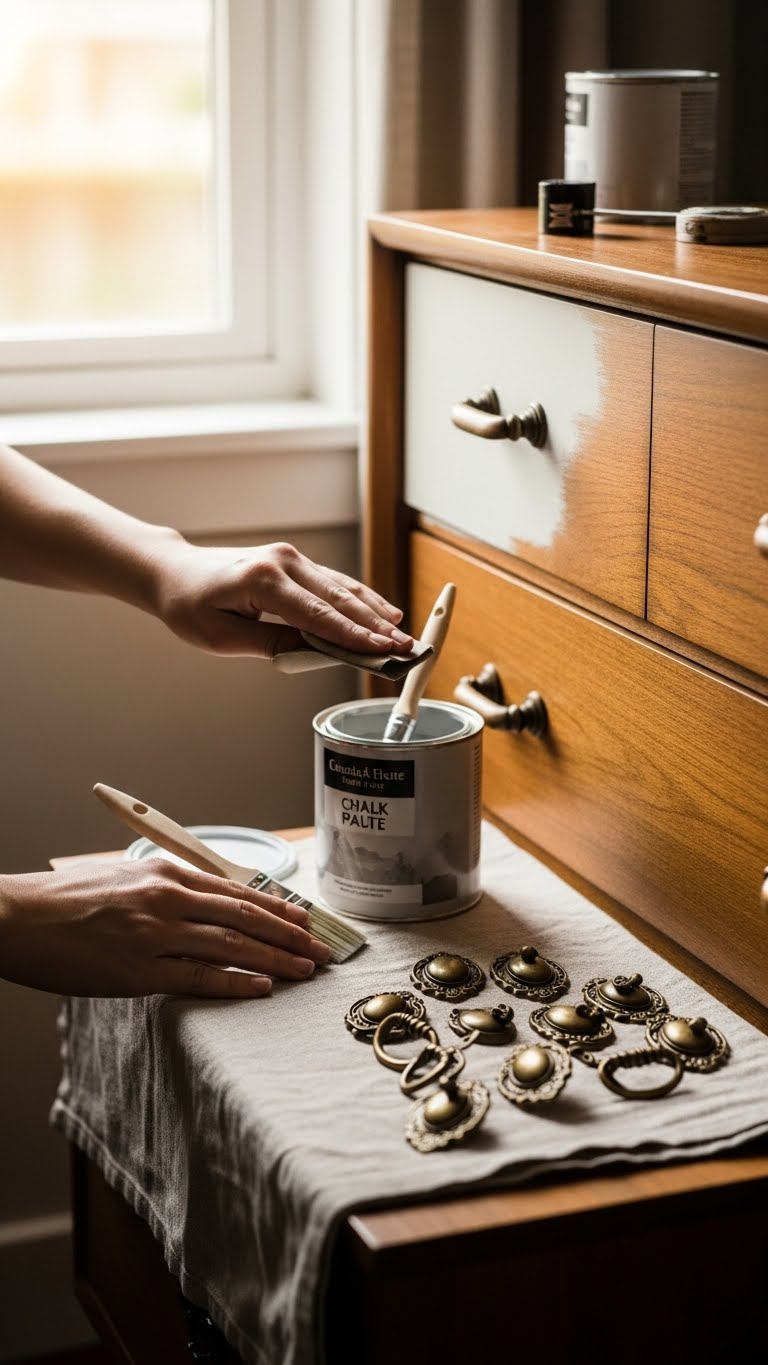
If you liked how a floating bedside shelf refreshed your nightstand, give your dresser the same treatment by repainting it and swapping the hardware—it’s one of the fastest ways to change a room’s look without buying new furniture.
Sand lightly, use chalk paint for matte, forgiving coverage, then seal.
Pick antique hardware for character, tighten or replace screws, and enjoy a freer, personalized space.
Refresh Cabinet Fronts With Removable Contact Paper
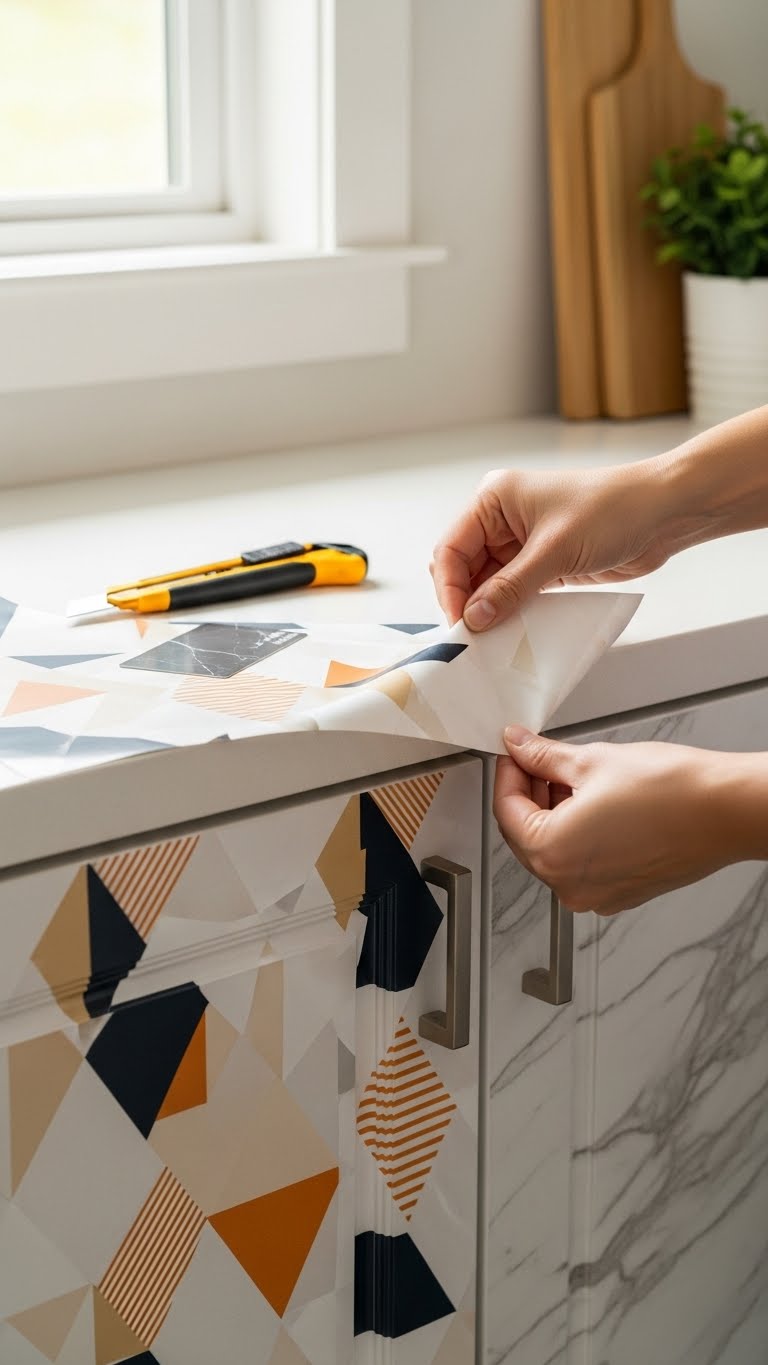
Give your cabinets a whole new look without sanding or repainting by covering the fronts with removable contact paper—you’ll get big impact with minimal effort.
Peel carefully, align edges, and trim around removable hinges so doors still swing freely. Smooth out bubbles with a credit card, match patterned seams for a seamless finish, and enjoy a bold, temporary upgrade that you can change whenever you crave a fresh vibe.
Swap Cabinet Pulls and Add Adhesive Organizers
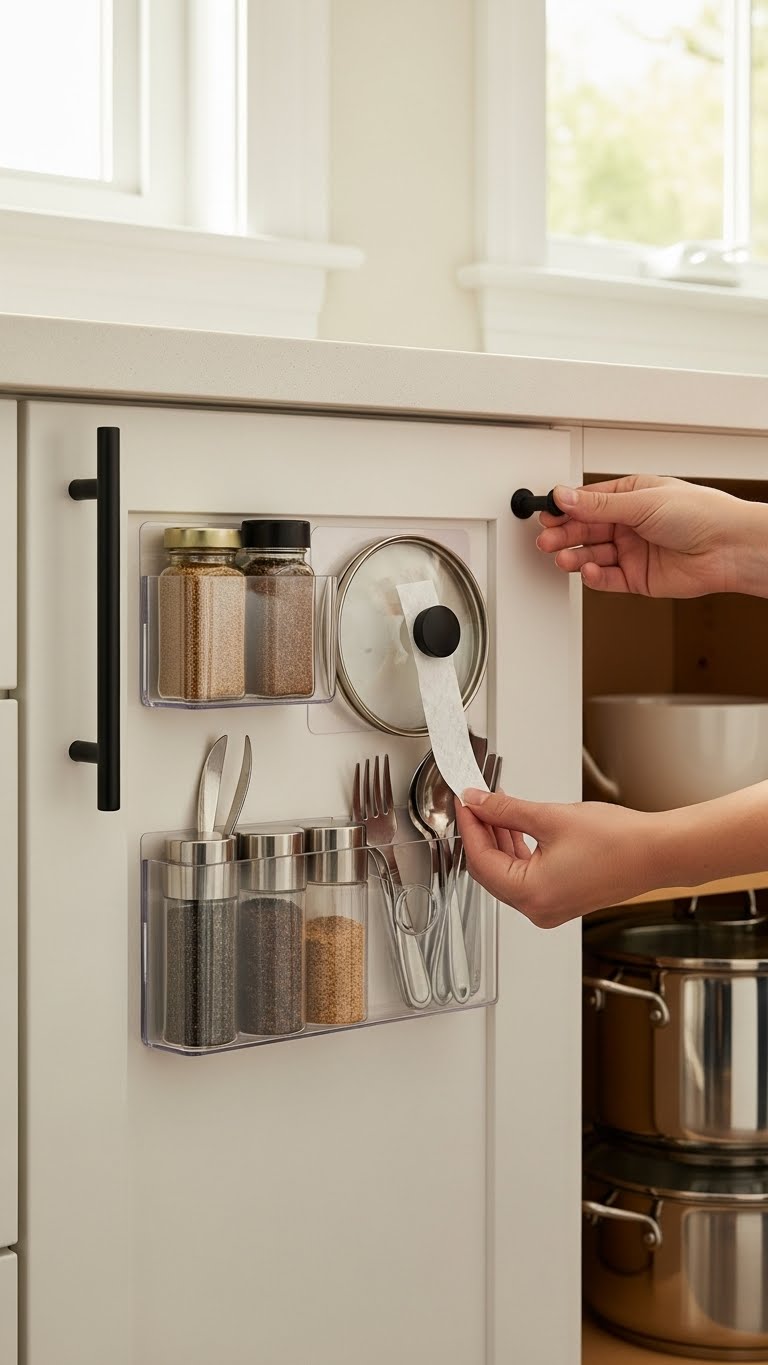
Swap out dated knobs and pull on a few sleek new handles to instantly modernize your cabinets, then tack on adhesive organizers inside doors to free up counter and shelf space. You’ll pick magnetic pulls for easy, tool-free swaps and attach peel organizers for spices, lids, or utensils.
Quick, low-commitment updates give your space functional style and the freedom to change whenever you want.
Turn Plain Lamps Into Statement Lighting
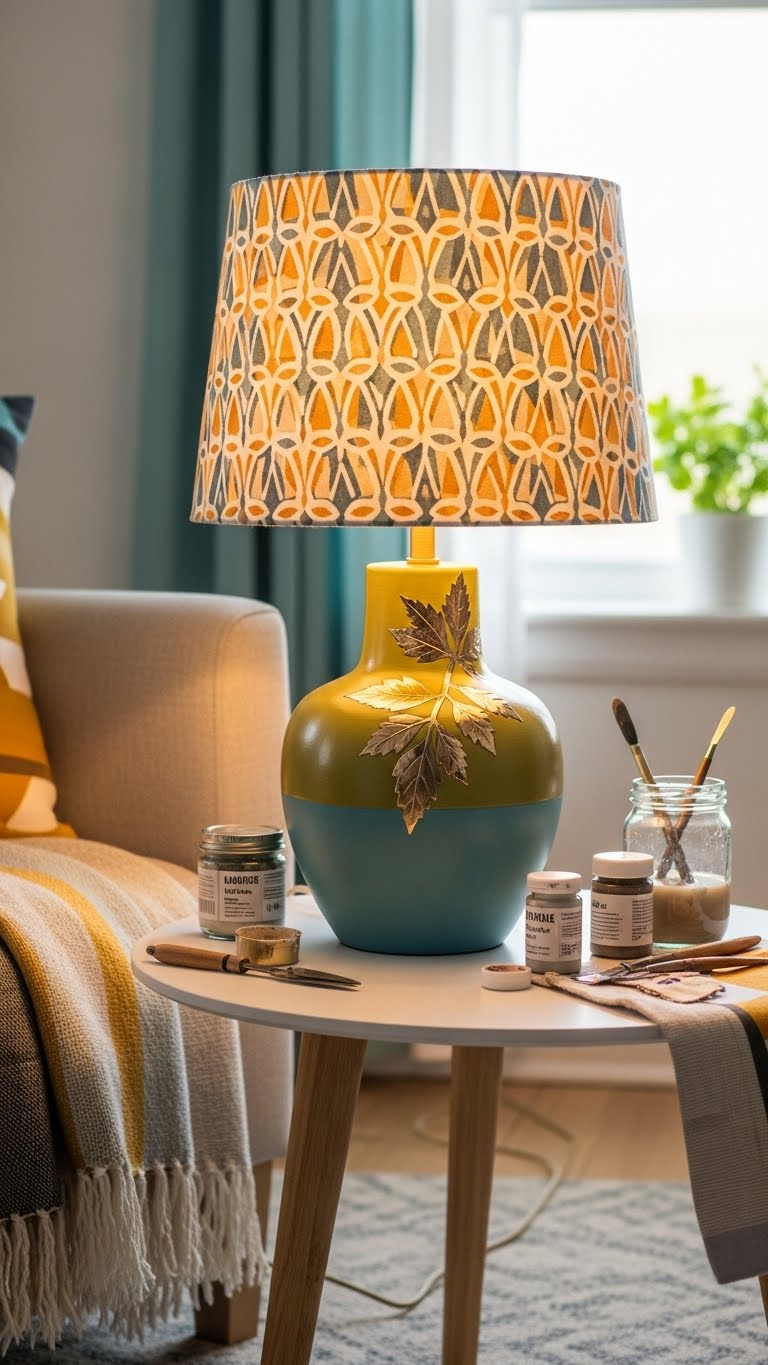
Bring a basic lamp to life with a few simple changes that deliver big style—think painted bases, patterned shades, or wrapped metal accents that tie the piece into your room’s palette.
You can craft upcycled bases from thrifted finds, add bold paint or metallic leaf, and swap plain shades for custom fabric shades.
Quick tweaks give freedom and instant personality.
Hang String Lights and LED Candles for a Soft Glow
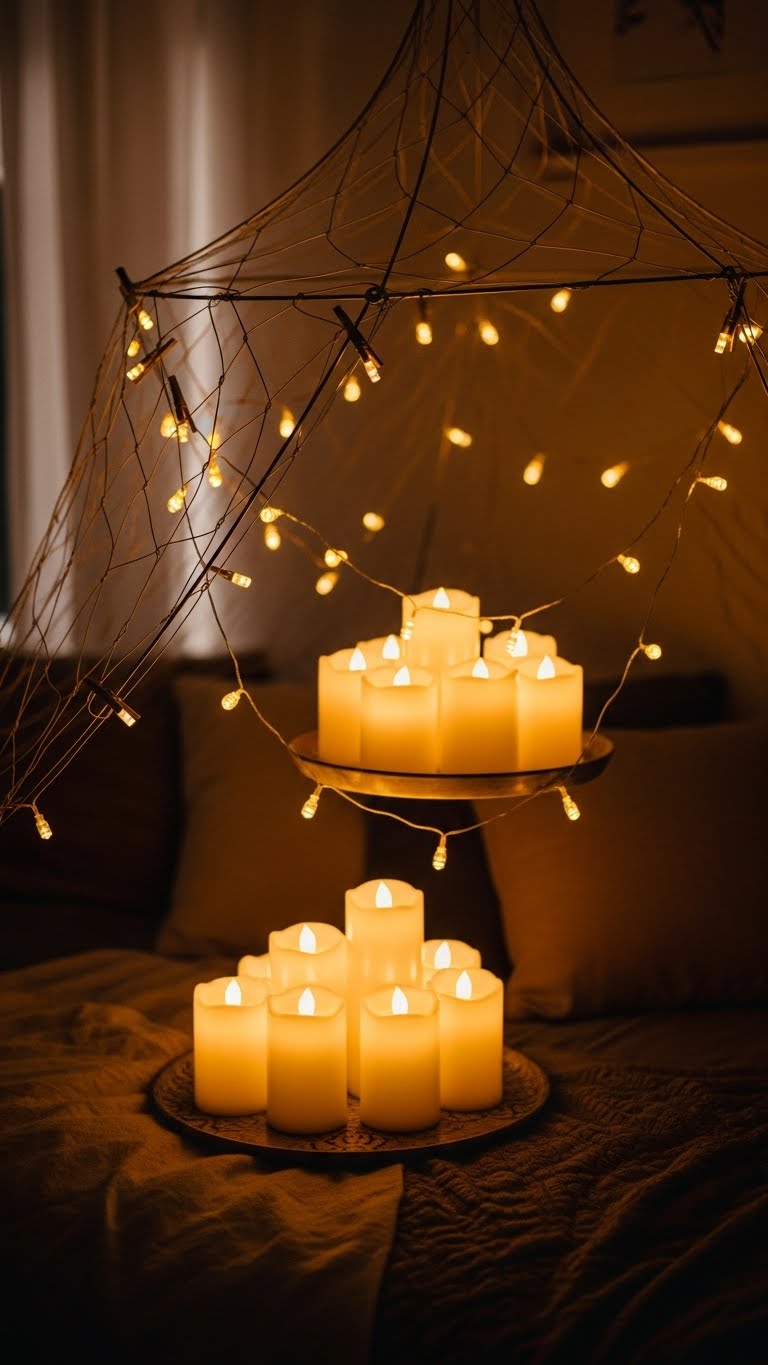
After you’ve made a lamp into a focal point, extend that warm, layered light across the room by hanging string lights and placing LED candles where soft pools of glow will matter most.
Drape a wire canopy over a bed or reading nook, clip string lights loosely for movement, and group ambient candles on trays.
You’ll create flexible, cozy zones without permanent changes.
Sew (No-Sew) Throw Pillow Covers From Old Tees

Turn your favorite worn tees into cozy throw pillow covers with just a few cuts and a little stitching—or no sewing at all if you prefer quick fixes.
You’ll cut tees to size, knot or whip-stitch edges, and slip an upcycled cushion inside. Add a bold jersey applique for contrast.
It’s liberating, cheap, and perfectly imperfect—personalize colors and shapes freely.
Layer Rugs to Warm Up Floors and Define Zones
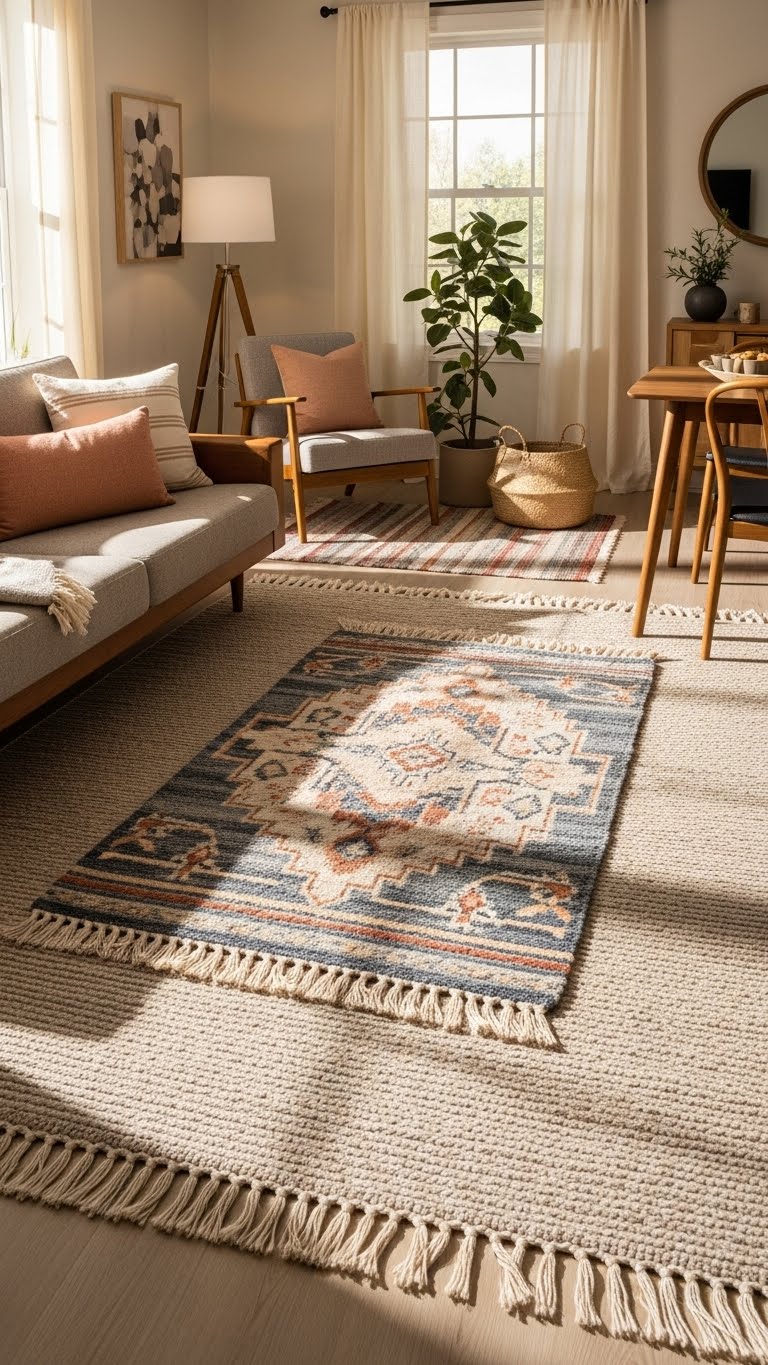
A few well-chosen rugs can instantly warm a room and carve out functional zones—layer a large, neutral base rug under a smaller patterned or textured rug to add depth, cushion, and visual interest.
You’ll create layered textures that feel curated yet effortless. Use scale and color to reinforce zone definition—placing rugs to anchor seating, reading nooks, or dining spots for easy, free-flowing living.
Make a Blanket Ladder From Scrap Wood
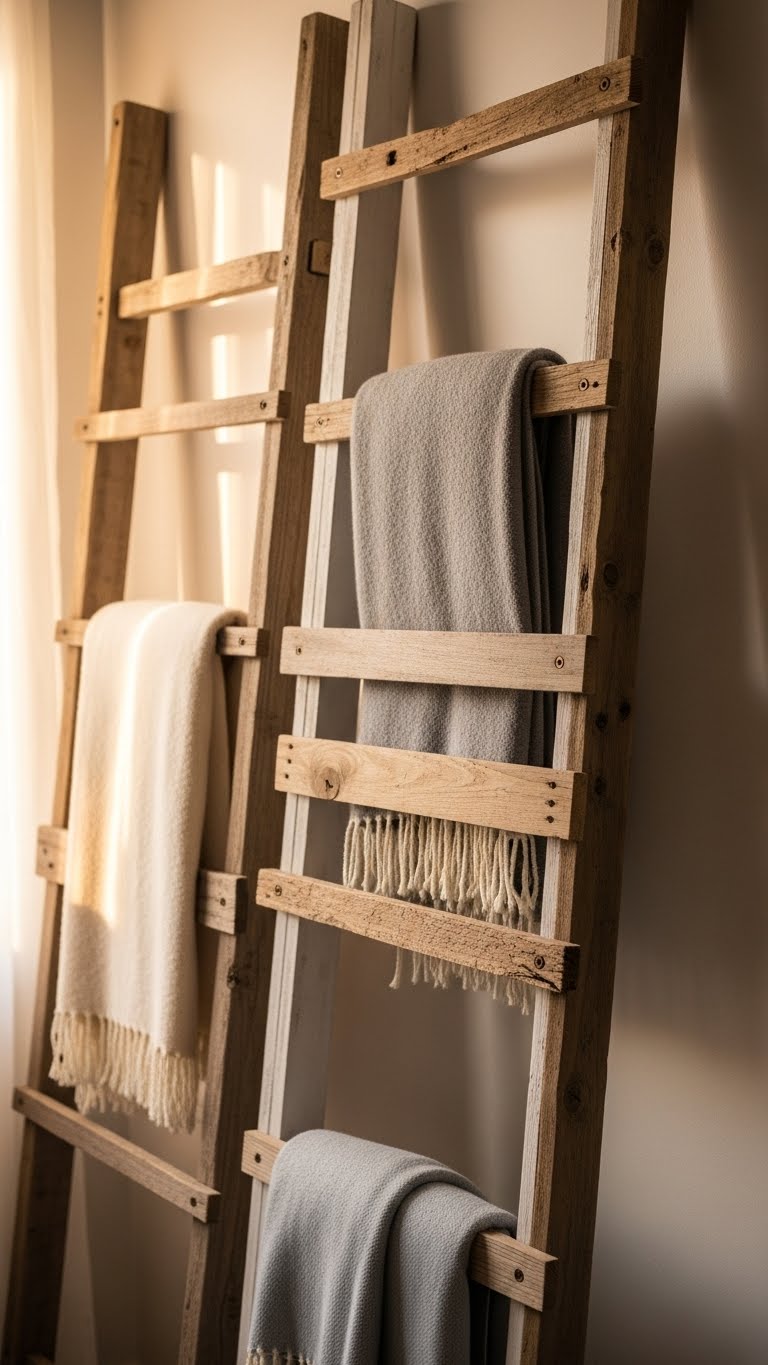
Grab a few lengths of scrap wood, and you’ll have everything you need to build a simple blanket ladder that’s both functional and decorative.
Cut two uprights and several rungs, sand edges, and join with screws.
Stain or whitewash for a rustic finish.
Lean it against a wall to free floor area—this space saving design keeps throws tidy and your room feeling open.
Create a Plant Corner With Thrifted Planters
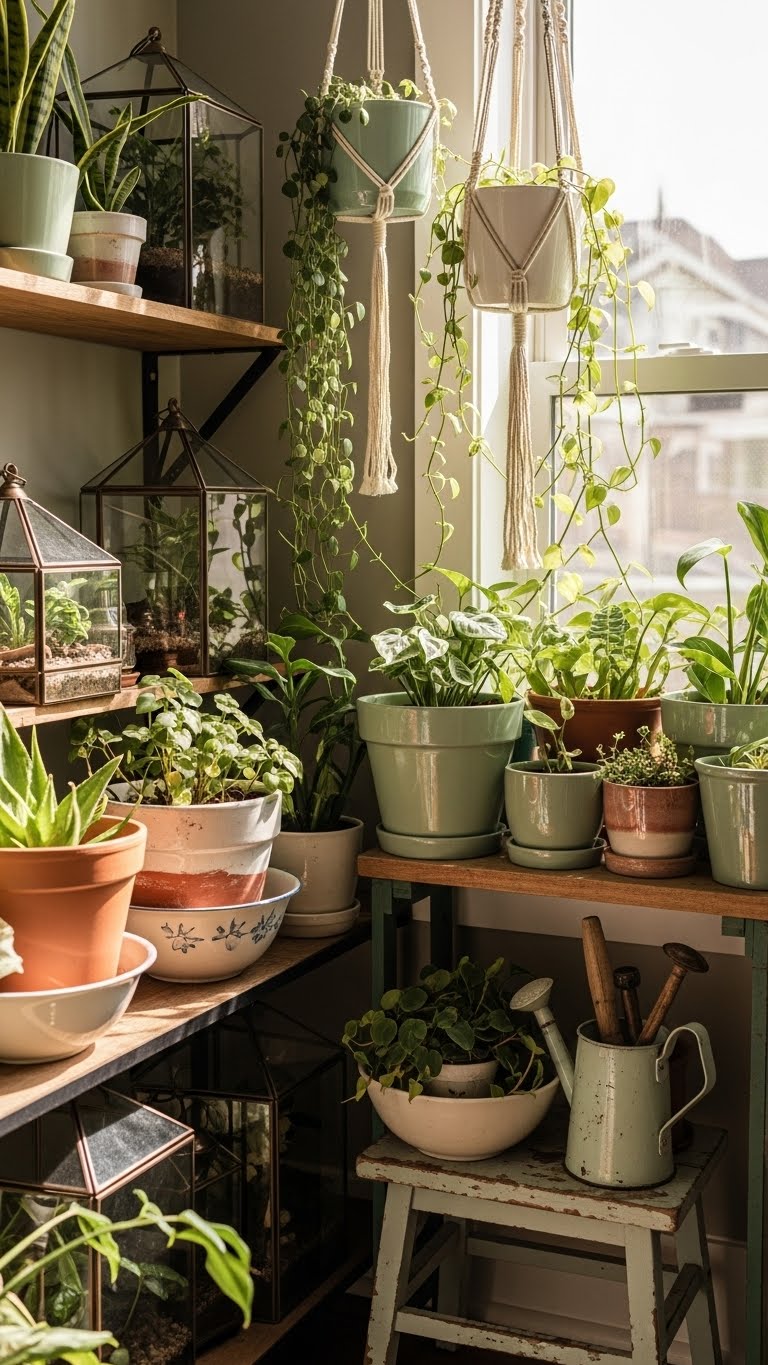
With thrift-store finds and a little elbow grease, you can transform an unused corner into a lush plant nook that feels curated, not cluttered.
Scout thrifted terrariums, mismatched pots and vintage bowls; clean and repaint for cohesion. Hang trailing vines in hanging macramé, cluster plants by light needs, and add a small stool for watering tools—simple, free-spirited, instantly cozy.
Repurpose Jars and Mugs Into Simple Planters
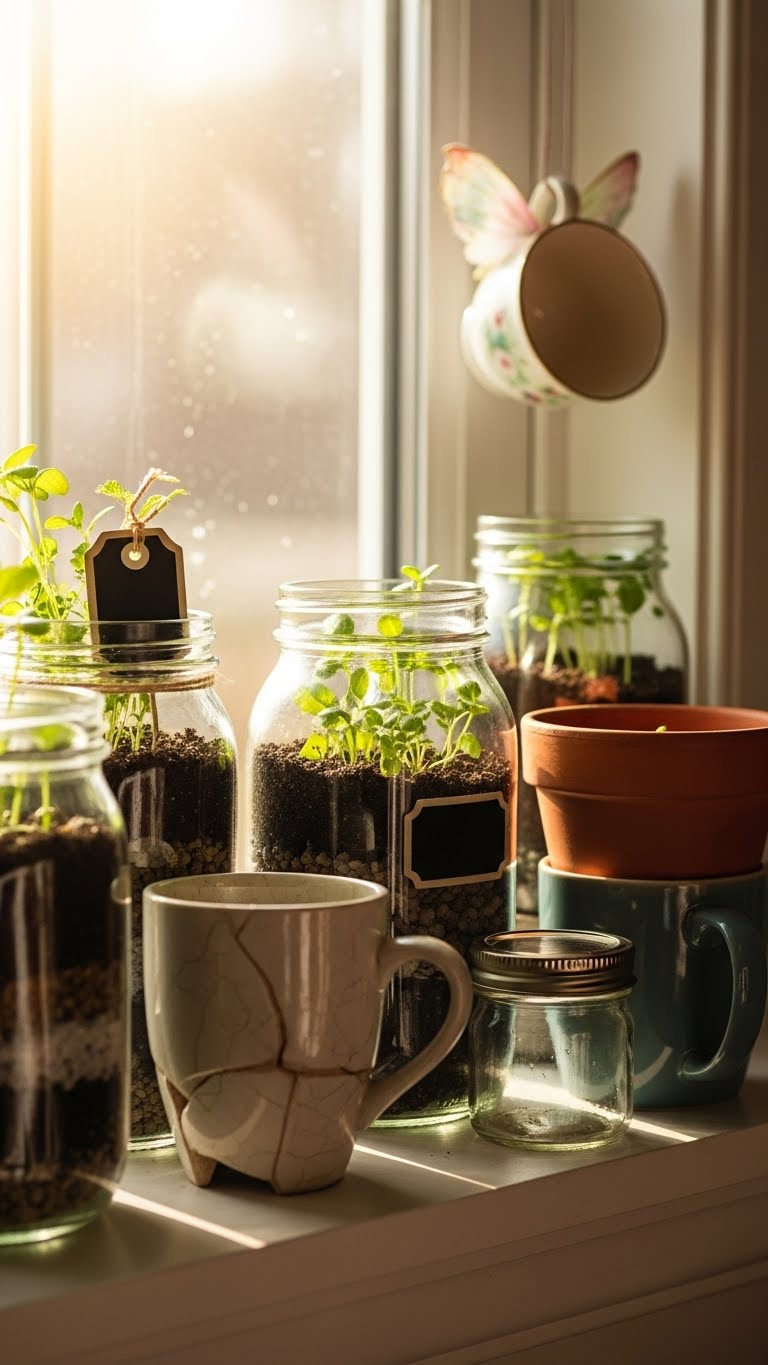
Give old jars and chipped mugs new life by turning them into easy, budget-friendly planters that add instant charm to shelves and windowsills.
You can plant herb starters in mason jars, layer gravel for drainage, and label with chalk. Hang a teacup fairy on a rim for whimsy.
Arrange varied heights, rotate sunlight, and water sparingly to keep things free and lively.
Collect and Style Thrifted Vases for a Grouped Display

If you’ve been filling your windowsill with jars and mugs, bring that same DIY spirit to thrifted vases for a grouped display that feels curated, not cluttered.
Hunt mismatched shapes, colors, and finishes for a vase grouping that sings.
Arrange by height and negative space, mix matte and glossy for texture contrast, and leave breathing room so each piece breathes.
Craft a Macramé or Fabric Wall Hanging
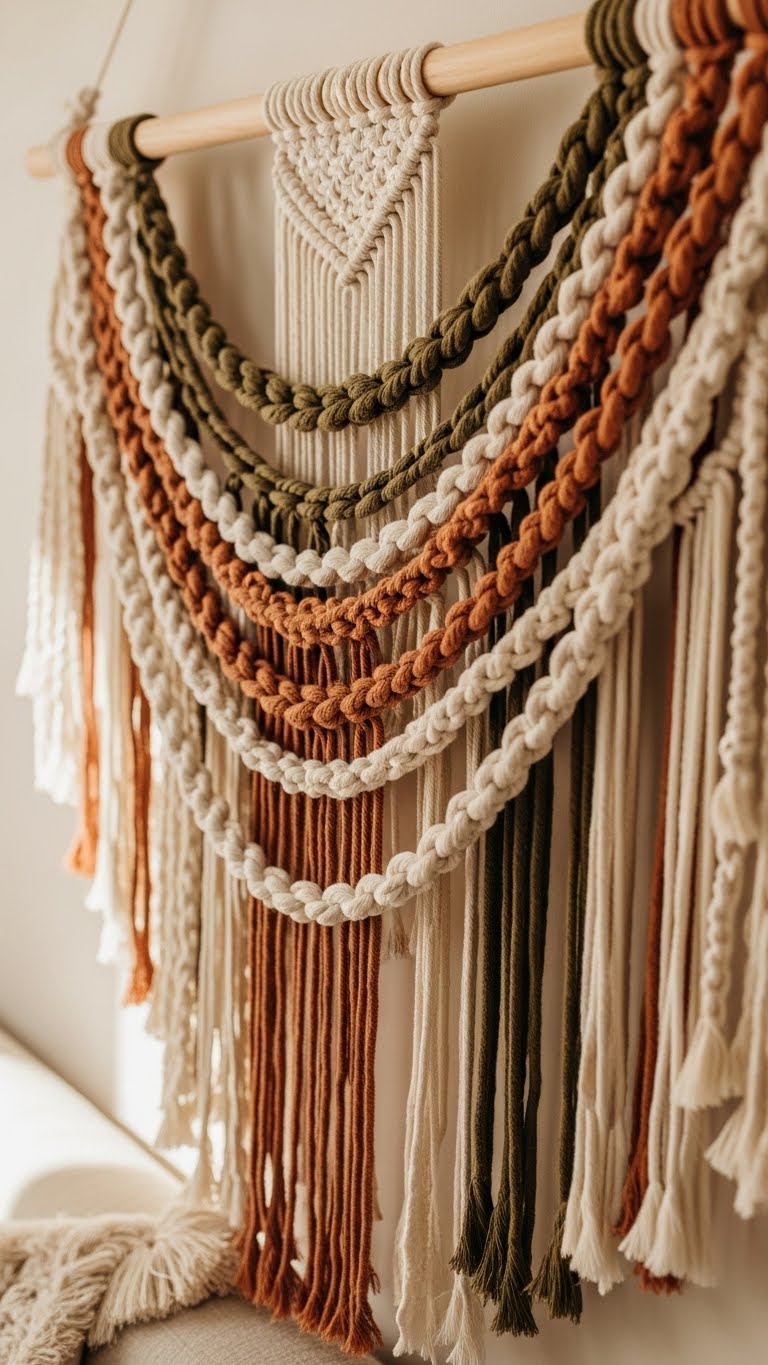
When you want a personalized focal point that’s easy to make, try a macramé or fabric wall hanging that reflects your apartment’s colors and texture mix. Choose a wooden dowel, natural cords or scrap fabrics, and plan boho knots and fringe. Layer varying weights and colors for texture layers. Hang above a sofa or bed, adjust lengths freely, and keep it simple and bold.
Make Scented Sachets and Potpourri for Drawers
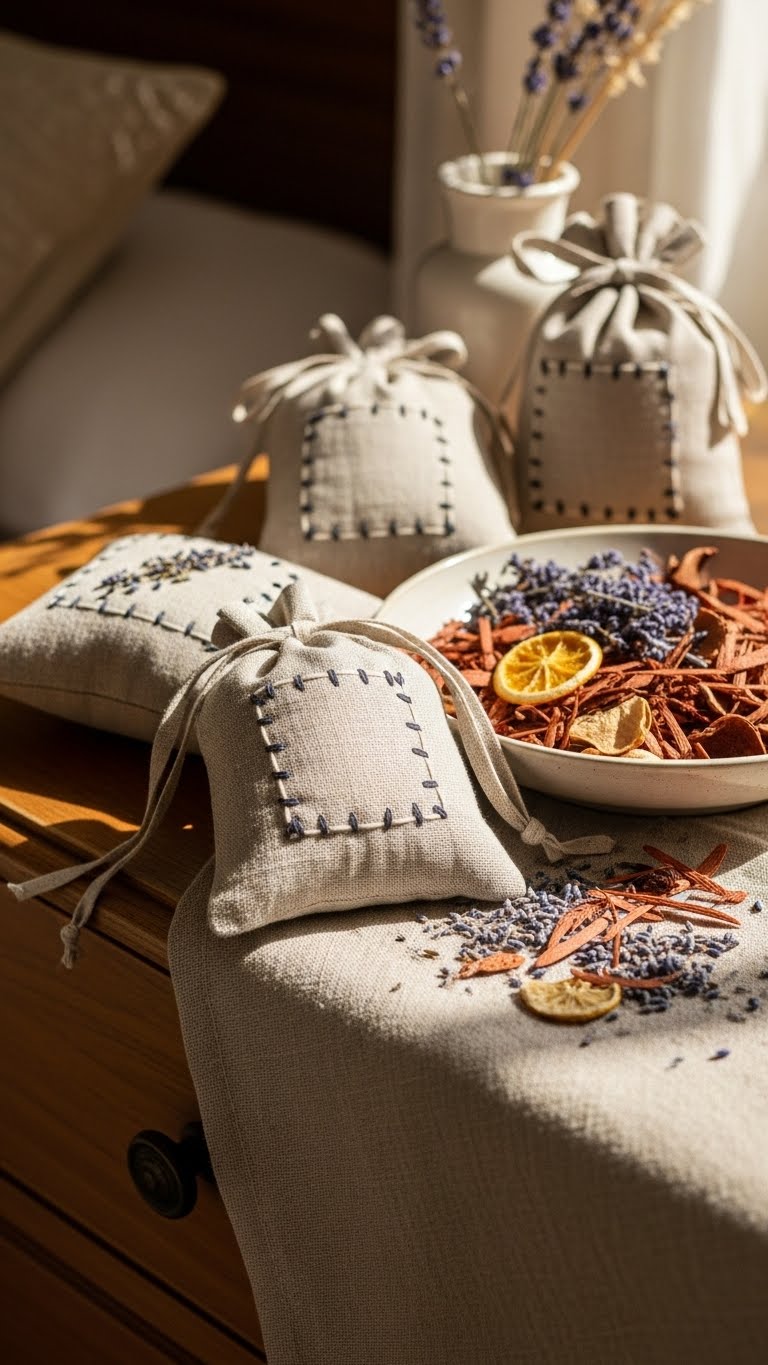
After you’ve hung a handmade wall piece that fills a room with texture, bring that same cozy vibe into drawers and linen closets with DIY scented sachets and potpourri.
Sew simple linen sachets, fill them with lavender, cedar chips, and dried citrus peels. Toss loose potpourri in a bowl or breathable pouch. Rotate scents seasonally to keep your space feeling fresh and free.
Refresh Curtains With Trim or Dye for Color
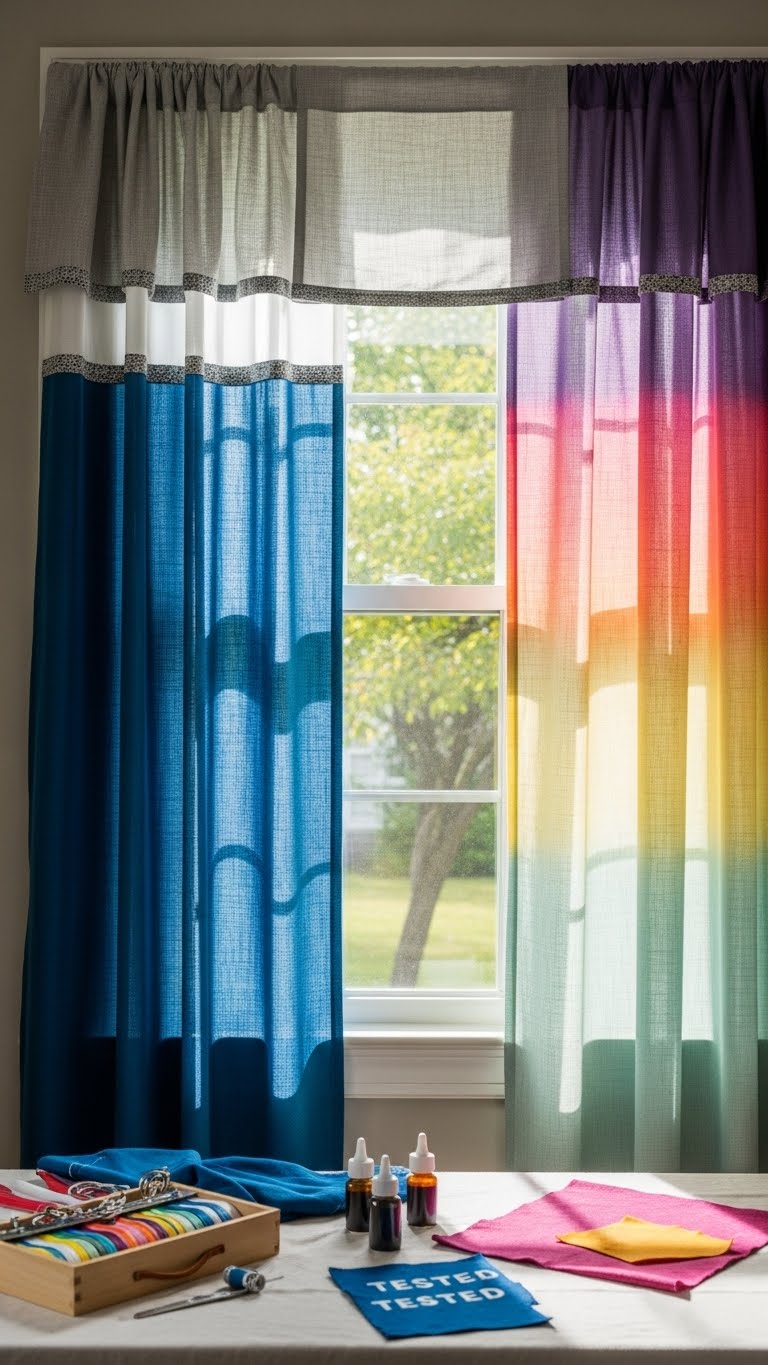
Brighten your windows by adding trim or dye to your existing curtains—it’s a fast way to introduce color and personality without buying new panels. You can sew contrasting bands, install trimmed valances, or brush on fabric dye for ombre curtains that fade from bold to soft.
Choose durable dyes, test a scrap, and enjoy a liberated, personalized look that costs little and changes mood instantly.
Build a Simple Ladder Shelf for Books and Decor
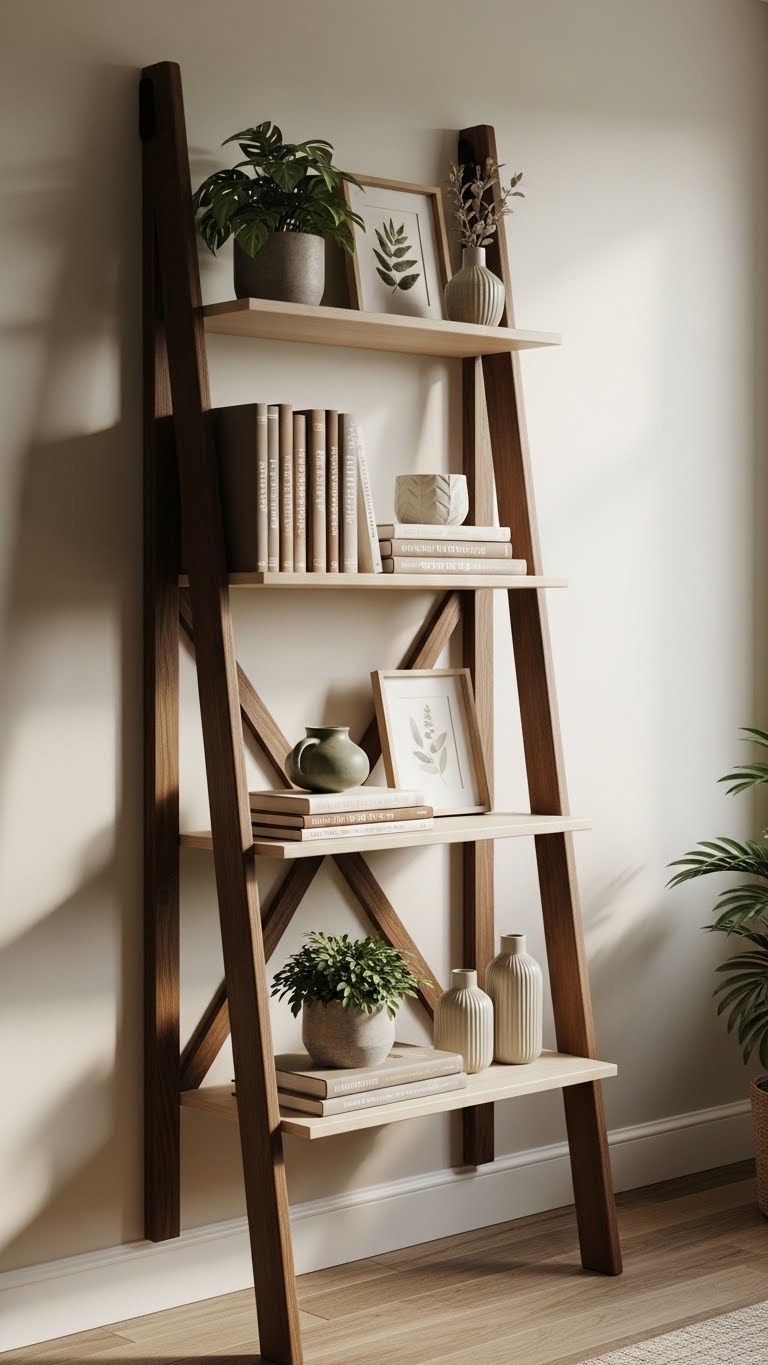
Build a simple ladder shelf to add vertical storage and display space without taking up much floor area. You’ll cut boards for shelves, stain rustic rungs, and attach angled supports so the unit leans securely against the wall.
Place books, plants, and small art on staggered tiers. It’s lightweight, portable, and lets you arrange items freely to match your mood.
Turn Thrifted Frames Into a Mirror Gallery

Pick through thrift shops and flea markets for frames with character—ornate gilt, worn wood, or mid-century simplicity—and turn them into a mirror gallery that adds light and personality to a small room.
Remove backing, fit affordable mirror sheets, and arrange asymmetrically.
Keep frame patina preservation in mind; pair mirrors with a vignette of antique glassware for eclectic charm that feels free and lived-in.
Install Adhesive Hooks and Renter-Friendly Storage Hacks
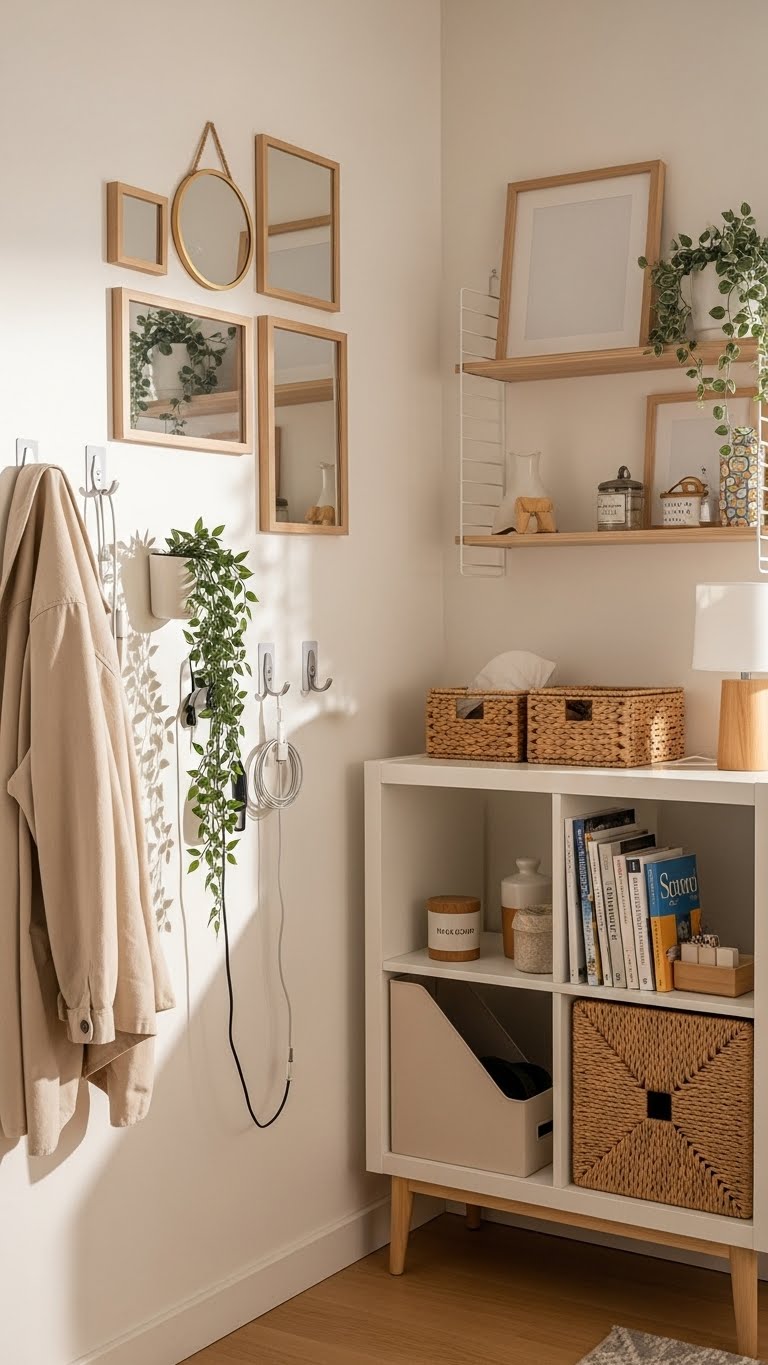
Now that your mirror gallery bounces more light around the room, make the most of that extra brightness with smart, renter-friendly storage that keeps surfaces clear. Use adhesive hooks for coats, plants, and cables—damage free hanging that’s strong and removable.
Add temporary shelving with command strips or freestanding cubes to stash books, baskets, and baskets, keeping your place tidy and flexible.
Eight Small-Space Rules to Keep DIY Decor Looking Curated
Although small spaces can feel limiting, you can make each DIY piece read intentional and polished by following a few simple rules: limit your palette to two or three complementary tones, vary scale so tiny items don’t get lost next to larger pieces, keep surfaces mostly clear so eye-catching accents pop, mix textures to add depth without clutter, and edit often so your setup stays functional and fresh.
Use scale tips, prioritize texture balance, group items deliberately, and leave breathing room so your space feels open and personal.