You can make a home that looks expensive without spending much, by choosing a few high-impact DIYs and smart materials. Think peel-and-stick marble, matte metallic sprays on thrift finds, layered textiles for scale, and simple lighting tricks that add warmth. I’ll show practical steps, tools, and where to splurge versus save — plus quick projects you can finish in an afternoon — so you can start transforming rooms right away.
Materials & Tools Quick List for Budget Decor Hacks
[IMAGE PROMPT: A bright, organized still-life of a compact DIY toolkit laid out on a wooden workbench in warm natural light. Include a cordless drill, staple gun, hand saw, sandpaper sheets and sanding blocks, measuring tape, level, painter’s tape, small paint cans with swatches of luxe neutral paints, assorted brushes and rollers, clamps, wood glue, clear sealer, fasteners in a clear hardware organizer, and a small palette of neutral paint chips; composition top-down with shallow depth of field, soft shadows, and a clean minimalist aesthetic in photorealistic style.]
Get set up with a compact kit of high-impact, low-cost supplies: a basic cordless drill, a staple gun, sandpaper (various grits), a small hand saw, measuring tape, a level, painter’s tape, a multi-surface paint set, wood glue, clear sealer, assorted brushes and rollers, clamps, and an assortment of fasteners (screws, nails, picture-hanging hardware).
Add adhesive essentials, sanding blocks, a compact hardware organizer, spare brushes, and a small palette of luxe neutrals to fuel bold, liberating projects.
How to Read This List: Quick Wins vs. Room Projects
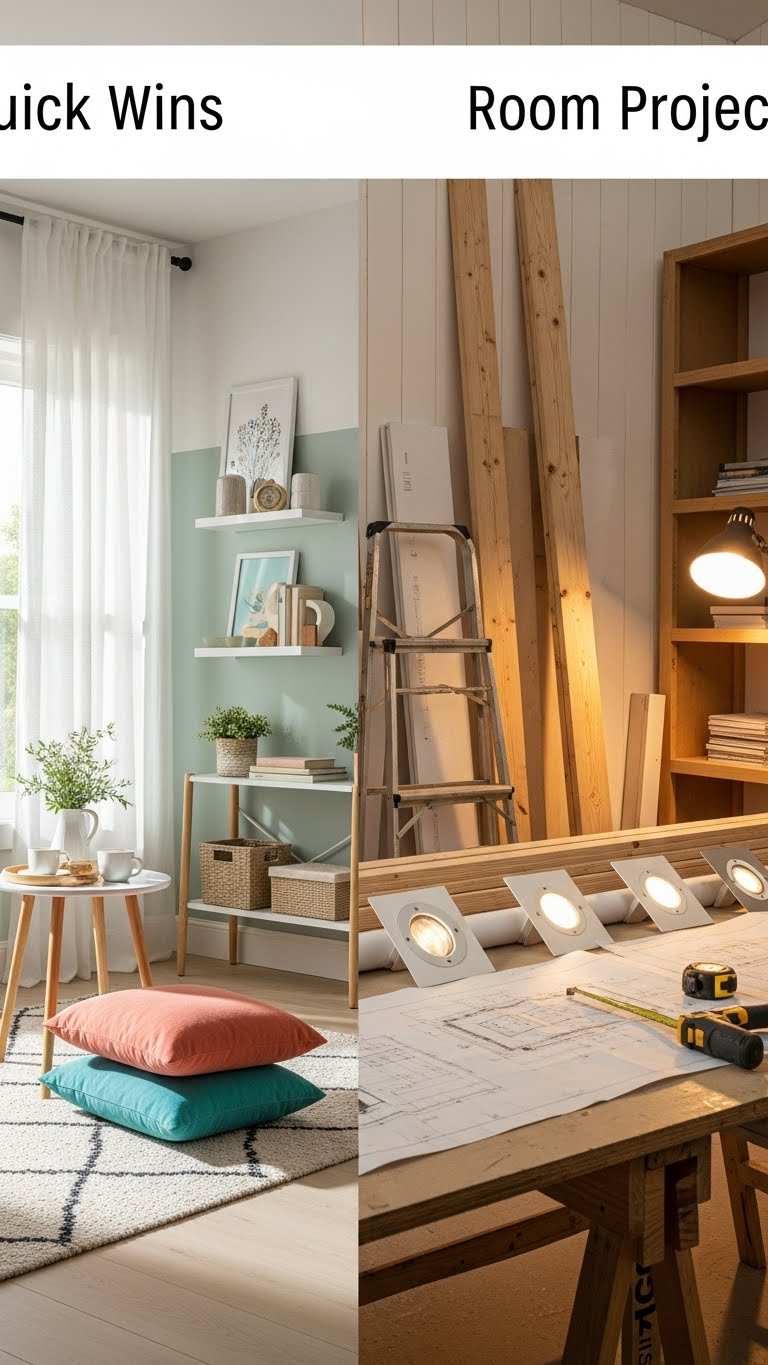
While you skim the list, think in two lanes: quick wins that refresh a space in an afternoon, and room projects that need planning, materials, and time. You’ll spot Quick Wins first — low-cost swaps, paint accents, styling tricks. Room Projects are larger: structural tweaks, built-ins, lighting reroutes. Choose by time, budget, and how much creative freedom you want.
Dollar Tree Vase Lighting: Materials + 3-Step How-To
[IMAGE PROMPT: A cozy, budget-friendly still-life vignette of a glass vase glowing warmly from within, set on a simple wooden table against a neutral, softly textured background. The vase holds a battery-powered LED string or small puck light whose amber glow diffuses through river rocks and faux moss, with a few Mason jar pendant accents nearby; color palette of warm ambers, soft greens, and natural browns; soft, directional warm lighting creates gentle shadows and a sculptural, intentional feel. Photorealistic style with shallow depth of field and clean, home-decor composition that highlights texture and the interplay of light and filler materials.]
Because small details make a room feel intentional, Dollar Tree Vase Lighting offers an easy, budget-smart way to add warm, sculptural glow—using a glass or ceramic vase, a battery-powered LED string or puck light, and a few filler materials to diffuse and style the light.
Gather LED stems, river rocks or faux moss, and Mason pendants for accents.
Step 1: nest light; Step 2: add filler; Step 3: style.
Copper String-Light Glow at Your Sink (DIY)
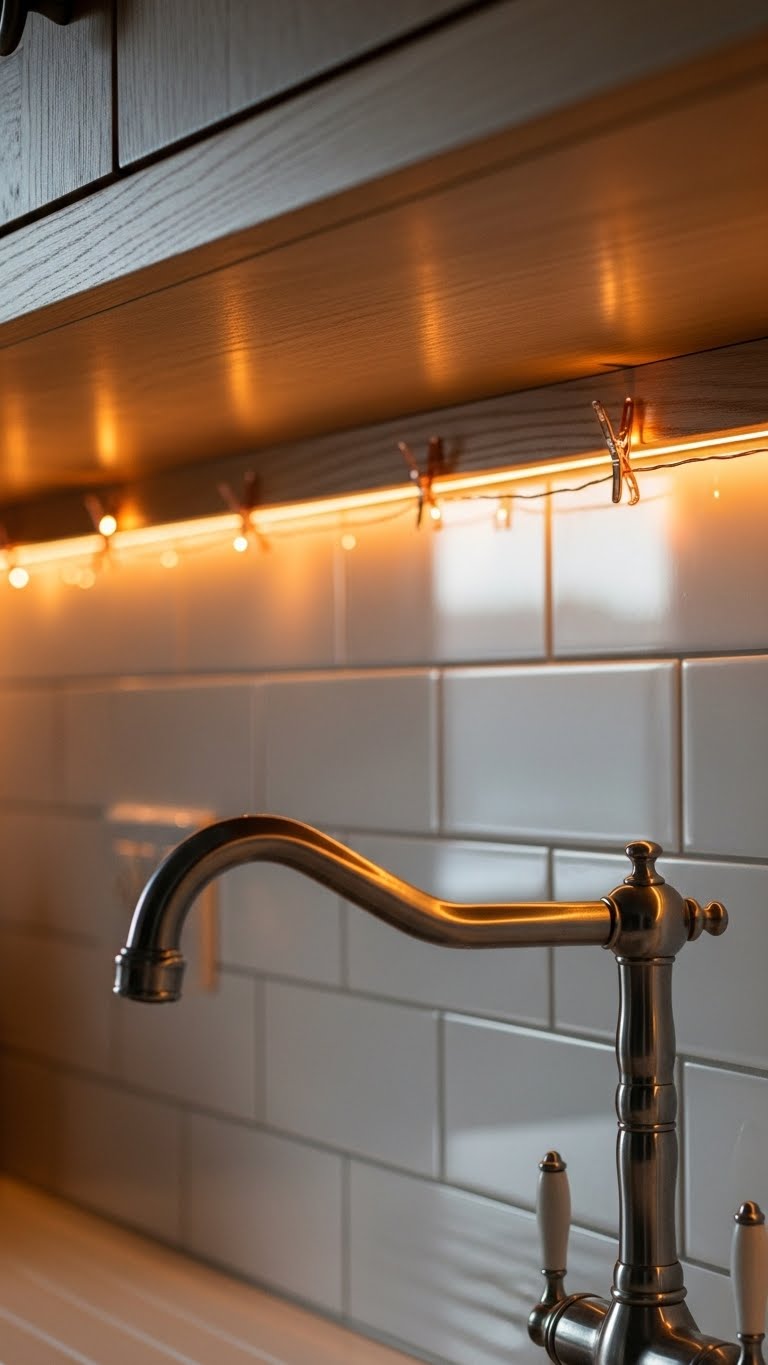
Brighten up the sink area with a copper string-light run that wraps neatly along the backsplash and under the cabinets, giving you warm, reflective highlights and a custom, high-end look for very little cost.
You’ll mount adhesive clips, hide thin copper wire behind trim, and plug into a nearby outlet. The glow complements a warm faucet and reflective backsplash, creating freedom-forward, luxe ambiance.
Make a Rustic Kitchen Riser From Budget Wood

Build a simple rustic kitchen riser from inexpensive pine or pallet boards to add height, texture, and function to your countertop display. Cut boards to size, sand edges, and join with simple butt joints or dowels. Stain lightly, then create a distressed finish with sanding and wax. Place herbs, oils, or art on this countertop riser to organize boldly and freely.
Gold-Lidded Storage Jars: Spray Paint + Knob Hack
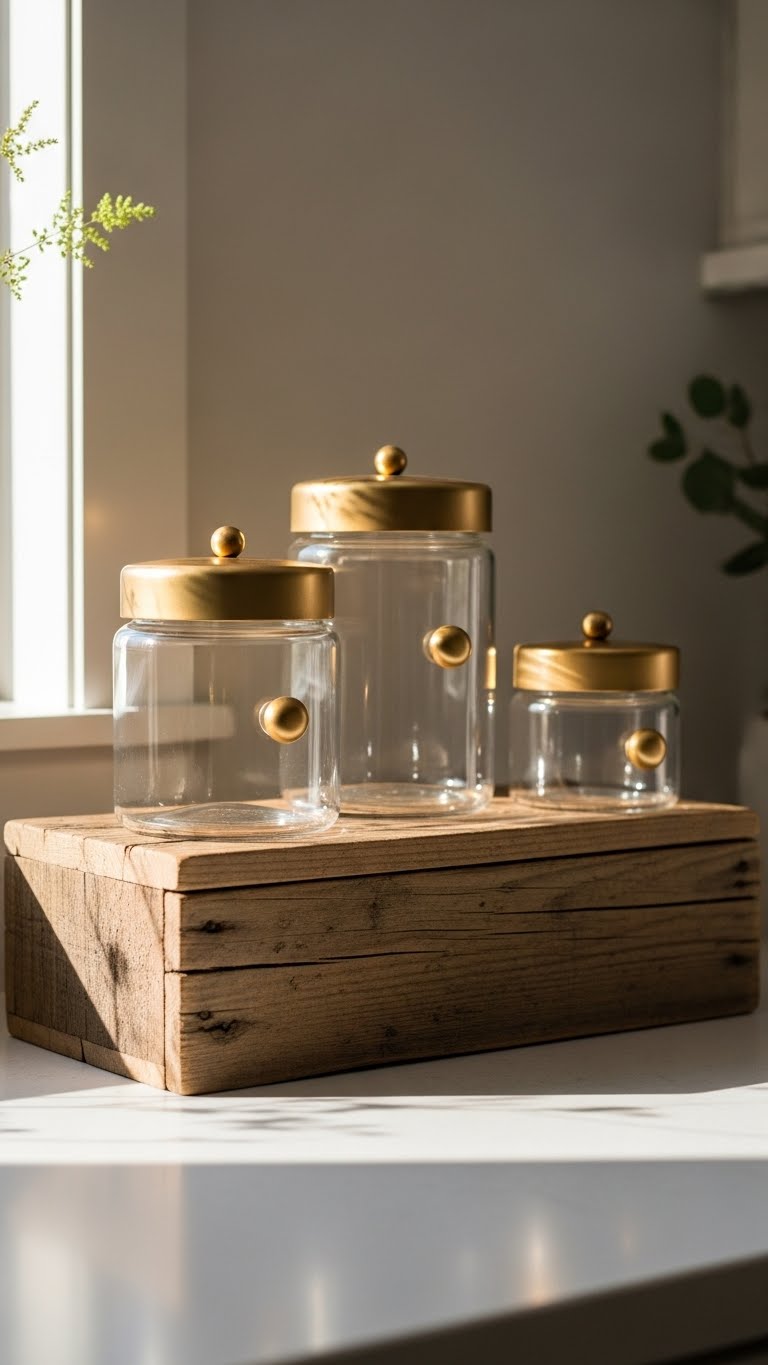
After you’ve finished the riser, use the extra countertop space to showcase matching, elevated storage jars that add instant polish. Swap plain lids for spray-painted gold lids, seal with matte lacquer for a soft, luxe finish, and screw on gold knobs for designer flair.
You’ll keep costs low, customize sizes, and enjoy uncluttered, liberated surfaces that feel intentionally curated.
Pool-Noodle Fall Centerpiece That Looks High-End
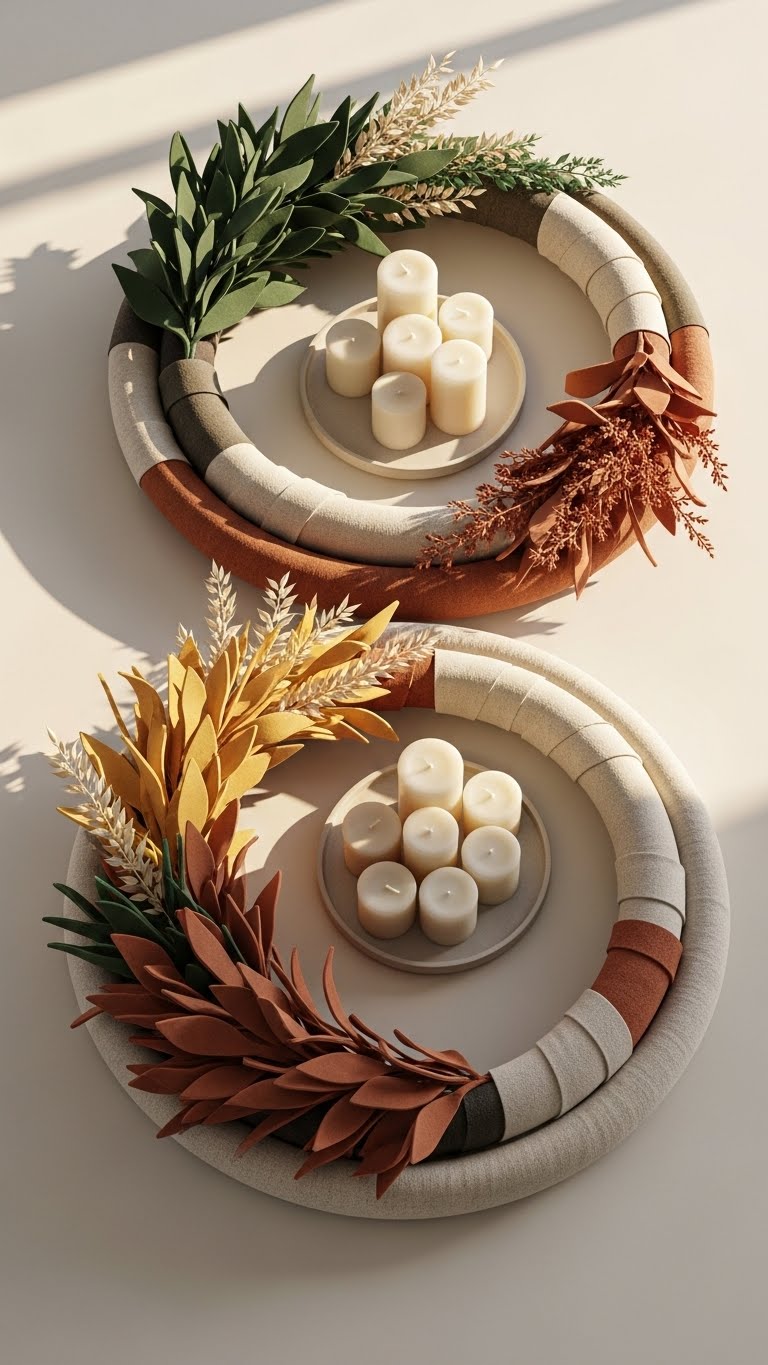
Want a centerpiece that reads designer but won’t break the bank? Cut a pool noodle into concentric rings, wrap in linen or faux suede, and glue in foam foliage for texture.
Tuck a minimal candle cluster in the center on a shallow tray to anchor the piece. You’ll get an airy, luxe fall display that’s lightweight, customizable, and unapologetically easy.
Dollar Tree Christmas Ornaments : Luxe Versions
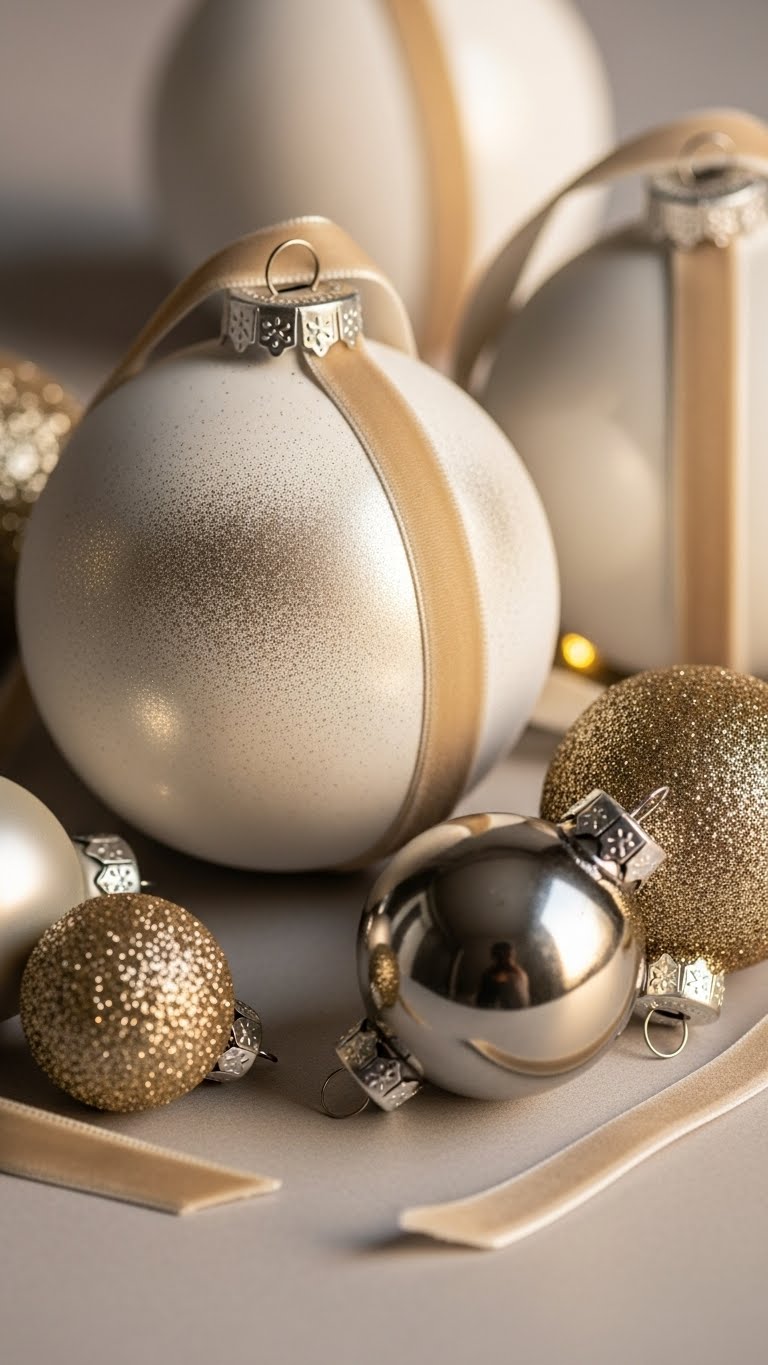
Give plain Dollar Tree ornaments a luxe facelift with a few smart materials and steady hands. You’ll sand gloss off, add metallic spray, and rebalance color with matte white paint.
Glue on glittered baubles accents, trim with velvet ribbon for contrast, and cluster varied sizes for impact. Seal with clear coat. You’ll create chic, repeatable ornaments that feel indulgent without breaking free.
Layer Rugs to Mimic a Designer Look (Budget Hack)

Layering rugs transforms a room without a designer budget—start with a large, neutral foundation rug and add a smaller patterned or textured piece on top to create depth and scale.
You’ll mix layered textures for contrast, play with overlap proportions to anchor furniture, and choose materials that read luxe—flatweave base, plush or vintage top.
Trust your eye and move pieces until it feels free.
Style a Sofa Table Like a Pro : 5-Item Formula
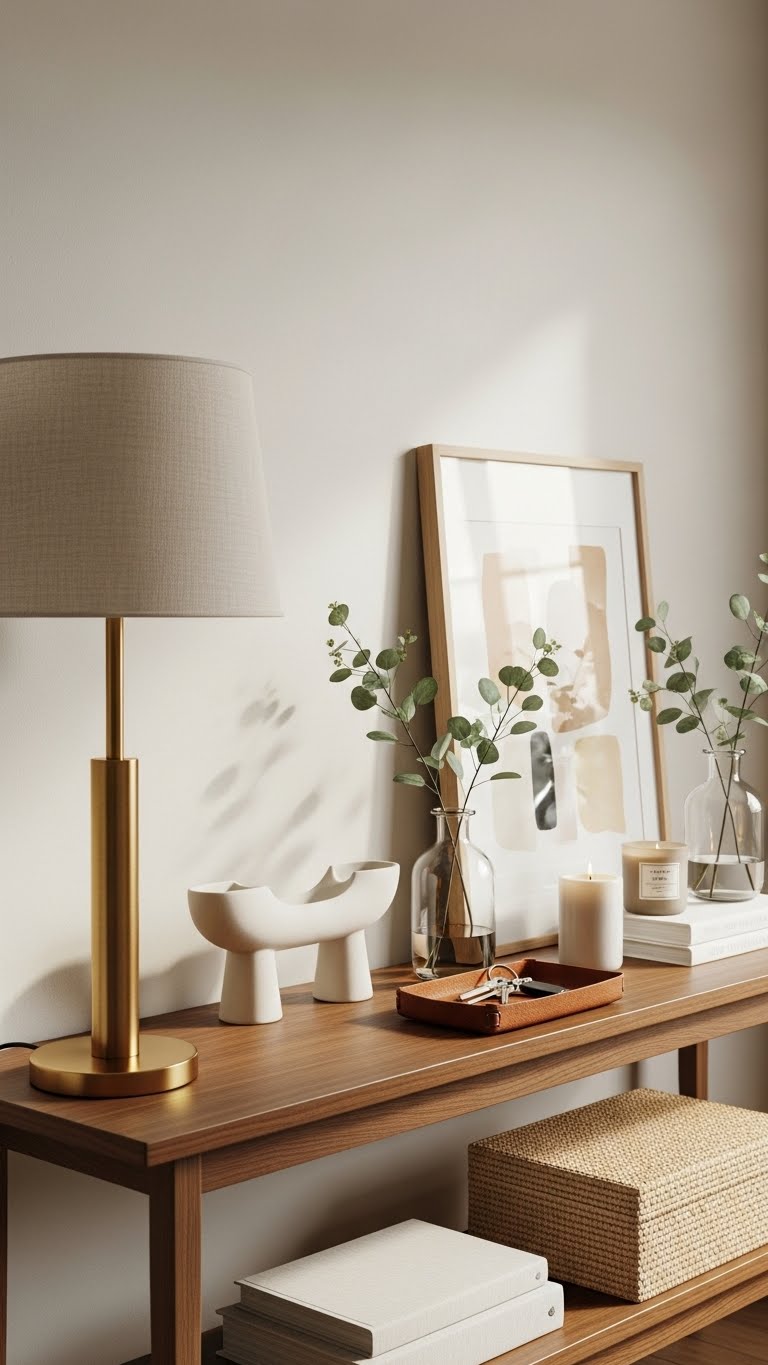
Often a sofa table feels like an afterthought, but you can style it like a pro with a simple 5-item formula that balances scale, texture, and function. Choose a lamp, low sculptural object, tray, greenery, and art—vary heights for scale balance. Use symmetry tips sparingly: anchor with pairs, then add an off-center organic piece. Pick materials that feel effortless and free.
Build Navy Accent Vignettes on a Small Budget
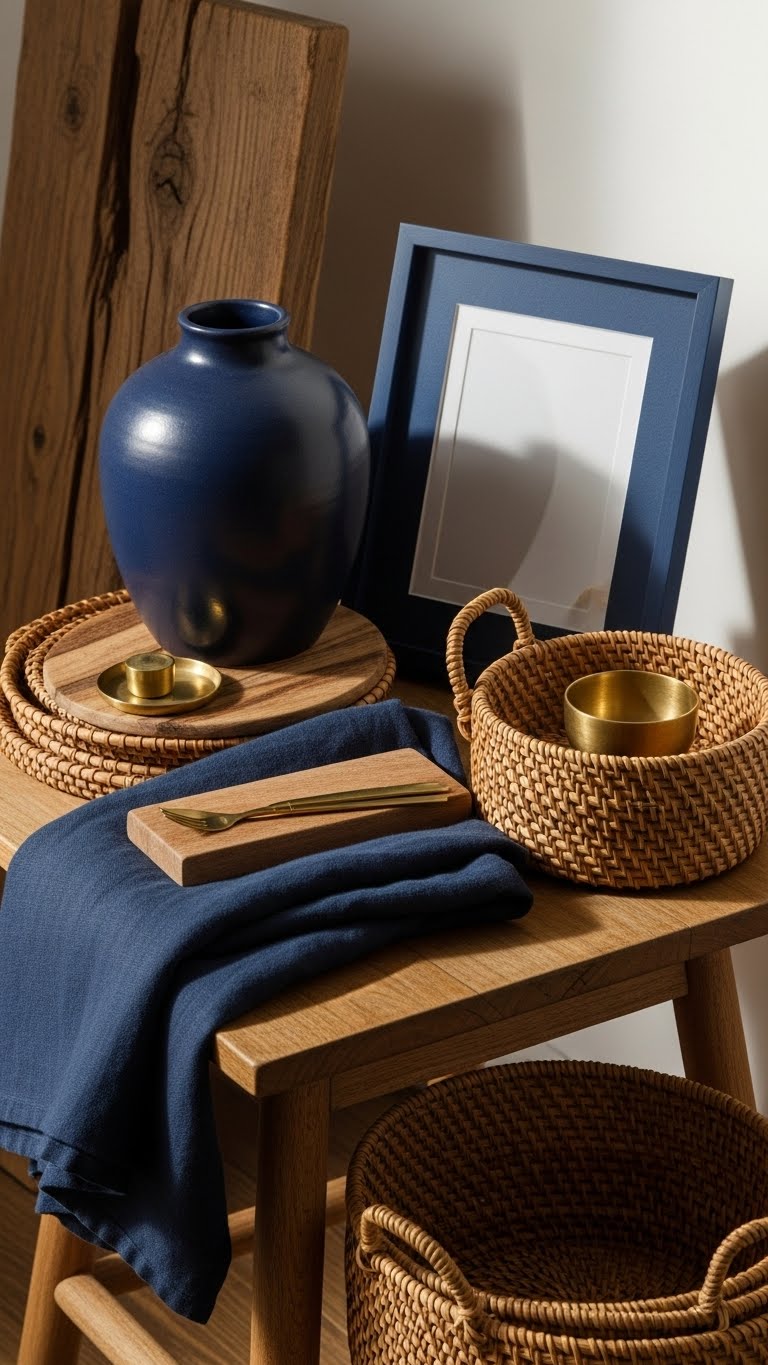
Start small and let navy do the heavy lifting: a few well-placed navy pieces instantly ground a vignette and add depth without blowing your budget.
Hunt thrift styling finds—vases, frames, textiles—and pair them with raw wood, woven textures, and brass accents. You’ll create cohesive navy vignettes that feel curated, unfussy, and liberating while staying economical and material-savvy.
Get Instant Glam With an Oversized Gold Mirror
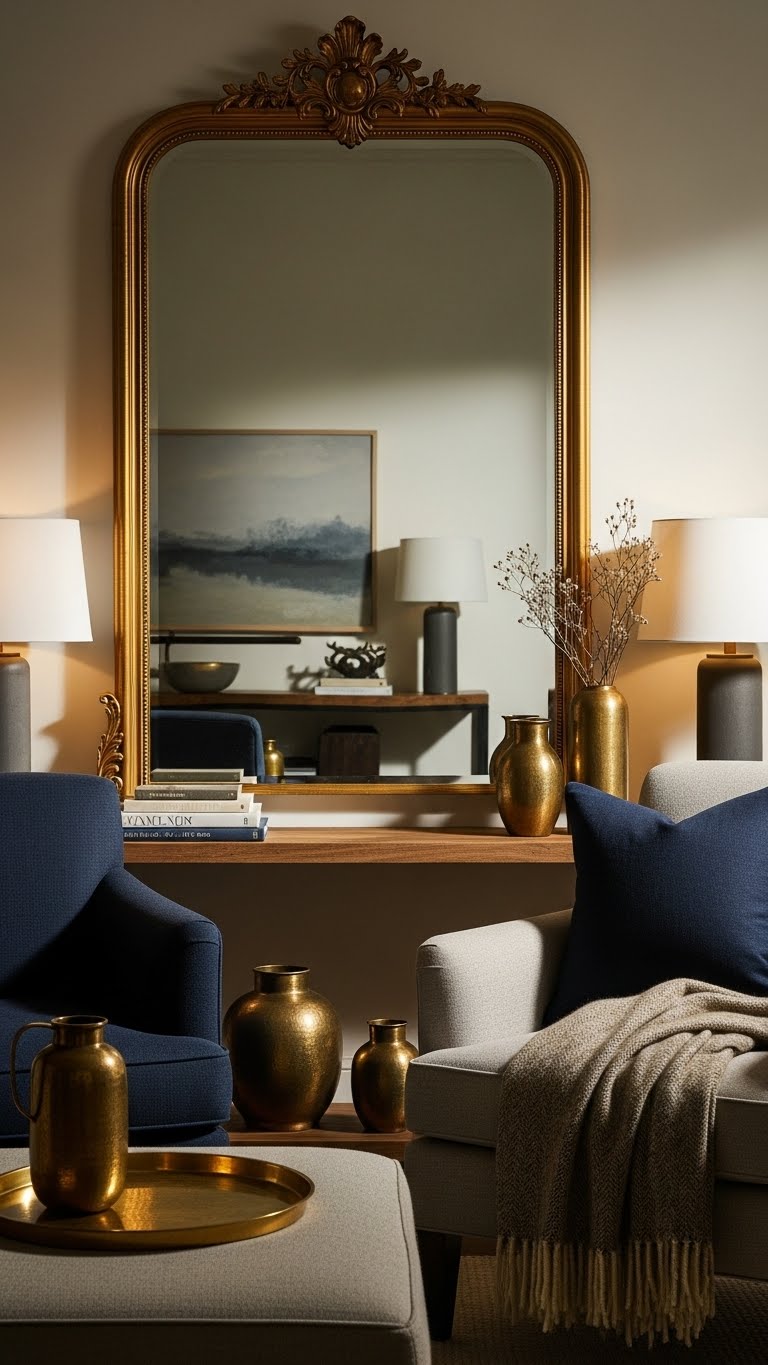
If you’ve grounded a vignette with navy pieces and tactile neutrals, add an oversized gold mirror to lift the whole look and introduce instant glamour. Choose a lightweight frame you can hang solo or lean; the statement mirror amplifies light and scale.
Use reflective layering with smaller metallics and matte textures for balance. You’ll create luxe impact without heavy expense.
Marble-Effect Peel-and-Stick Countertop Guide
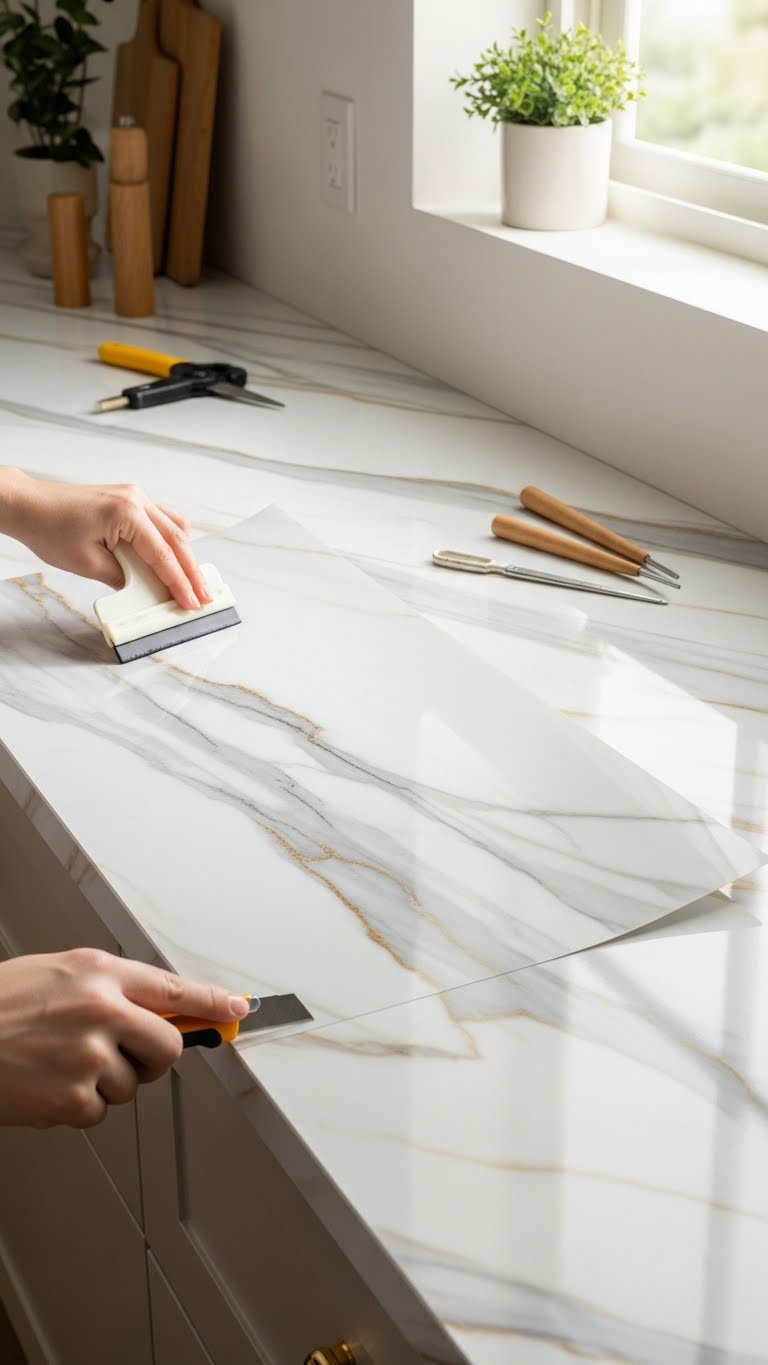
Transform tired counters with marble-effect peel-and-stick sheets that give you luxe veining and a seamless finish without a full renovation.
You’ll choose adhesive types for durability, prep surfaces thoroughly, and follow installation tips: measure, squeegee out bubbles, and align veins for natural flow.
Trim precisely and focus on neat edge finishing so the result feels effortless, chic, and freeing.
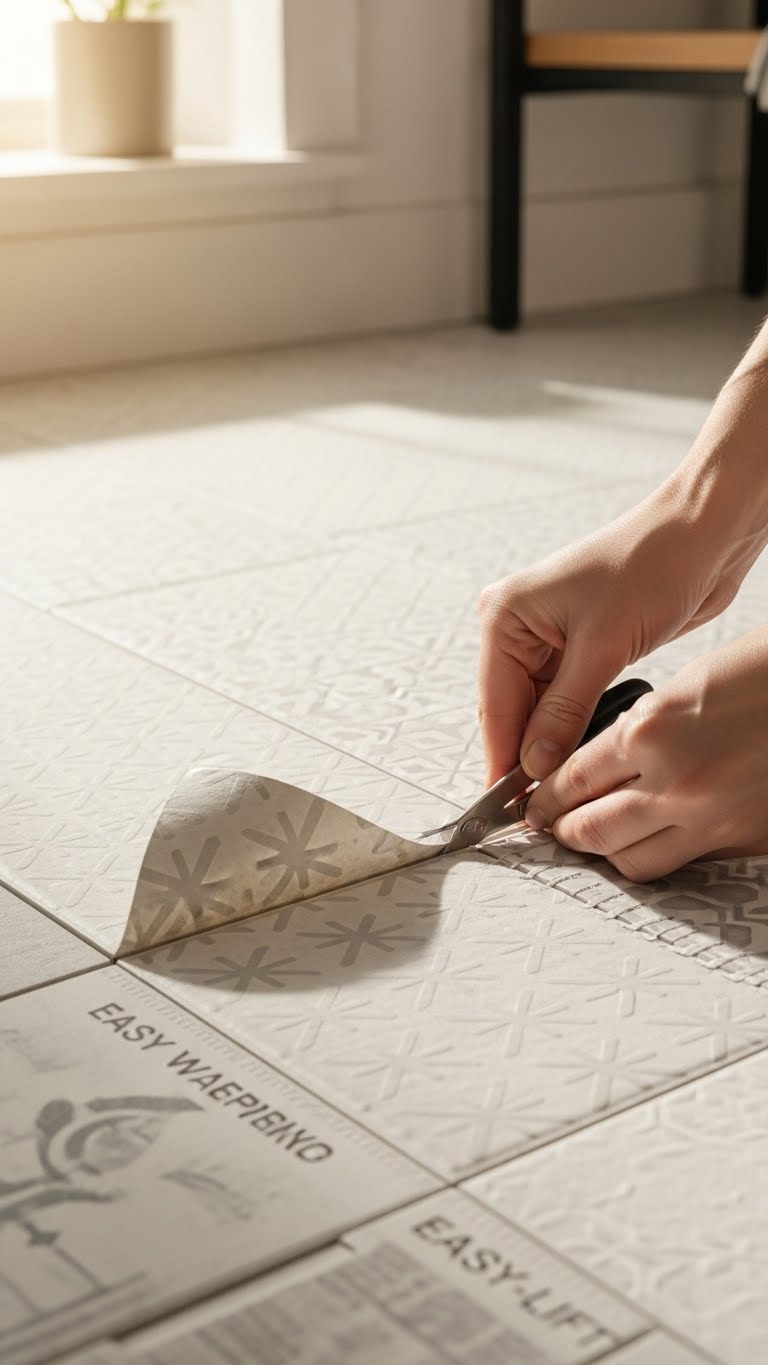
Patterned Vinyl Tile: Install Tips & Best Uses

After updating counters with marble-effect sheets, give your floors a matching upgrade with patterned vinyl tile that mimics encaustic ceramics or hand-painted cement without the cost or weight.
You’ll plan adhesive patterns for a seamless repeat, dry-fit tiles, then use grout alternatives like caulk or seam sealant for waterproofing.
Cut carefully, press firmly, and enjoy a luxe look that stays removable and freeing.
Peel-and-Stick Kitchen Splashback for Big Impact

Peel-and-stick splashbacks let you refresh your kitchen instantly—no grout, no messy tiling, just a clean sheet of material that adheres directly to the wall. Choose finishes that elevate peel aesthetics—marble, metal, or matte stone—then prep the surface and measure carefully. Press firmly, smoothing bubbles for a seamless look. Consider adhesive longevity and heat resistance so your bold, flexible update lasts.
Removable Textured Vinyl for Bathroom Floors
Try textured removable vinyl when you want a quick, stylish floor that stands up to moisture and traffic.
You’ll pick textured surfaces for grip and visual depth, cut tiles precisely, and prioritize waterproof seams to keep water out.
Focus on clean pattern alignment for a couture look, press edges firmly, and choose peel-back panels so you can refresh the room whenever freedom calls.
Sofa Fabric Layering: Throws, Cushions, and Order
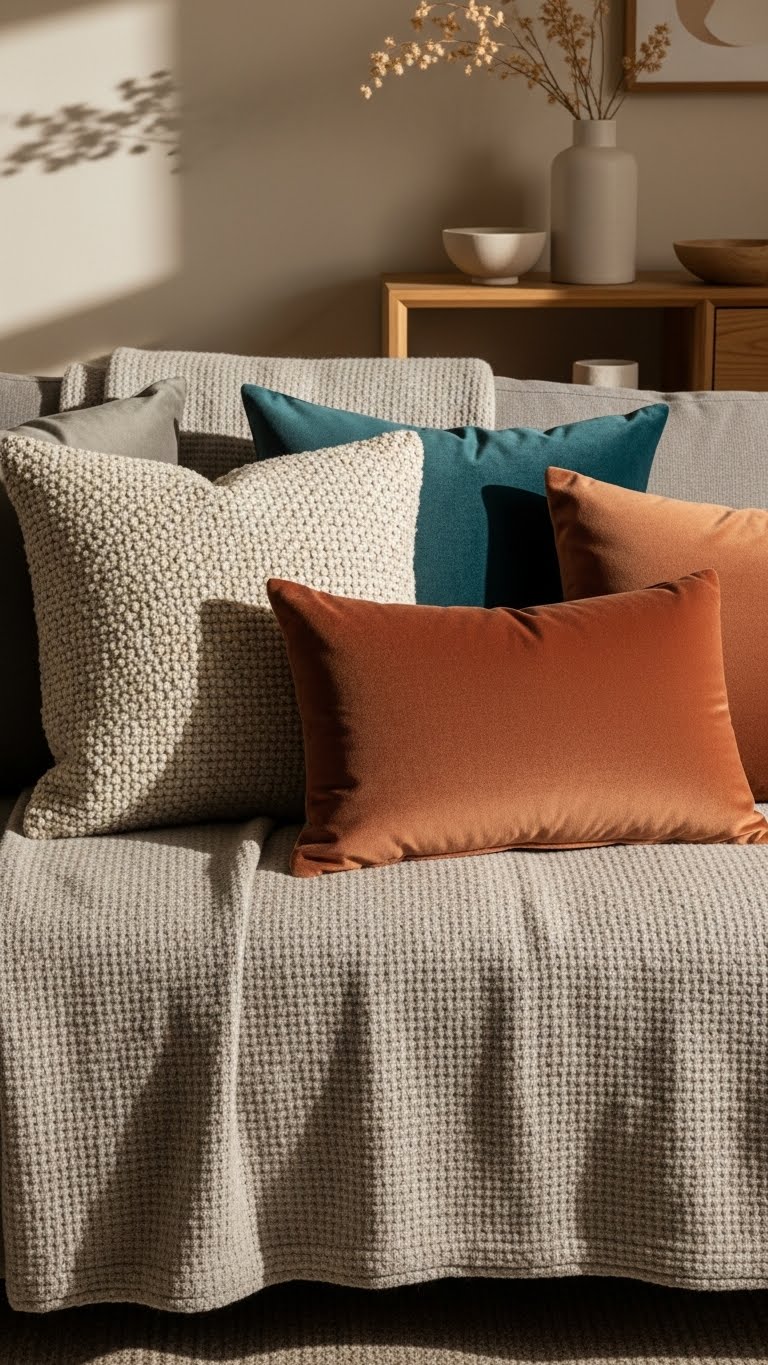
When you layer fabrics on a sofa, think of it as arranging a small textile collection: mix a structural base (a linen or tightly woven cotton throw) with softer, tactile pieces (a boucle or velvet cushion) to balance form and comfort.
Rotate textures regularly for texture rotation, set a clear pattern hierarchy—large scale motifs, mid-scale geometrics, then small accents—and keep placements relaxed.
Hang Floor-to-Ceiling Curtains to Raise a Room
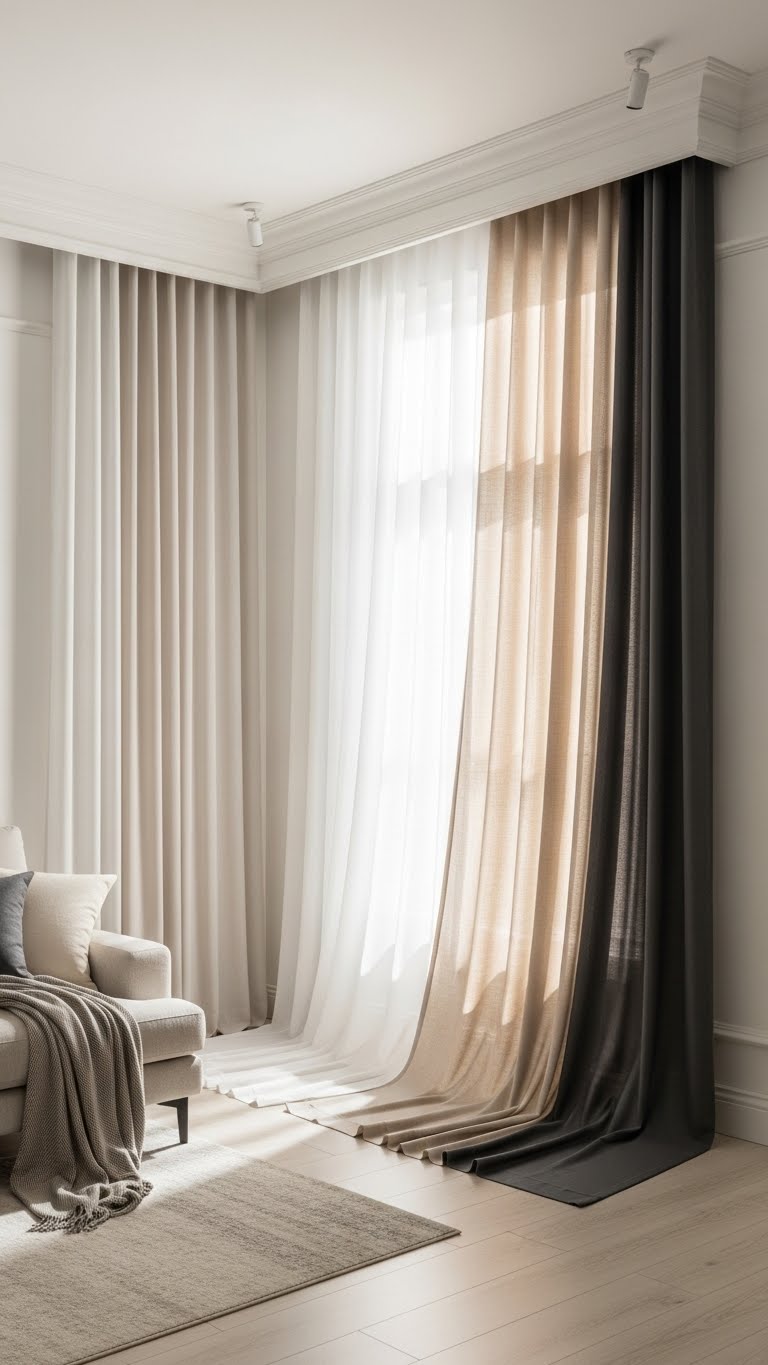
After you’ve layered textiles on the sofa to anchor a seating area, lift the room’s whole proportion by hanging floor-to-ceiling curtains. Mount ceiling mounted rods close to the crown molding, choose lightweight panels for graceful curtain stacking, and add blackout lining for functionality.
You’ll create height, drama, and flexible light control without heavy expense—freedom to style, shift, and breathe.
DIY Linen Canopy for a Boutique Bedroom Feel
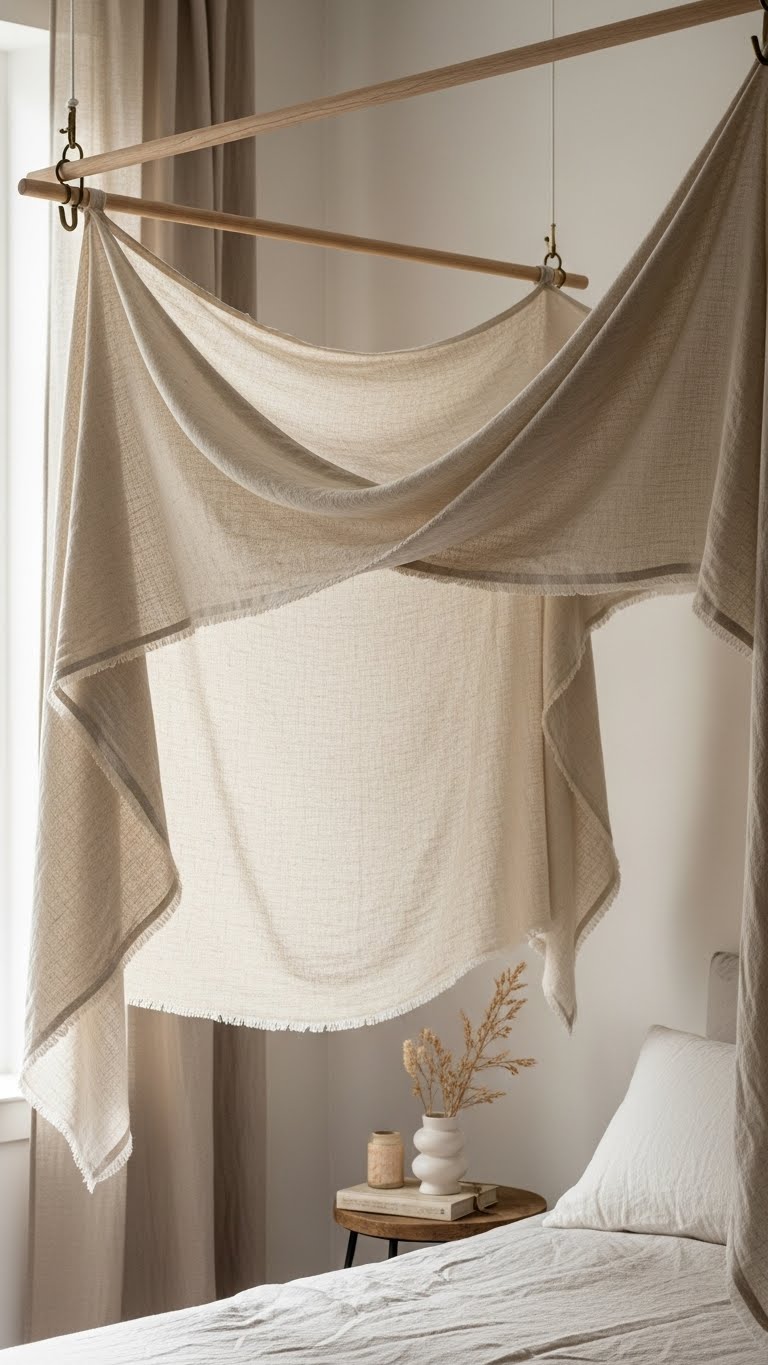
Often a simple linen canopy transforms a plain bedroom into a boutique retreat, and you can build one with just a few materials and minimal tools. Choose a breathable linen drape, measure for balanced fall, and pick discreet canopy suspension like a ceiling hook or hoop.
Secure lightweight rods, hem edges, and anchor corners for gentle movement — you’ll craft an airy, liberated focal.
Create a Plush Look With Abundant Cushions
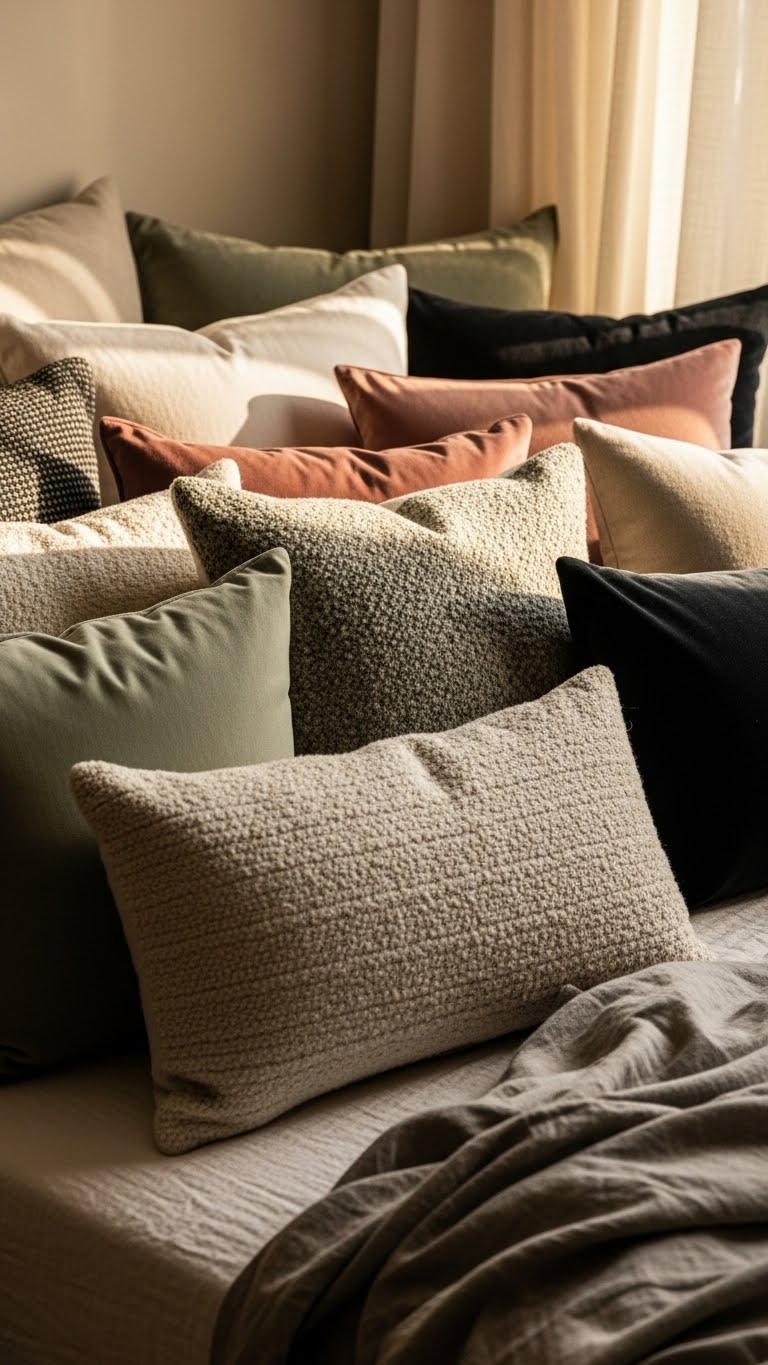
Pile on cushions to instantly elevate a bed from simple to sumptuous—mix sizes, shapes, and fill densities so each piece contributes to depth and comfort. Choose a plush texture mix—velvet, boucle, linen—for contrast. Arrange them in a relaxed, layered cushion arrangement that feels abundant but curated.
Swap covers seasonally, use feather inserts for loft, and let your bed invite lingering mornings.
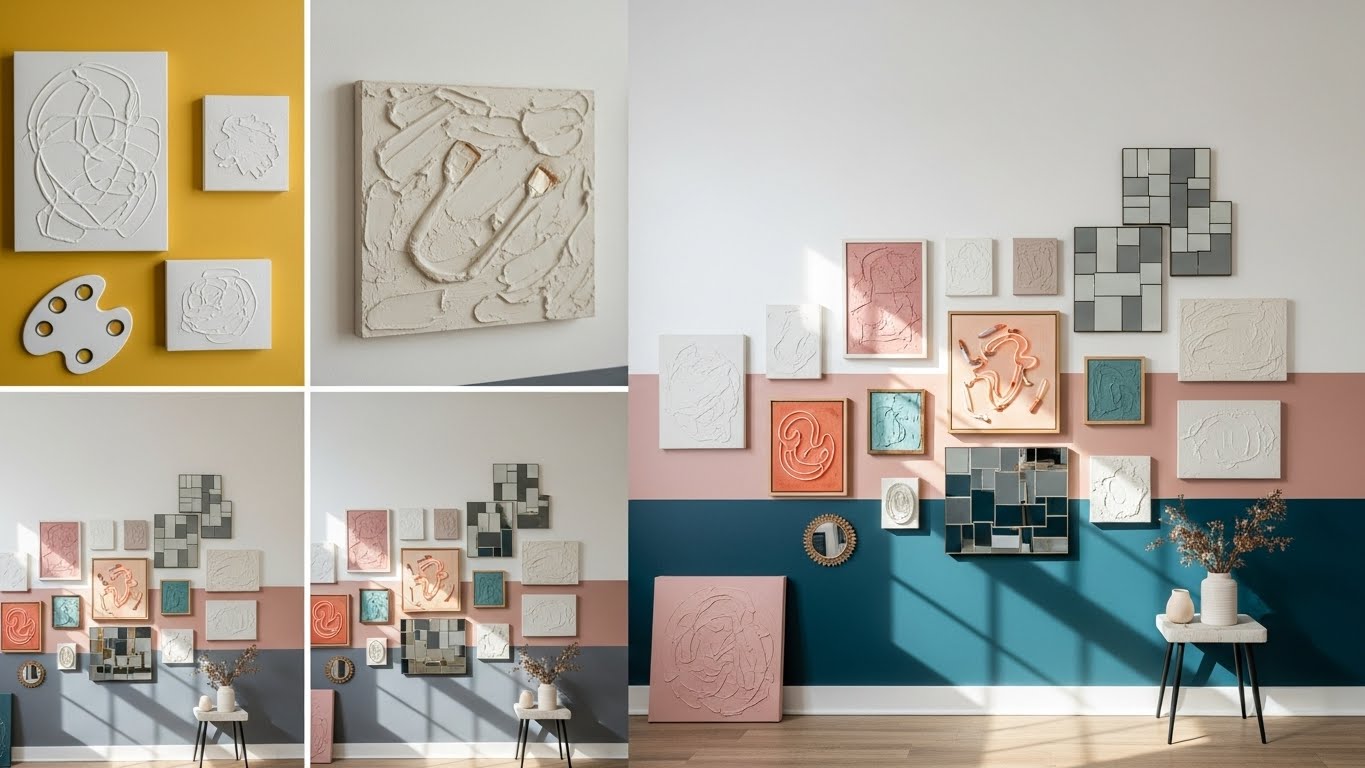
Make Large-Scale Canvas Art Without Breaking the Bank
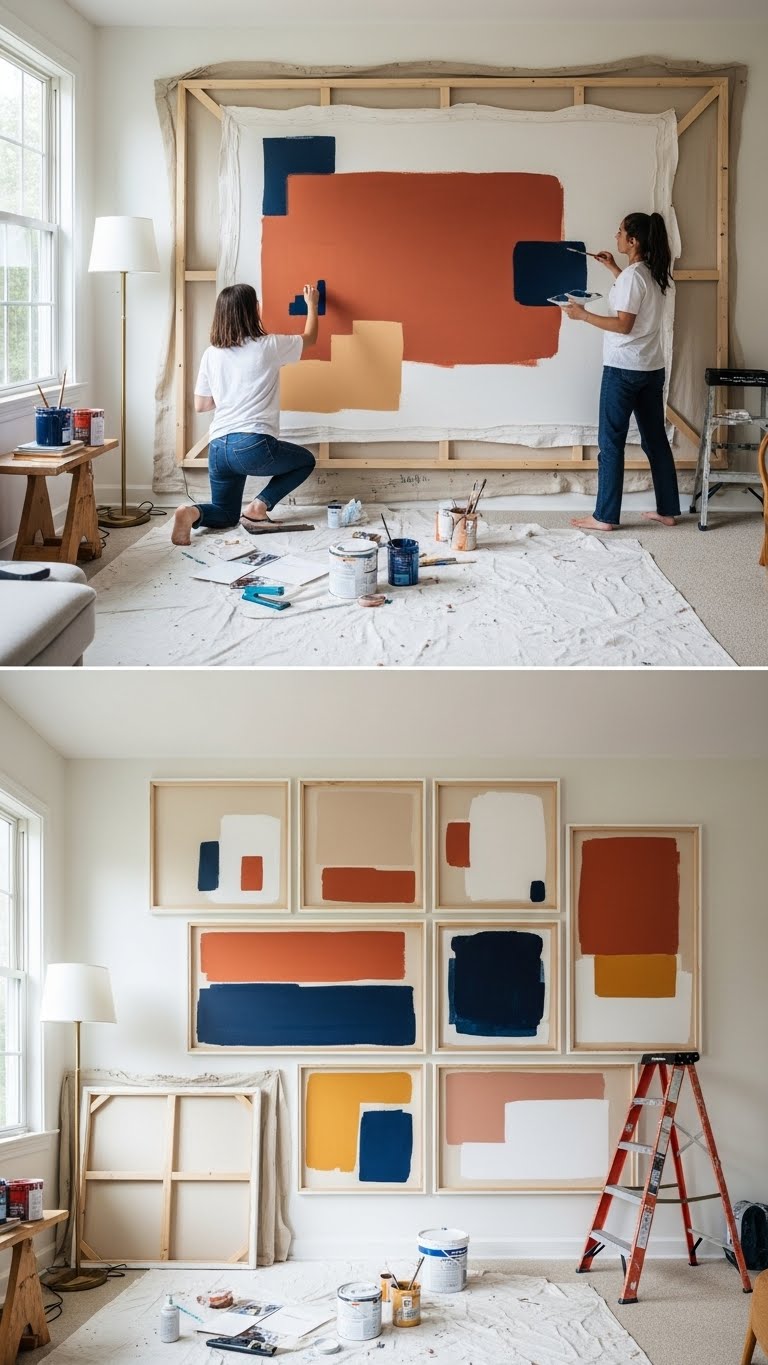
Kick-start a statement wall without spending a fortune by making your own oversized canvas art—you’ll get big impact with small cost and a few smart materials. Stretch drop cloths or thrifted sheets over simple frames, paint bold oversized abstracts or minimalist color fields, or arrange multiple panels into chic gallery grids. You’ll customize scale, save money, and enjoy creative freedom.
Turn a Rug Into a Woven Wall Hanging (Easy)
[IMAGE PROMPT: A cozy interior scene showing an old woven rug repurposed as a wall hanging above a sofa or bed. Warm, natural light from a nearby window highlights the rug’s rich colors—muted terracotta, deep navy, cream—and intricate patterns and textures; edges are neatly trimmed, the top folded into a clean rod pocket around a simple wooden dowel, and a contrasting textured fringe or preserved pile adds depth. Composition is centered on the hanging as an artful focal point, framed by minimal mid-century furniture and soft textiles; photorealistic, warm, inviting atmosphere with soft shadows and an elevated, effortless bohemian aesthetic.]
Give an old rug new life by turning it into a woven wall hanging—you’ll get texture, pattern, and warmth without buying expensive art.
Trim edges, secure a wooden dowel, and fold the top for a clean rod pocket.
Add textured fringe or preserve original pile for contrast.
Hang as a framed centerpiece above a sofa or bed to elevate your space with effortless, liberating style.
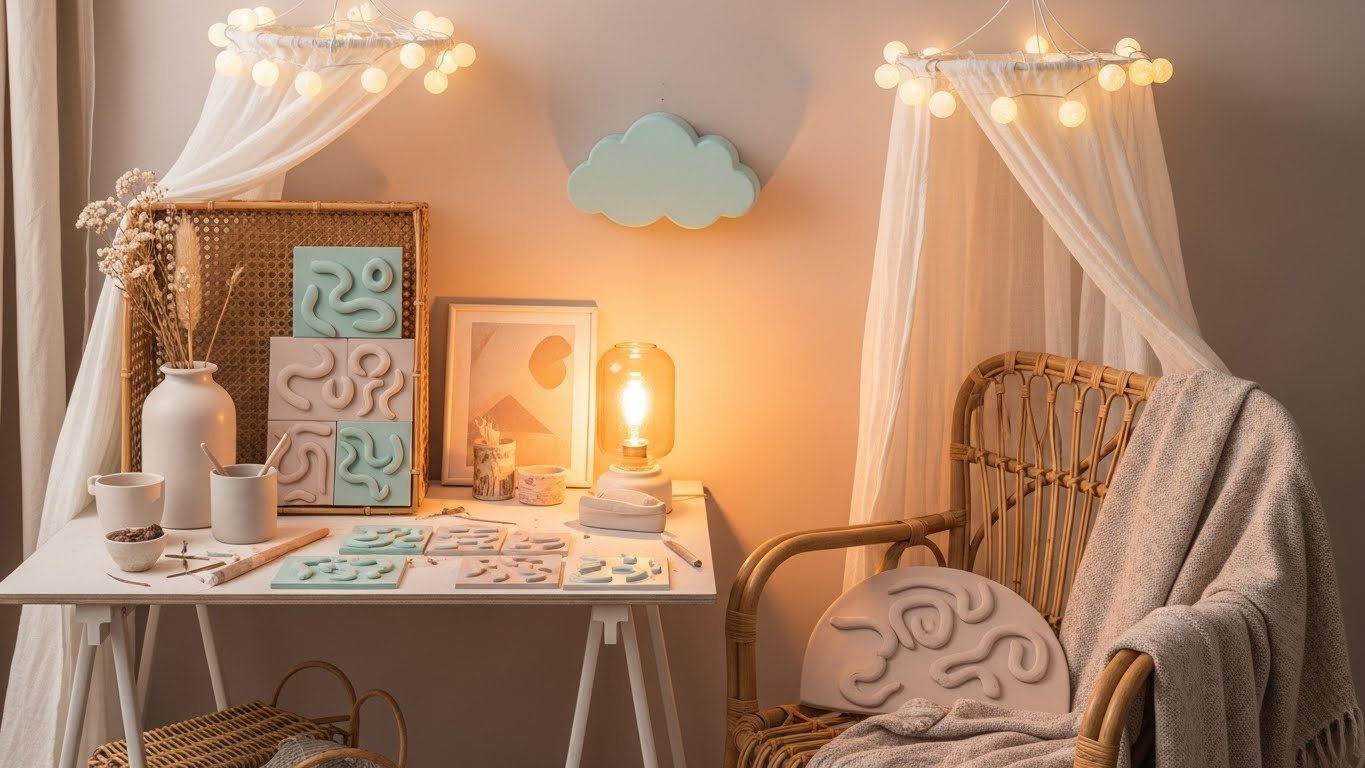
Modeling-Paste Abstract Art: Step-by-Step for Beginners
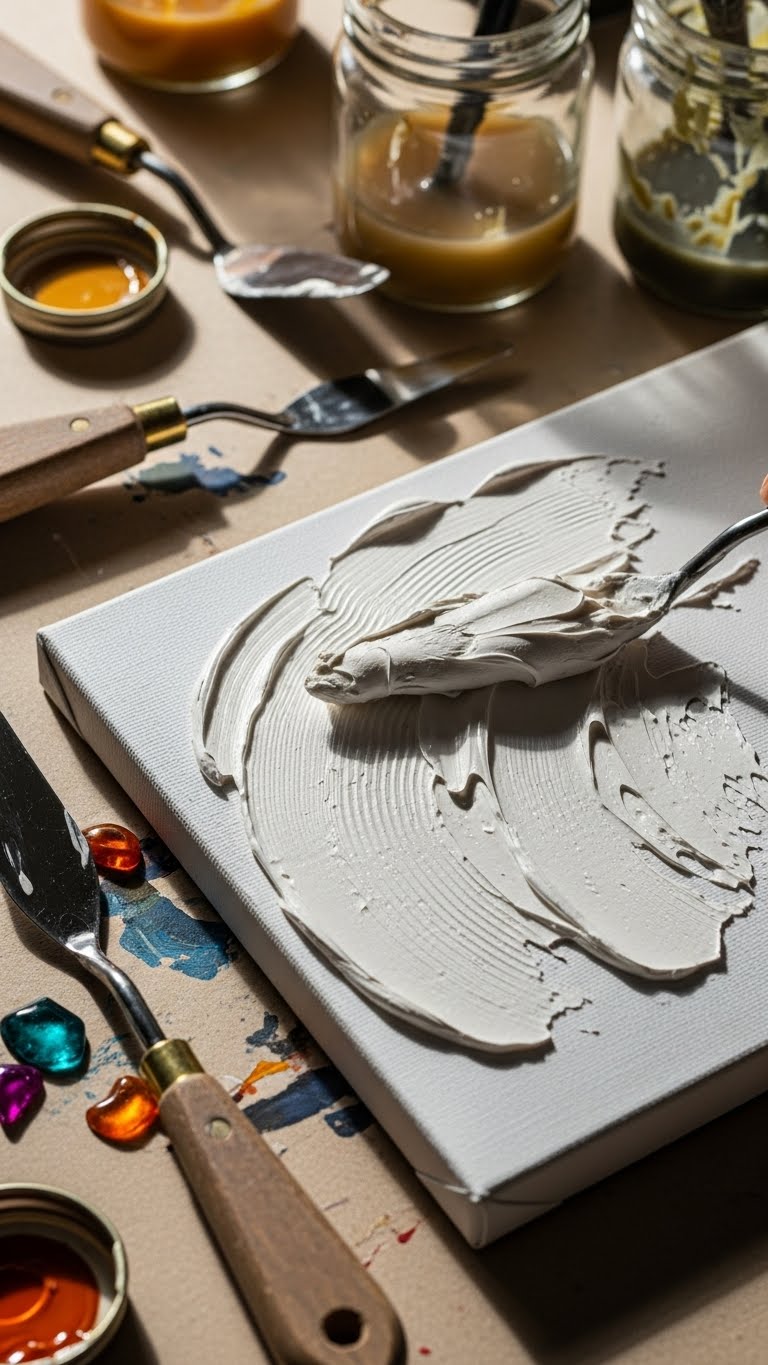
Start by gathering a few basic materials—modeling paste, a palette knife, acrylic paints, a primed board or canvas, and a few tools for texture—so you’re ready to work wet-on-wet.
Apply paste boldly, sculpt ridges, scrape and lift for varied texture techniques.
Layer thinned color, refine with palette pairing choices, step back, adjust contrast, and embrace imperfect marks to create liberated, luxe-feeling abstract art.
Style a Bookshelf as a Gallery : Layout Rules

After you’ve explored tactile modeling-paste pieces, bring that same attention to surface, scale, and rhythm when styling a bookshelf as a gallery.
Arrange art, books, and objects with balanced asymmetry: group in odd numbers, vary heights, and layer textures. Leave breathing space around focal items, rotate displays seasonally, and let negative space amplify each piece so the shelf feels curated, free, and purposeful.
Upgrade Lampshades for Instant Statement Lighting
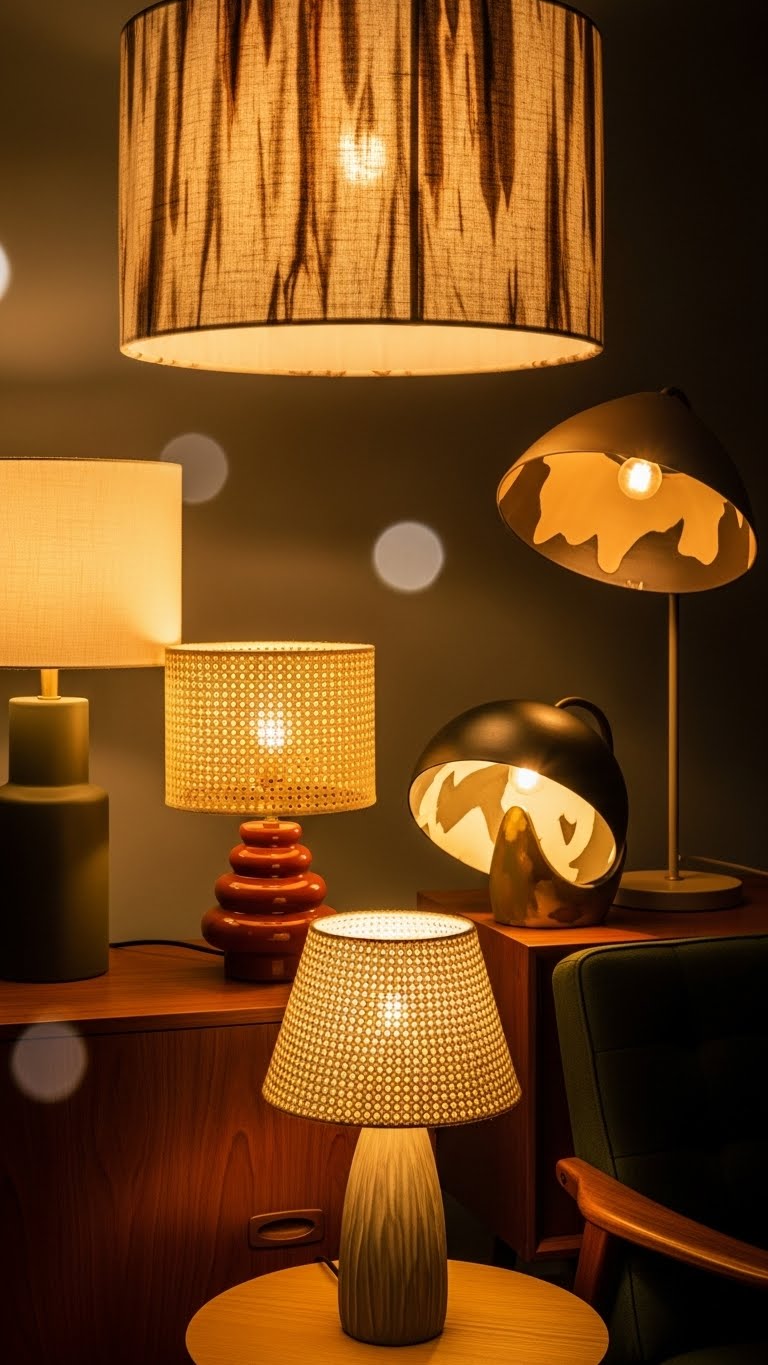
When you swap a plain shade for one with texture, pattern, or sculptural form, the whole room shifts from functional to intentional; think hand-dyed linen, woven rattan, or a painted metallic interior that throws warm, directional light.
You’ll mix Statement Pendants with Shade Embellishments—trim, dye, or paint—to craft bold lighting.
Choose tactile materials and directional glow to free the space and elevate mood.
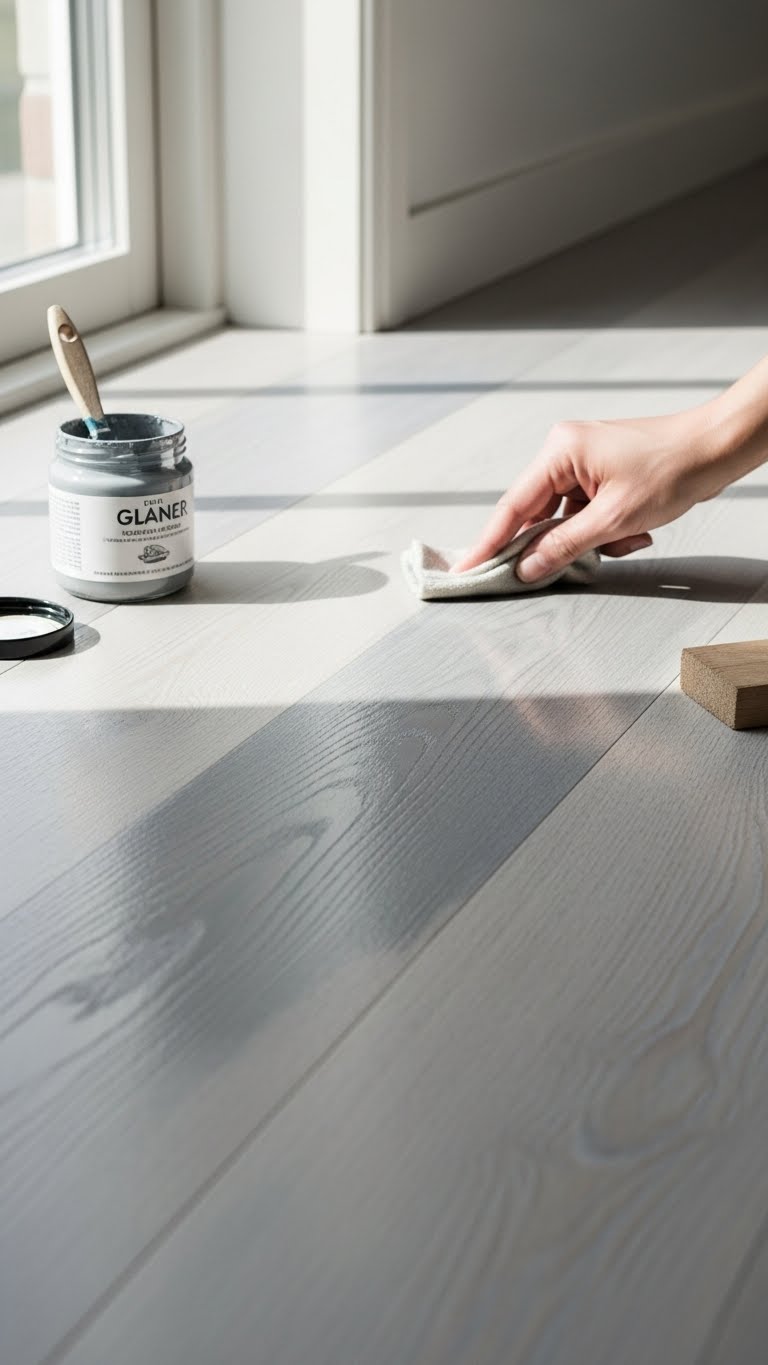
Paint Hardwood Floors With a Subtle Color Wash
Give your floors a whisper of color by applying a thin, translucent wash that tones the wood instead of hiding it. Choose a soft graywash for cool, modern calm or a whitewashed oak look to brighten rooms. Sand lightly, mix paint with glazing medium, test on a scrap, then wipe back for control. Seal with matte poly for durability and freedom to refresh.
Wrap Drapery Around a Bed Frame for a Canopy
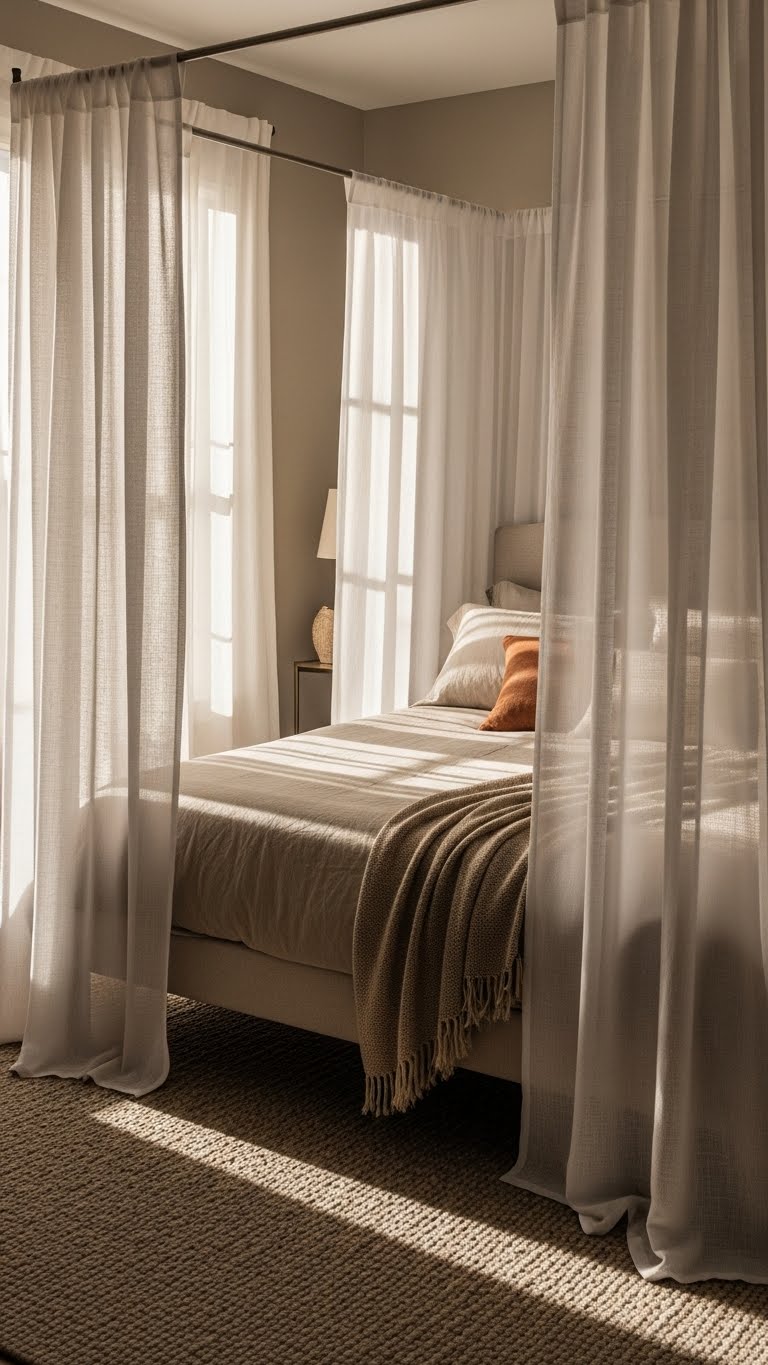
If you’ve toned your floors for a soft, cohesive base, carry that calm upward by wrapping drapery around the bed frame to create an intimate canopy. Choose a sheer drape for airiness, anchor fabric to a simple bed crown, and use hidden hooks for clean lines. Add fabric tiebacks to reveal views or cocoon the bed—effortless, liberated, and luxe on a budget.
Small Luxe Details: Hardware, Trim, and Switches

Dial into the details: swapping out basic knobs, adding subtle trim, and upgrading switches instantly elevates a room without a full remodel.
Choose brass or matte black hardware to match fixtures, install beveled trim around doors and windows for shadow and depth, and fit polished switchplates for a refined touch.
These small, material-savvy swaps let you customize spaces that feel luxe and free.