You’ll find textured decor is the easiest way to make a room feel intentional and tactile without a full remodel. Start with simple tools and homemade pastes, then experiment with relief panels, impasto canvases, or sandpainted driftwood to add shadows and touchable depth. These 26 ideas range from budget-friendly to workshop-level, and once you see how light plays across peaks and valleys you’ll want to try a few techniques yourself — here’s how to begin.
Essential Tools and Basic Texture Techniques
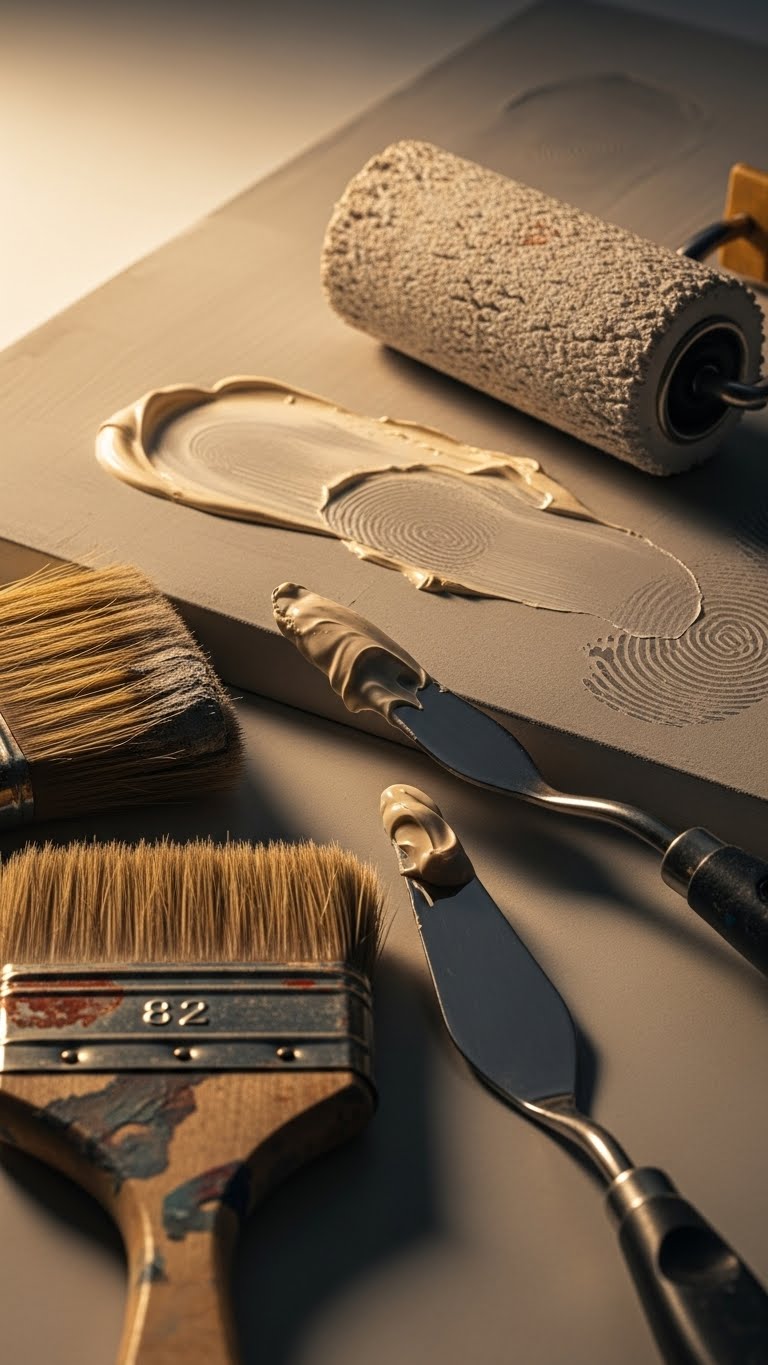
Gather the right tools before you start—texturing is part technique, part tactile intuition. You’ll favor solvent-resistant brushes for varied brush selection, palette knives, and rollers that let you scorch, drag, and scrape.
Nail surface prep: clean, sand, prime for adhesion. You’ll work with pastes and gels, feeling grain and drag, choosing strokes that free your style while keeping control.
Stretched Canvas: Prepping for Texture Art
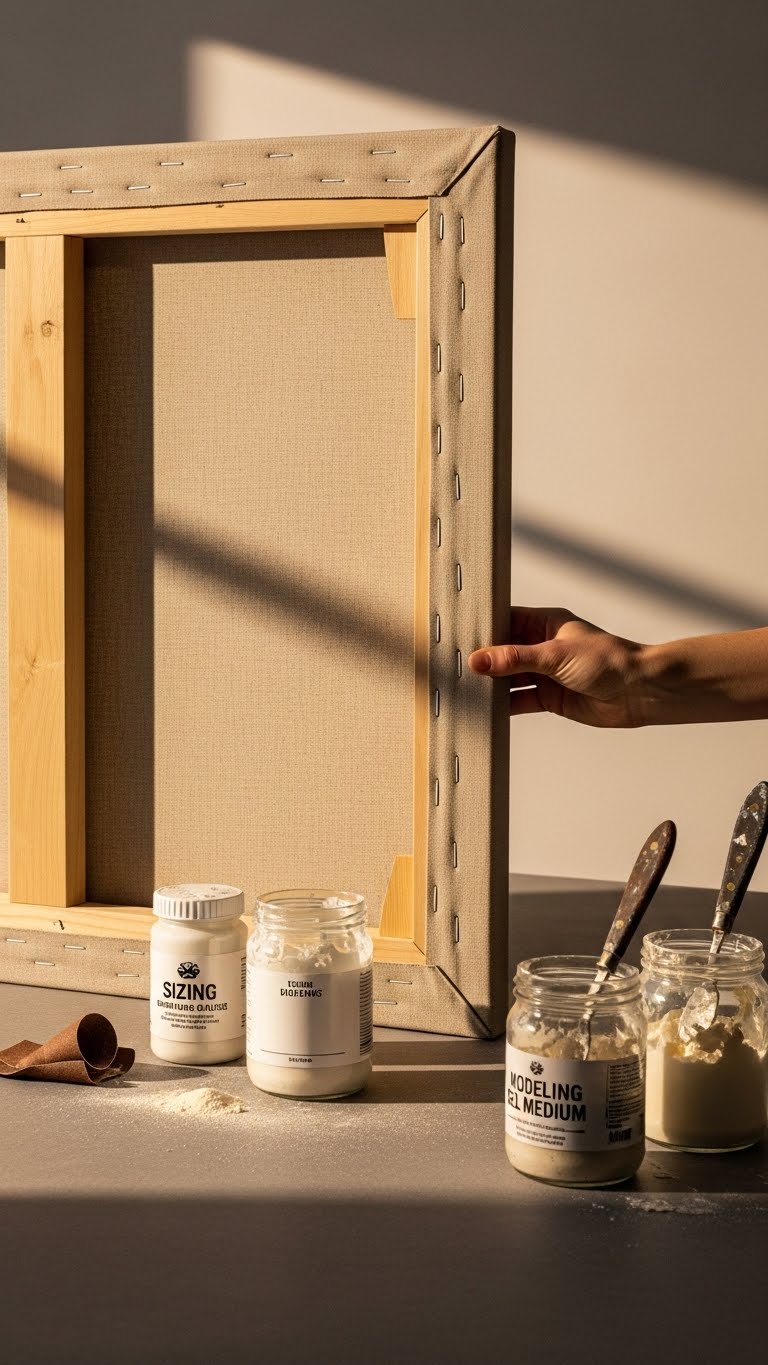
Start by checking the frame for tightness and flatness—any slack or warping will ruin texture work—then lightly sand and wipe the surface so pastes and gels grab evenly. You’ll consider canvas sizing to control absorbency and choose primer selection for tooth and sheen. Stretch evenly, tap staples flush, and feel the tautness—your foundation dictates how texture responds and endures.
Homemade Texture Paste: Recipe and Tips
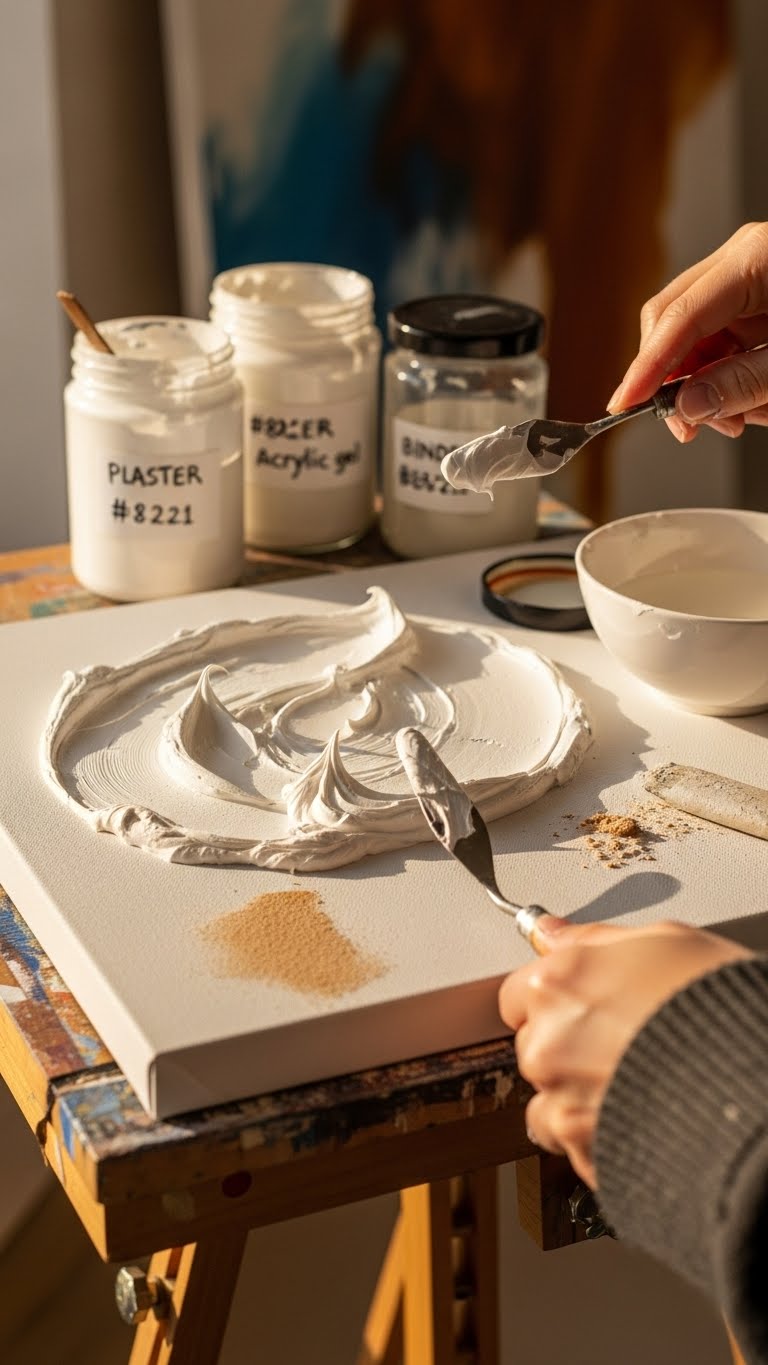
Once your canvas feels rock-solid and has the right sizing and tooth, you can move on to making your own texture paste to shape surface and hold detail.
Mix plaster or fine homemade grain with acrylic gel, add a flexible binder for stretch, and thin with water.
Apply with palette knife, sculpt wet peaks, sand lightly when dry.
Experiment—trust touch and freedom.
Paper-Mâché Clay for Raised Abstract Canvases
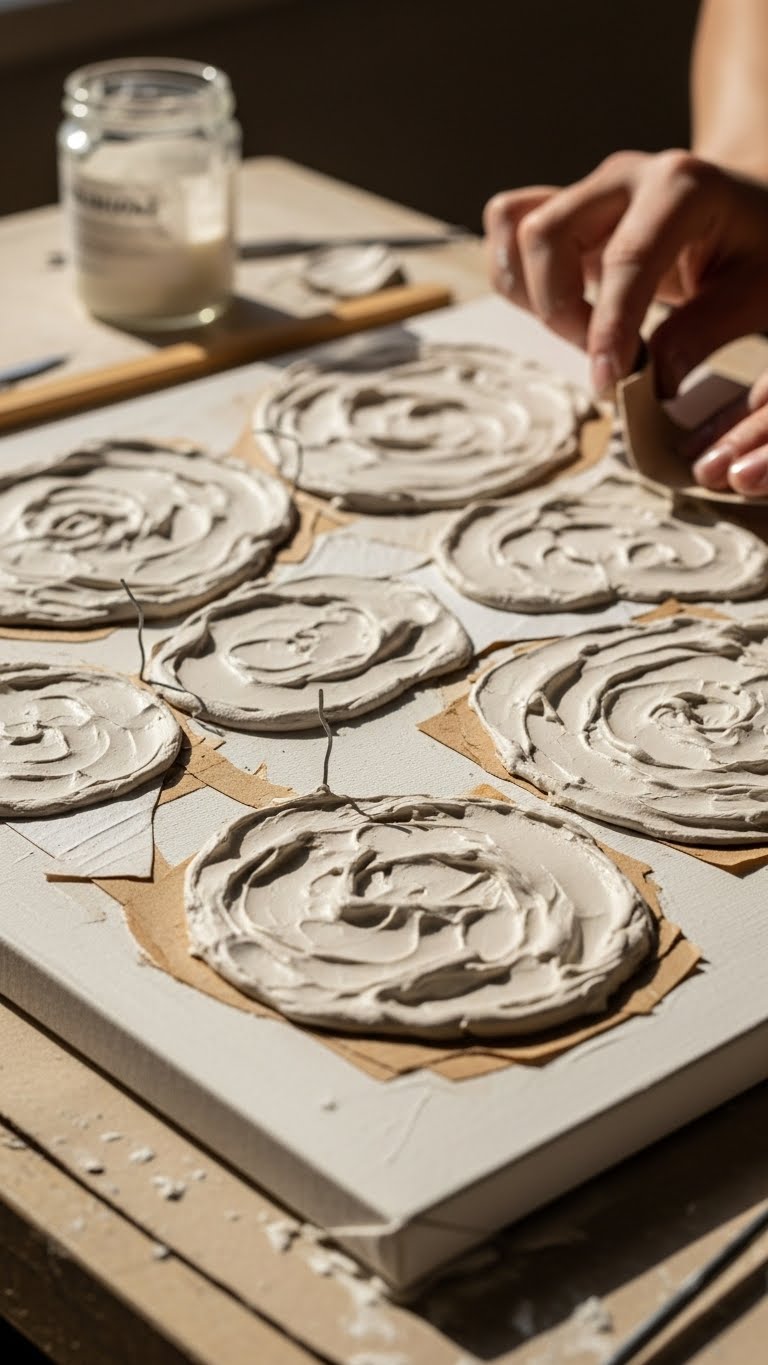
Bring paper-mâché clay to life on a primed canvas by working quickly while the mix still holds a soft, tacky bite — you’ll get the best lift and edge definition that way.
You’ll shape freeform reliefs using simple armature and subtle sculpting techniques, then let pieces air dry. Use lightweight reinforcement methods for durability; sand selectively and seal to preserve raw texture and movement.
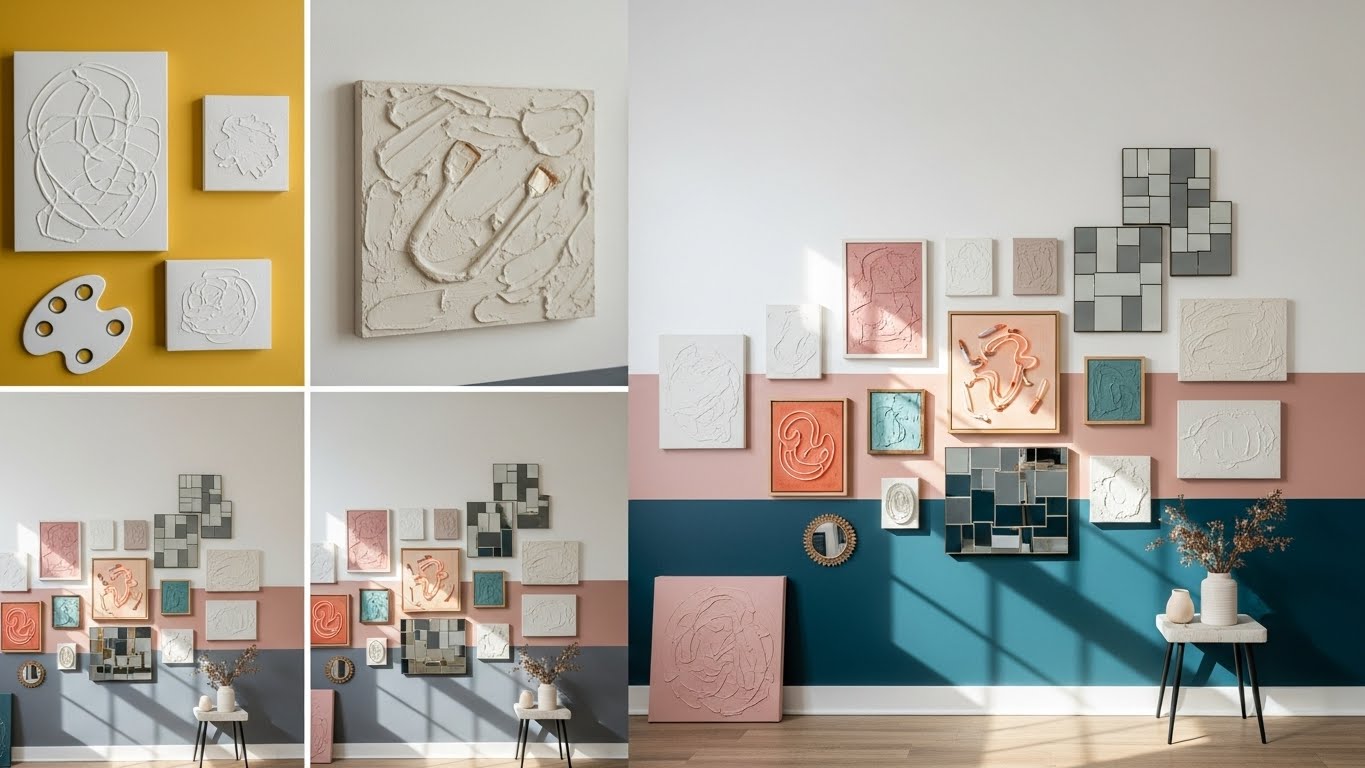
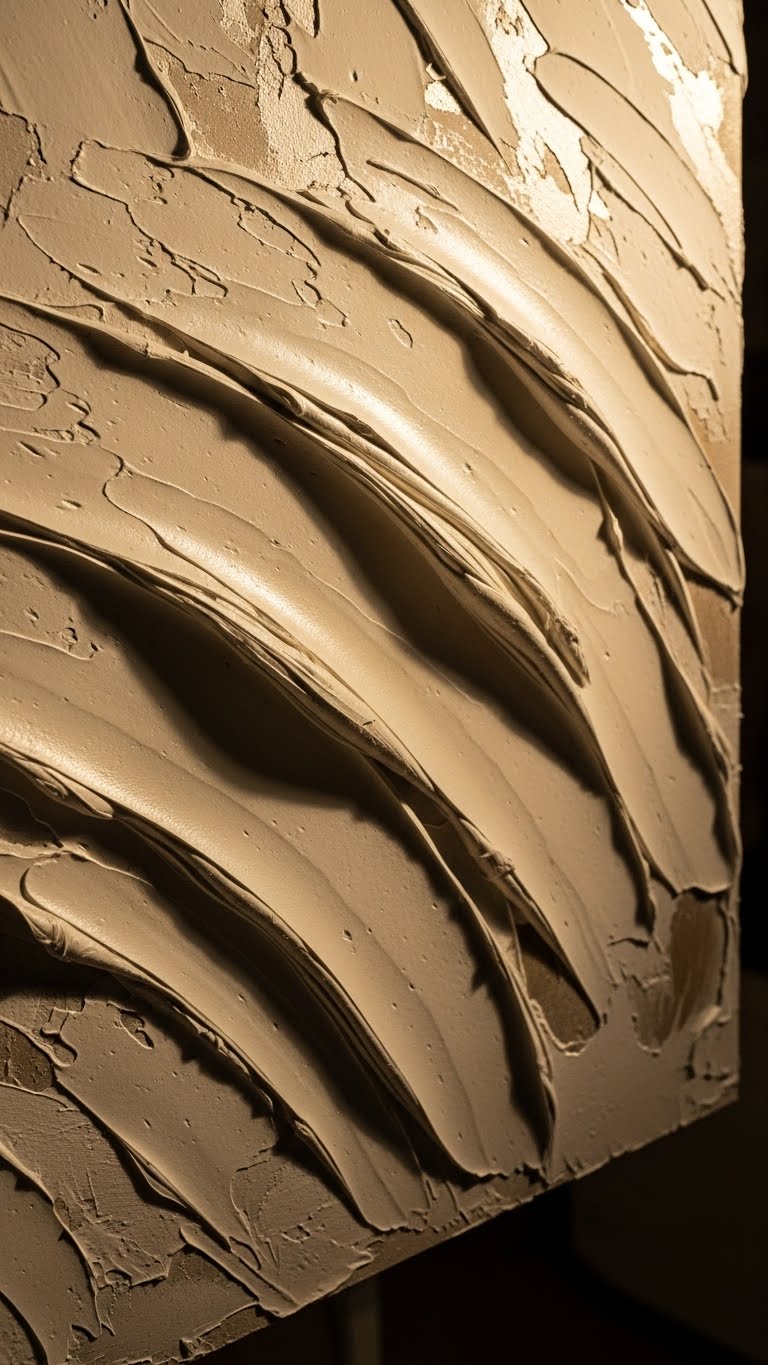
Palette-Knife Textured Panels With Acrylics and Paste
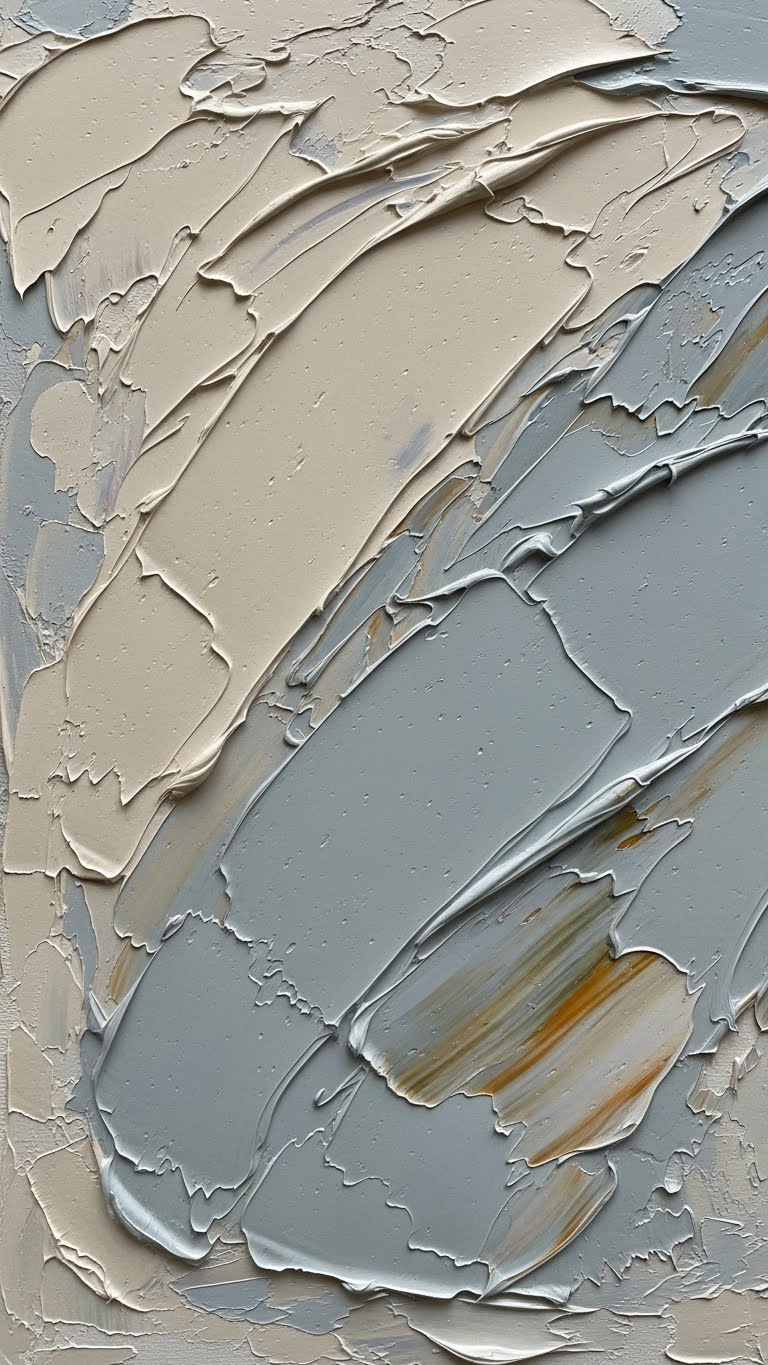
Load your palette knife with thick acrylic paste and carve gestures across a primed panel to build bold ridges, crisp edges, and tactile planes that read beautifully from both close up and across a room. You’ll explore impasto studies, varying pressure and edge techniques to catch light, then glaze selectively with acrylics.
The result feels liberated, rugged, and vividly tactile—freedom you can hang.
Baking-Soda Paint Technique for Low-Cost Relief
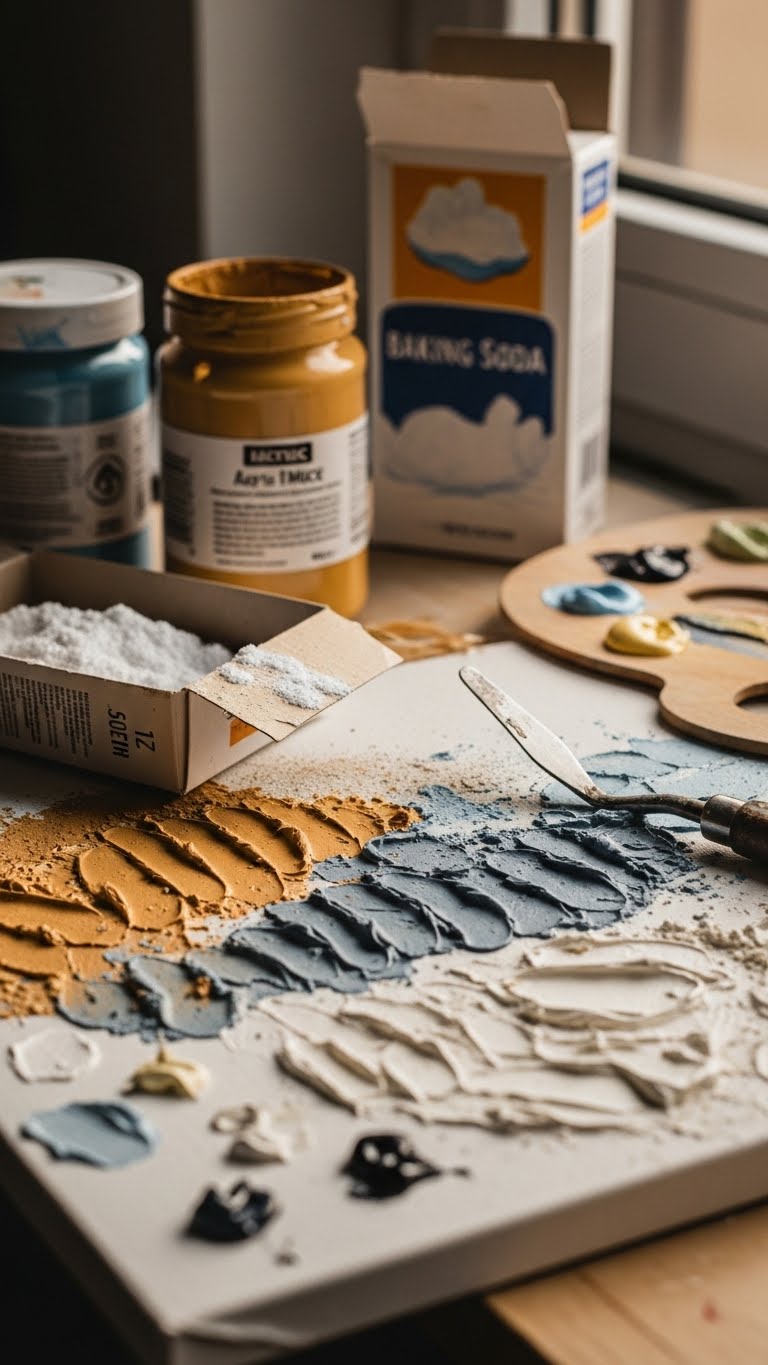
If you liked the rugged, knife-sliced textures of impasto, try a pantry-friendly alternative that gives raised relief without heavy tools: baking soda mixed into paint creates toothy, sand-like surfaces you can sculpt with a brush or palette knife. You’ll explore a versatile paint technique for low cost relief, testing ratios, drying times, and color washes in adventurous surface experiments that reward tactile, liberated design.
Spackling Compound for Large-Format Textured Art
When you scale up texture, spackling compound gives you a forgiving, cost-effective way to build bold relief across large canvases and panels. You’ll spread, sculpt, and sand to shape sweeping peaks and soft valleys; the tactile finish invites touch.
Focus on surface bonding—prime and key coats—and mix for compound longevity. Light washes or metallic glazes heighten depth without weighing the piece down.
Mixed-Media Canvas With Fabric and Found Objects
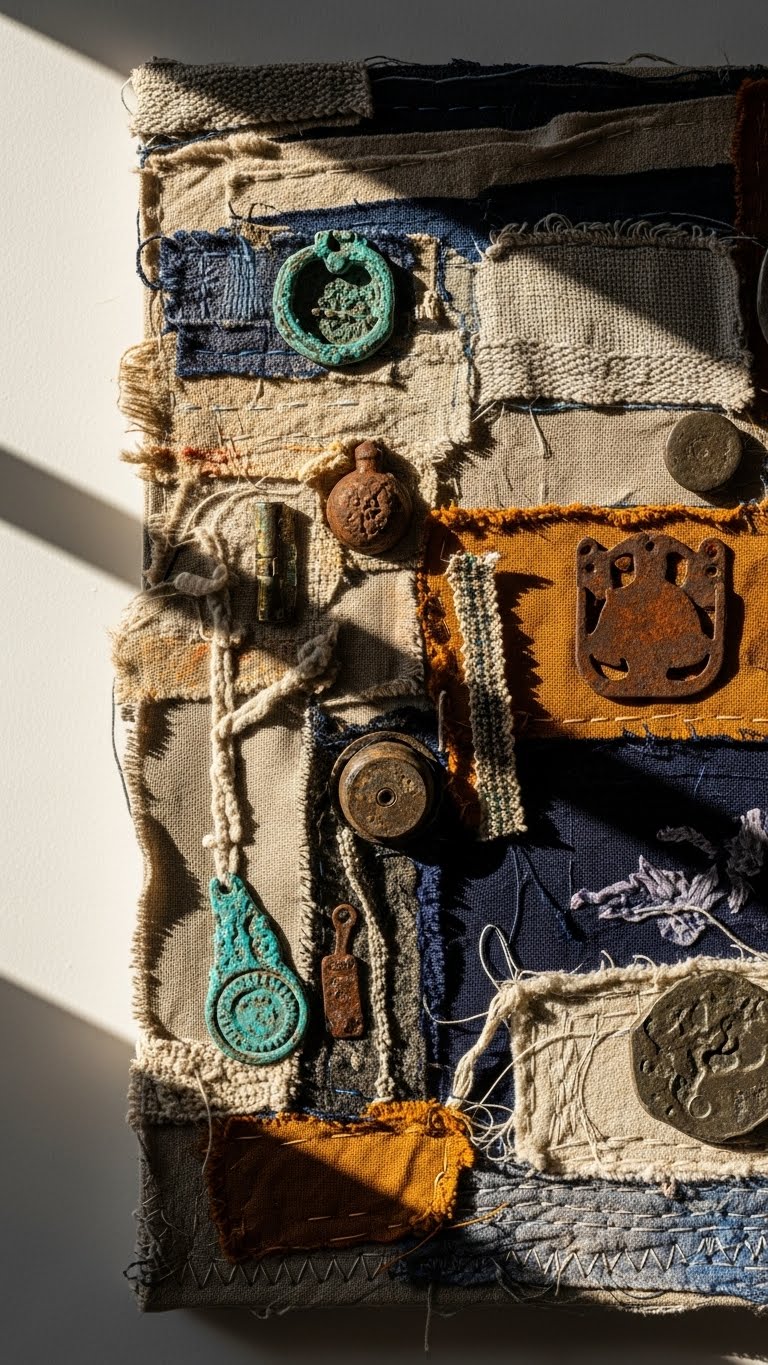
Because texture benefits from contrast, layer fabric and found objects onto your canvas to create a dynamic, tactile narrative that reads well both up close and from across a room.
You’ll combine repurposed trimmings, paint, and small artifacts, arranging balance and negative space.
Stitch elements for a stitched collage effect, secure with adhesive, and let raw edges and shadows invite touch and roaming eyes.
Stenciled Metallic Sand Paint Accents
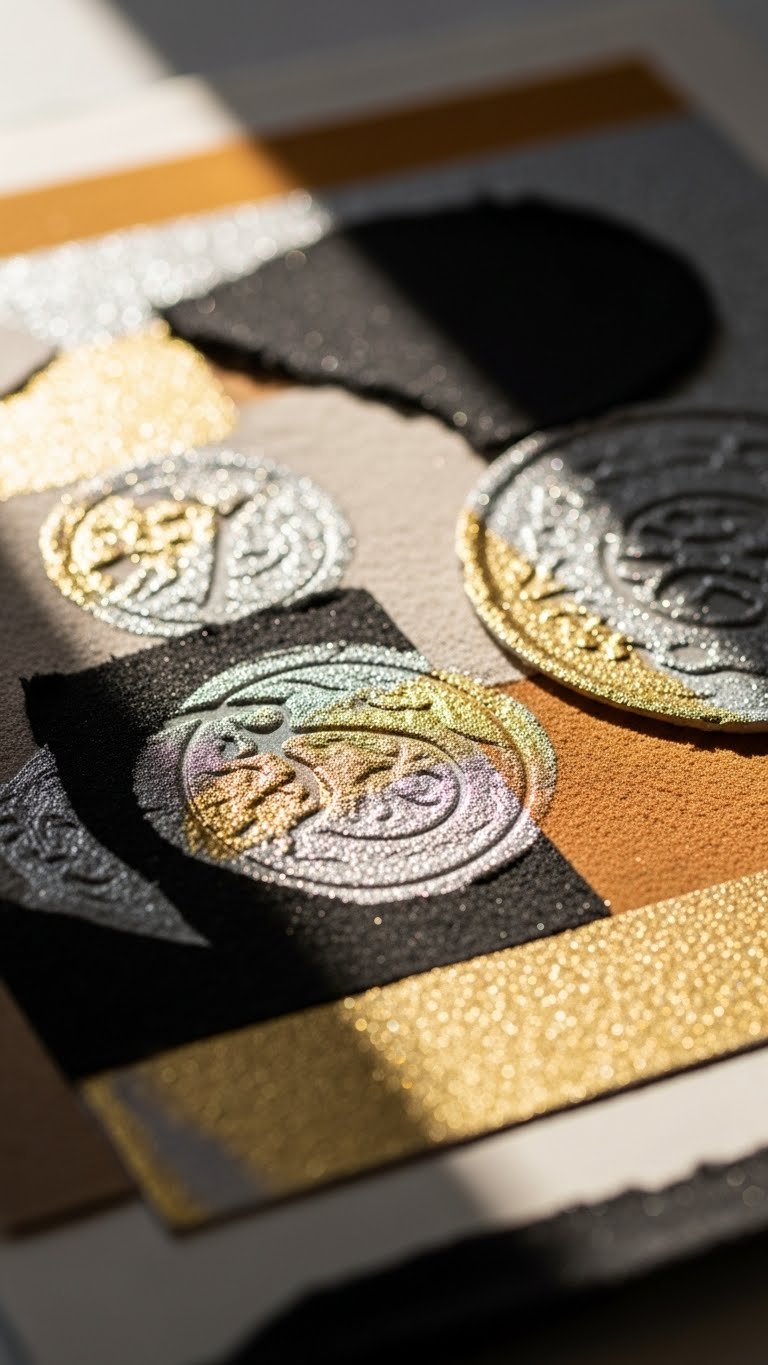
You can carry the tactile energy of fabric and found objects into crisp, reflective highlights by stenciling metallic sand paint over and around your collage elements.
You’ll apply metallic stenciling with a firm hand, creating sand embossed edges and gilded relief that catch light.
Let shimmering grains define pattern, keep contrasts bold, and embrace imperfect strokes for a liberated, modern textured finish.
Sponge-Applied Texture Inside Stencil Motifs
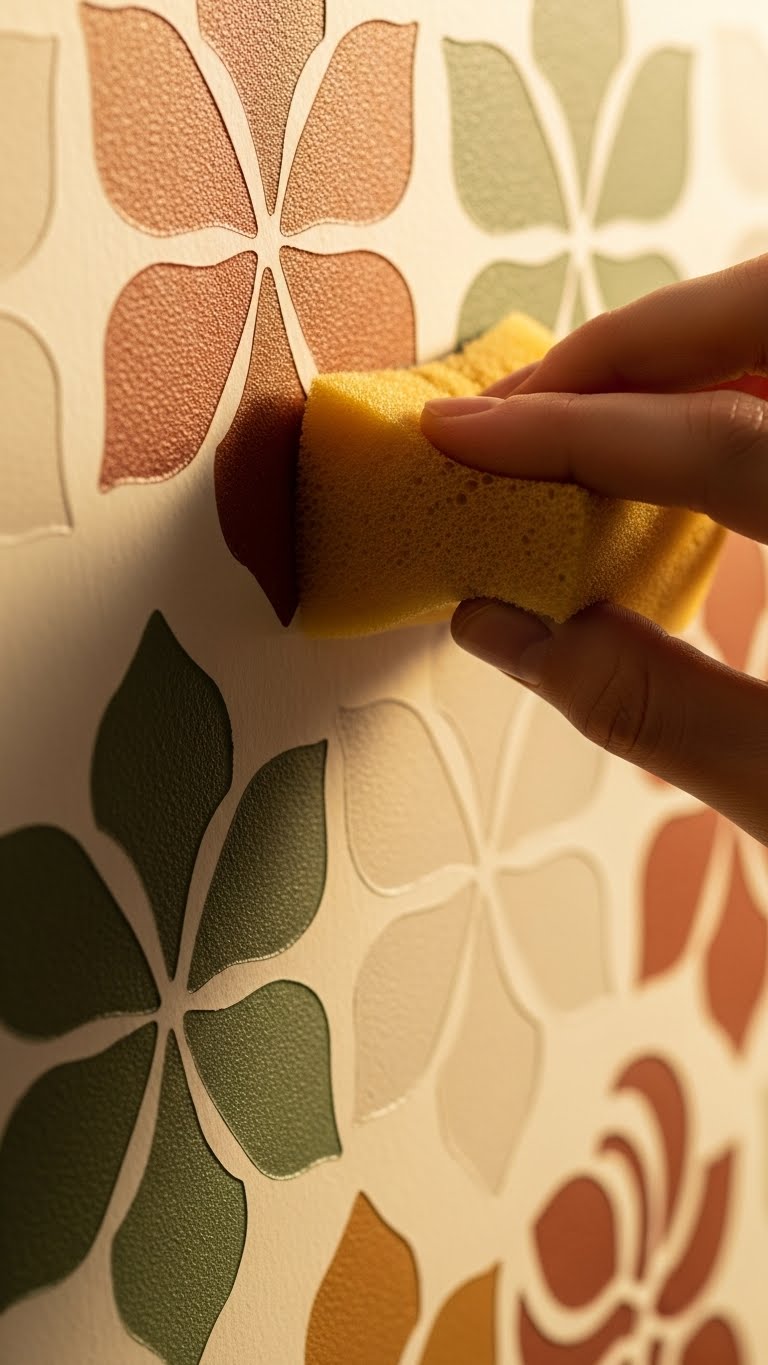
With a damp natural sponge and a steady rhythm, you can lay down concentrated texture inside stencil motifs that reads tactile from across the room and up close. You’ll use sponge stenciling to press pigment and micro‑texture into patterns, controlling depth with pressure.
Motif layering adds contrast and movement; you’ll experiment freely, trusting touch and rhythm to create bold, wearable walls.
Make Textured Wallpaper Panels With Joint Compound
Mix joint compound like a thick paint and spread it over heavyweight paper or thin MDF panels to create durable, tactile wallpaper you can hang like art.
You’ll explore compound sculpting with palette knives, stamps, or palette tools to build ridges, waves, or geometric repeats.
These texture panels let you experiment freely, paint afterward for contrast, and swap pieces to refresh a room instantly.
Install Fluted Wall Panels (DIY Weekend Guide)

Although fluted panels look luxe, they’re straightforward to install over a weekend when you plan, measure precisely, and pick the right tools.
You’ll cut, dry-fit, and adhere panels, checking groove alignment so lines read seamless. Sand lightly, caulk joints, then finish with matte paint to feel depth beneath fluted lighting. The result’s tactile, modern, and liberating—your wall becomes sculptural, not fussy.
Beadboard and Moulding as Decorative Texture
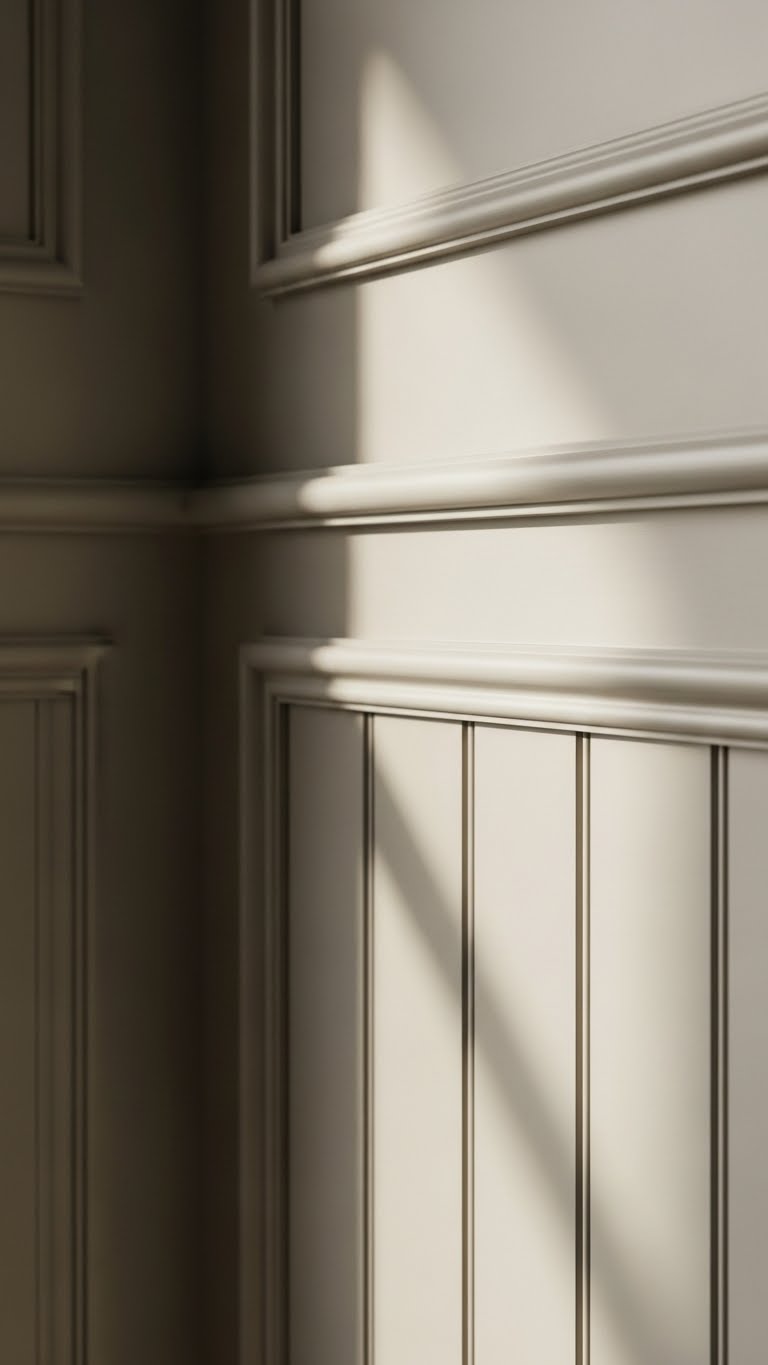
If you want a timeless, tactile upgrade that reads both classic and contemporary, beadboard and moulding give your walls instant rhythm and depth.
You’ll choose a beadboard accent for vertical grain and a mix of moulding profiles to sculpt shadows.
Install confidently, paint matte for touchable warmth, and arrange strips to create airy, liberating rooms that feel handcrafted and unfettered.
Faux Brick Hardboard Panels: Caulked Joints and Paint
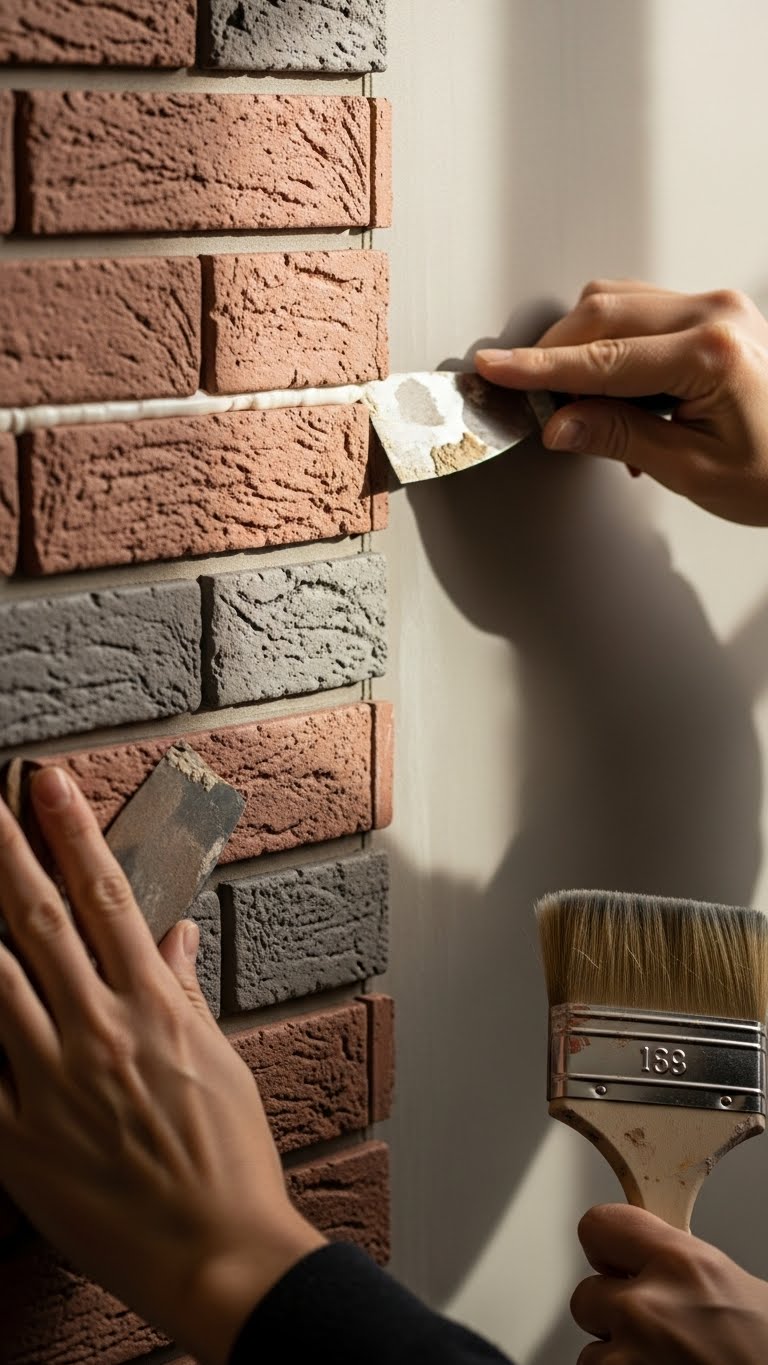
After the clean lines of beadboard, faux brick hardboard brings a rugged, tactile counterpoint that reads urban and finished in equal measure.
You’ll butt panels, caulk to create seamless seams, then sand and paint for depth. Choose a muted base, dry-brush a weathered finish, and seal. The result feels lived-in, free, tactile—an effortless focal wall that invites touch.
Shiplap Accent Wall for Rustic Dimension
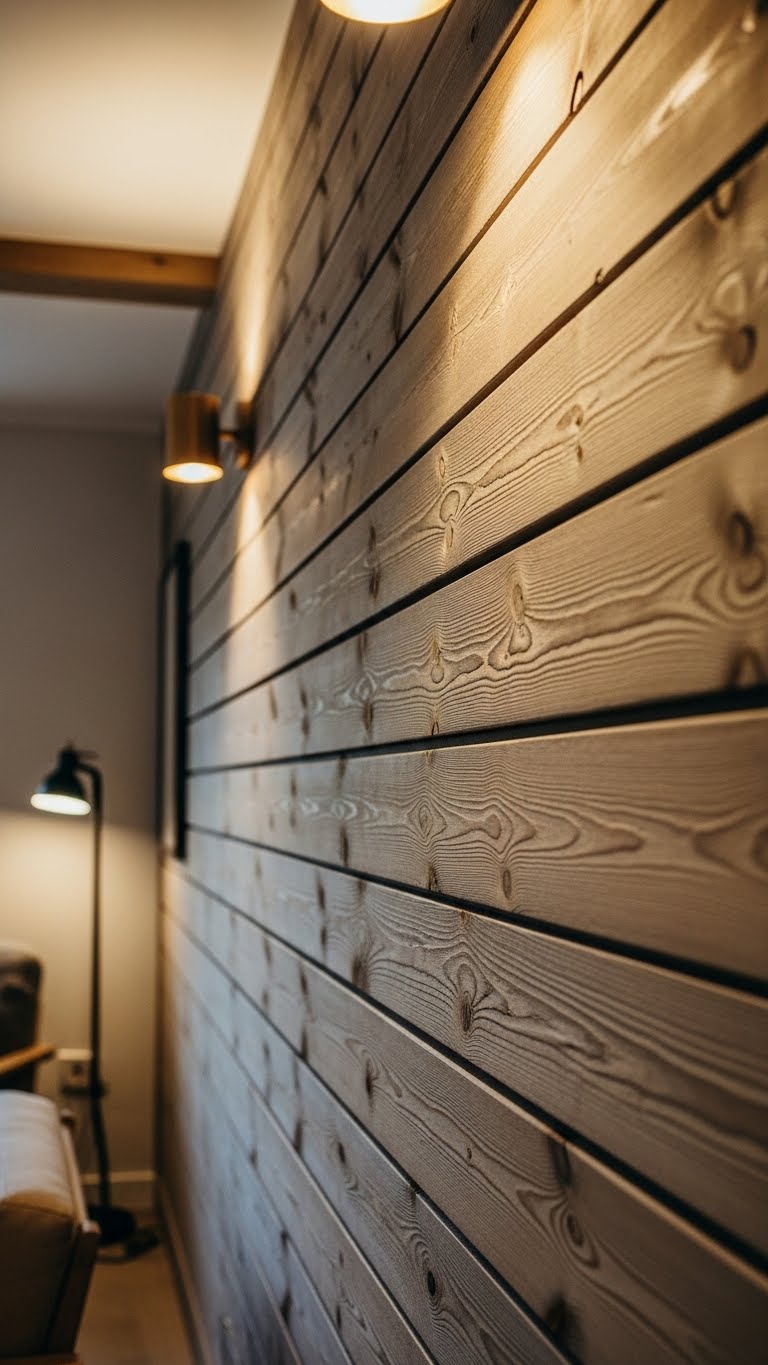
Install shiplap to add warm, linear texture that anchors a room with rustic clarity. You’ll choose weathered planks for authentic grain and tactile depth, then space boards evenly for crisp shadow lines. Add shiplap lighting—warm sconces or hidden LED strips—to enhance grooves and mood. You’ll enjoy a liberated, cabin-meets-modern vibe that feels lived-in yet intentional, tactile and restrained.
Layered Paper Mandala Wall Hanging (Step-By-Step)

You can balance the shiplap’s linear, weathered warmth with a layered paper mandala that brings delicate, tactile contrast to the wall. You’ll trace concentric templates, cut paper filigree motifs, and stack for layered symmetry. Glue with precision, vary tones for depth, then hang on a slim hook. The result feels airy, handcrafted, and boldly free — a quiet statement of texture and movement.
Make Dimensional Word Art With Foam and Texture Paste
[IMAGE PROMPT: A close-up photorealistic craft-station scene showing dimensional layered letters made from white and colored craft foam on a wooden worktable. Tools—palette knife with texture paste, foam-stamped typography tool, small jars of pastel and muted acrylic washes, sanding block, and glue—are arranged around the letters; some letters show stacked layers and wet paste being sculpted for crisp relief. Soft natural light from a nearby window casts gentle shadows, warm tones highlight texture, and a shallow depth of field focuses on the tactile surfaces and edges, evoking a calm, creative workshop atmosphere.]
Give words real presence by building them up with craft foam and texture paste—it’s an easy way to turn a flat quote or name into a tactile focal point.
You’ll cut layered letters, glue stacks for depth, then apply paste with a palette knife or foamstamped typography tool for crisp relief.
Sand, seal, and finish in washes to keep edges clean and surfaces inviting.
Taupe and Charcoal Color Blocking to Highlight Texture
When you layer warm taupe against deep charcoal, texture pops—soft mineral tones recede so the raised ridges and carved edges read sharply, while charcoal anchors the composition and amplifies shadow.
You’ll use taupe gradients to subtly shift warmth across surfaces, then add charcoal accents to define planes. The result feels tactile, modern, and liberating—design that lets material and light do the talking.
White-on-White Textured Minimal Canvas Ideas
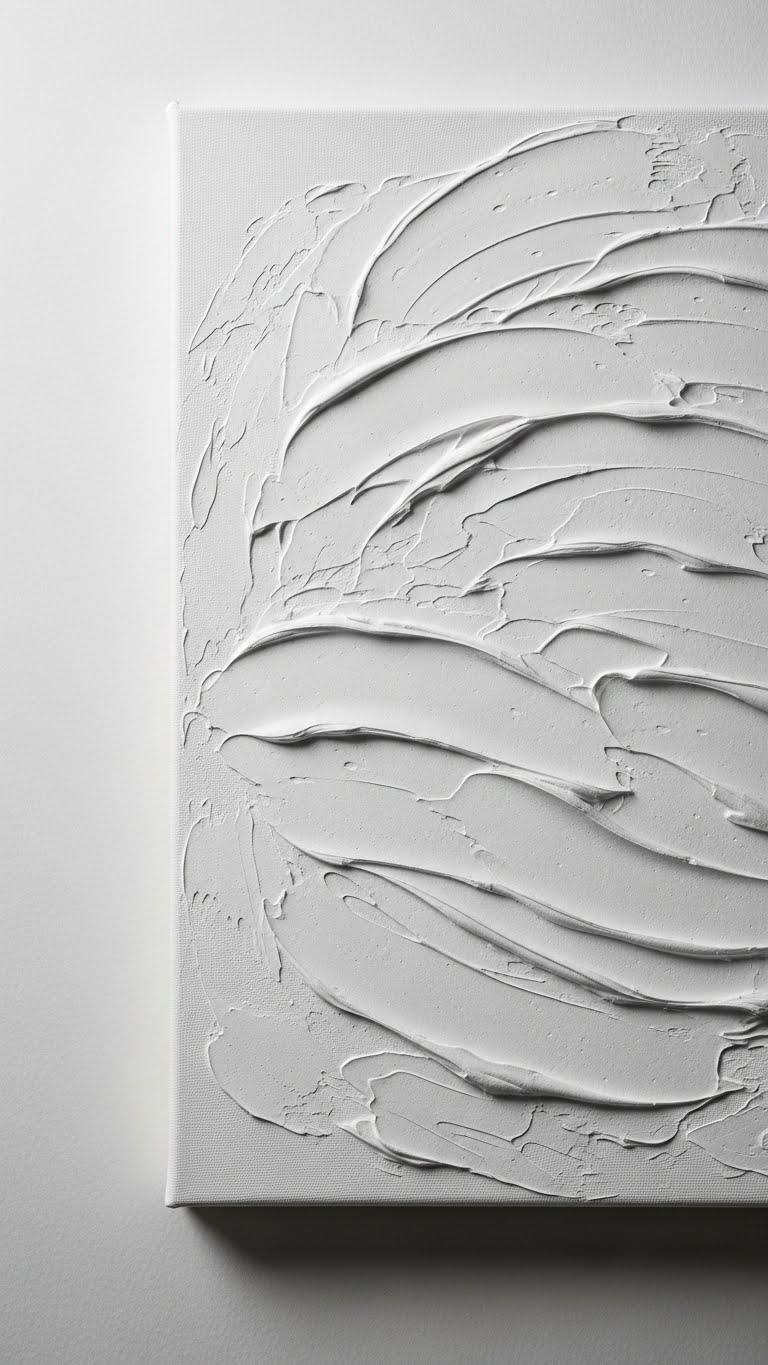
How does an all-white palette stay dynamic rather than flat? You layer subtle relief—monochrome relief achieved with plaster ridges, gesso waves, or canvas folds—so light sculpts shadow.
You press a linen imprint for tactile depth, sand selectively, and seal matte. The result feels open, intentional, and free; minimalism becomes textured expression rather than sterile decor.
Metallic-Finished Textured Panels for Modern Accents
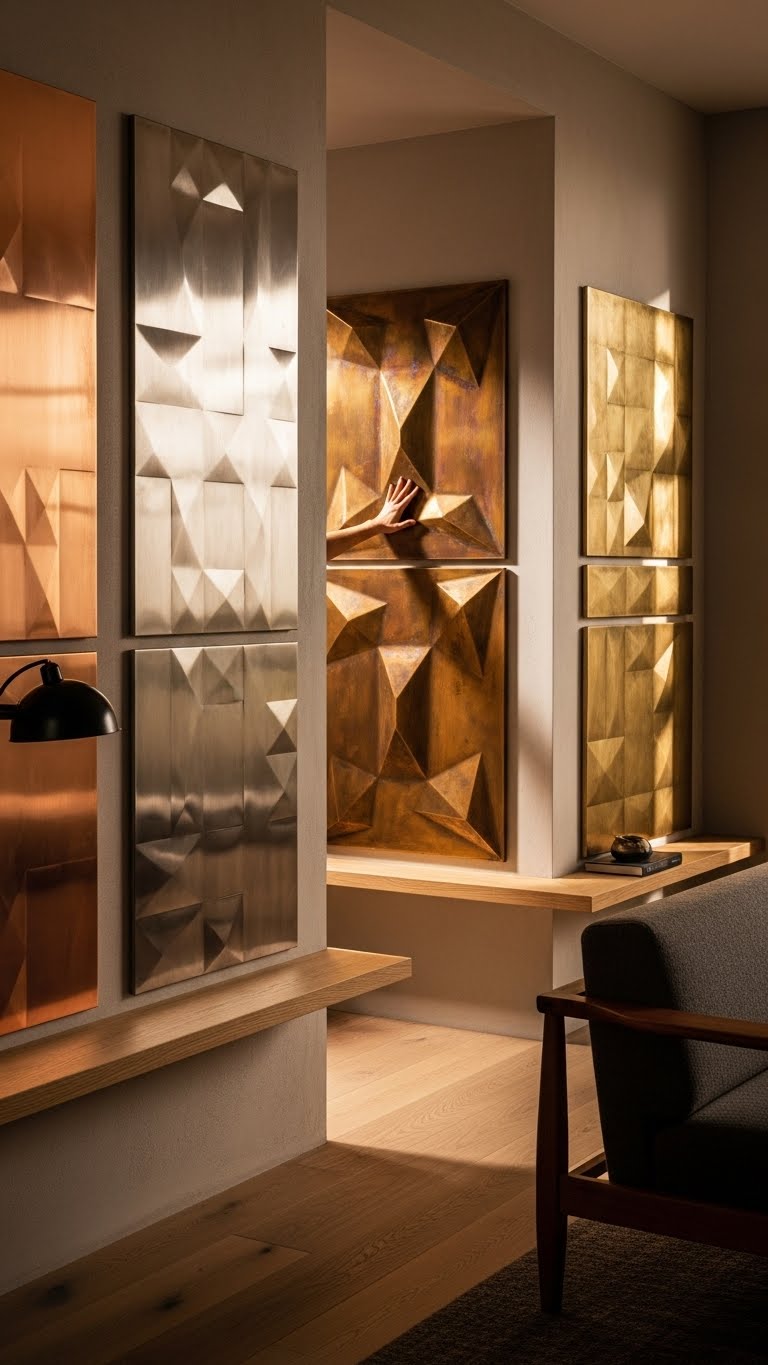
Although rooted in industrial chic, metallic-finished textured panels bring a warm, contemporary edge to any room, and you can use them as focal points or subtle accents depending on finish and scale.
You’ll pair metallic patination with matte plaster or wood, employ reflective layering to catch light, and install panels where movement and touch invite exploration—bold, liberating, tactile modern accents.
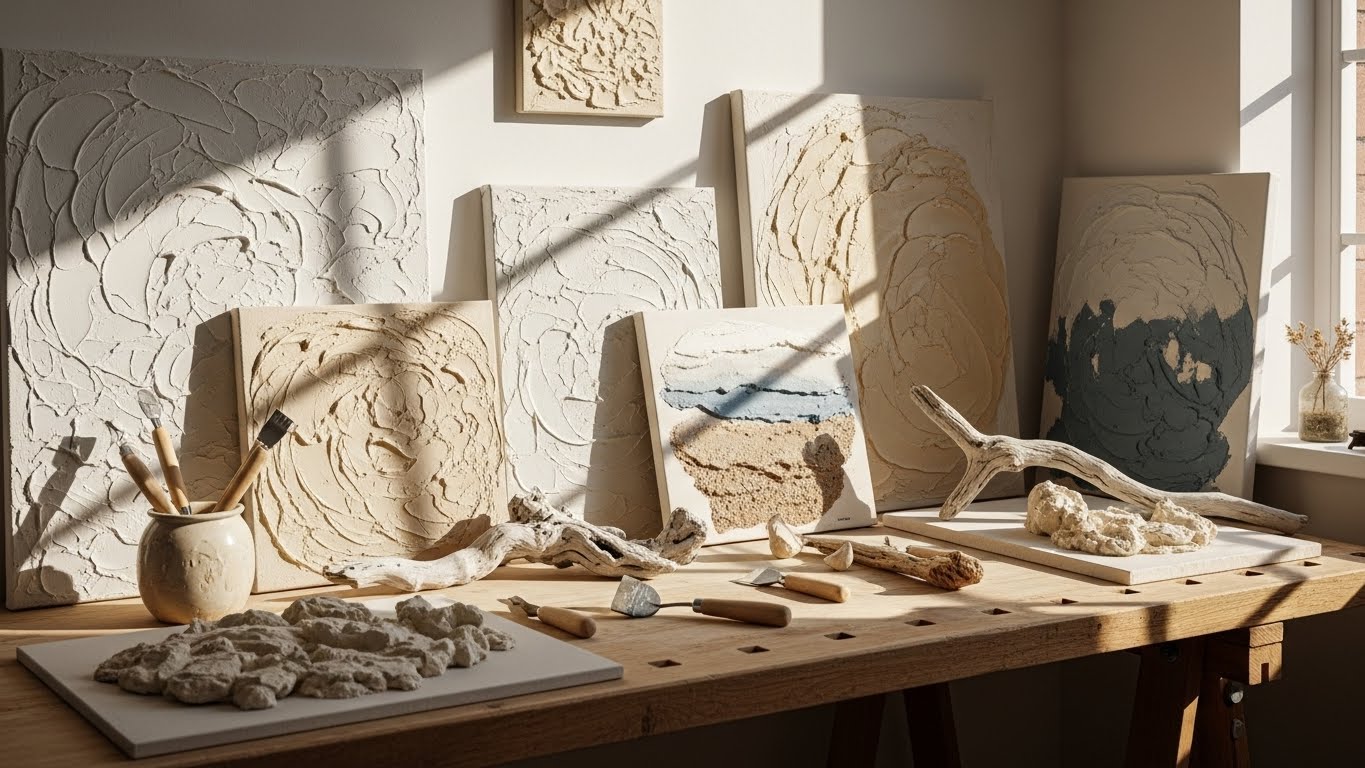
Coastal Textured Art With Driftwood and Sand

Drawing on shoreline textures and weathered materials, coastal textured art with driftwood and sand invites you to bring the tactile calm of the beach indoors. You’ll craft driftwood mosaics, layer varied grains, and use tidal sandcasting to freeze ripple patterns.
The result feels breezy yet grounded: sun-worn wood, gritty relief, and subtle coastal palette that frees your space without fuss.
Boho Macramé + Paint Textile Wall-Hanging
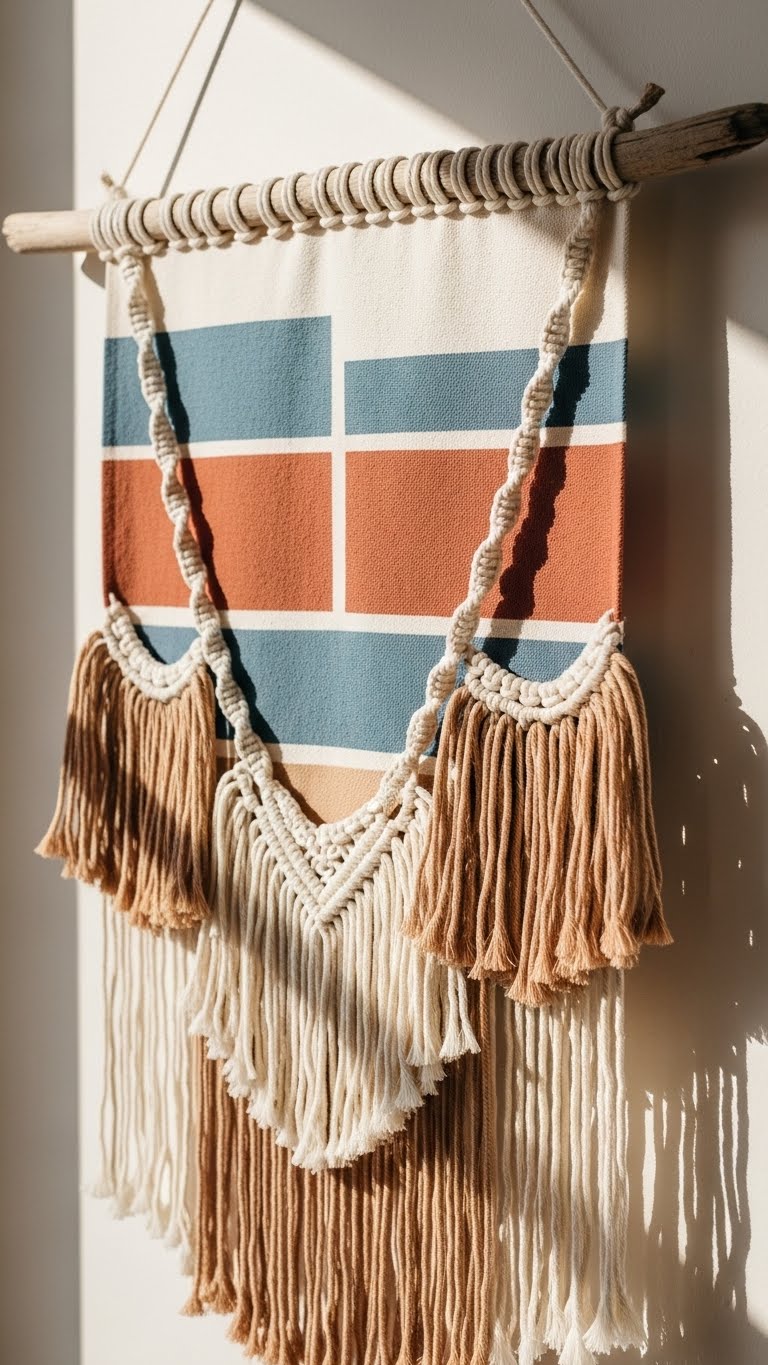
After coastal driftwood and sandy relief bring a washed-ashore calm to your walls, you can warm that same breezy palette with a boho macramé + paint textile wall-hanging that marries knotwork and colorblocking.
You’ll craft clean boho knots, brush bold geometric bands, then add tactile contrast with dyed fringe. It’s liberated, tactile decor that reads modern, handmade, and effortlessly free.
Dollar-Store Ornament Makeover With Paper-Mâché
[IMAGE PROMPT: A close-up still-life of a transformed dollar-store ornament on a neutral tabletop, photographed in soft natural light with shallow depth of field. The round bauble shows layered paper-mâché texture with visible gentle ridges and a grainy tactile surface, finished in matte neutral tones—warm off-white, soft clay beige, or muted gray—with subtle waxed highlights and no glitter. Composition focuses on texture and handmade detail, with a minimal modern background and a few craft tools (sandpaper, small paintbrush) blurred in the background; photorealistic, contemporary, artisan aesthetic.]
Give plain dollar-store ornaments a chic upgrade with paper-mâché that’s cheap, tactile, and surprisingly elegant.
You’ll transform an upcycled bauble using papier mâché layers, sanding for soft ridges and tactile grain.
Embrace a glitter free finish—matte paint, wax, or natural pigment—for subtle depth.
This ornament revival feels modern, handmade, and liberating; you control texture, tone, and mood.
Glass and Mirrored Small-Texture Tabletop Displays
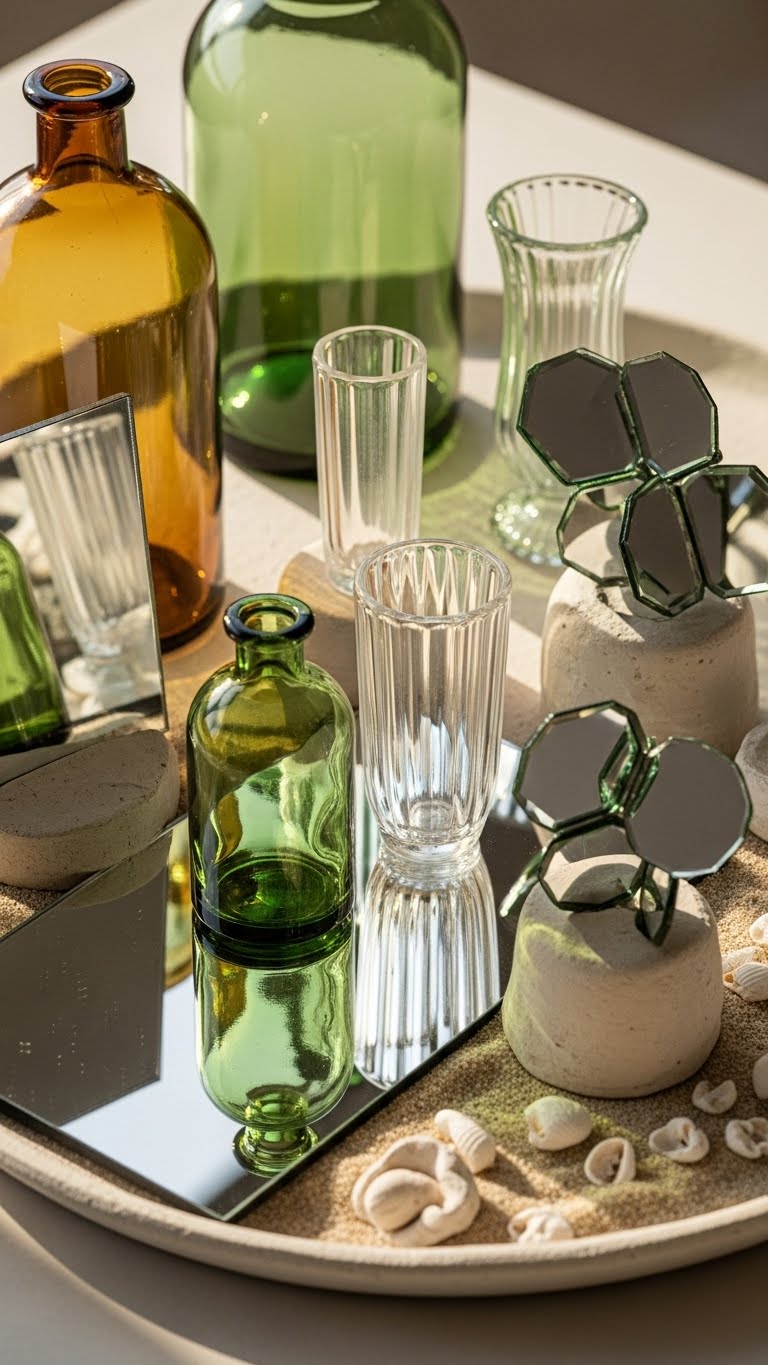
Lean into reflected light and subtle texture to make small glass and mirrored displays feel intentional and tactile. You’ll arrange antique bottles, clear vases and bevel clusters on a low tray, mixing patina and shine.
Add sand, tiny shells or matte clay bases for contrast so light skims edges. This keeps the vignette airy, sculptural and freely styled.
Repeatable Raised Patterns With Tape and Templates
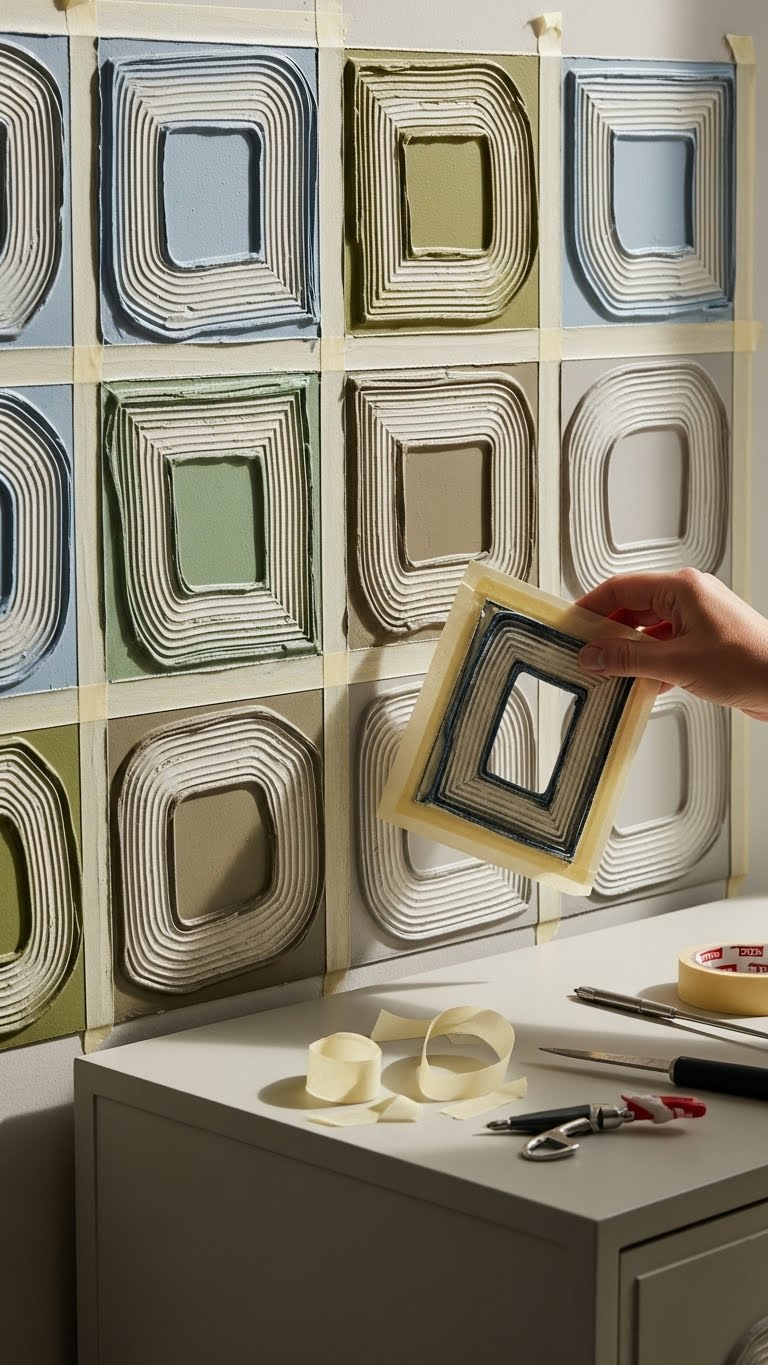
If you liked the tactile contrast of glass and patina, raised patterns let you echo that interplay on walls, furniture, or smaller surfaces. You’ll use pattern masking and raised templates to repeat motifs precisely, layering joint compound or paint gel for crisp edges.
Work intuitively, vary pressure for subtle relief, and embrace irregularities that read handcrafted — freedom without chaos, modern and tactile.
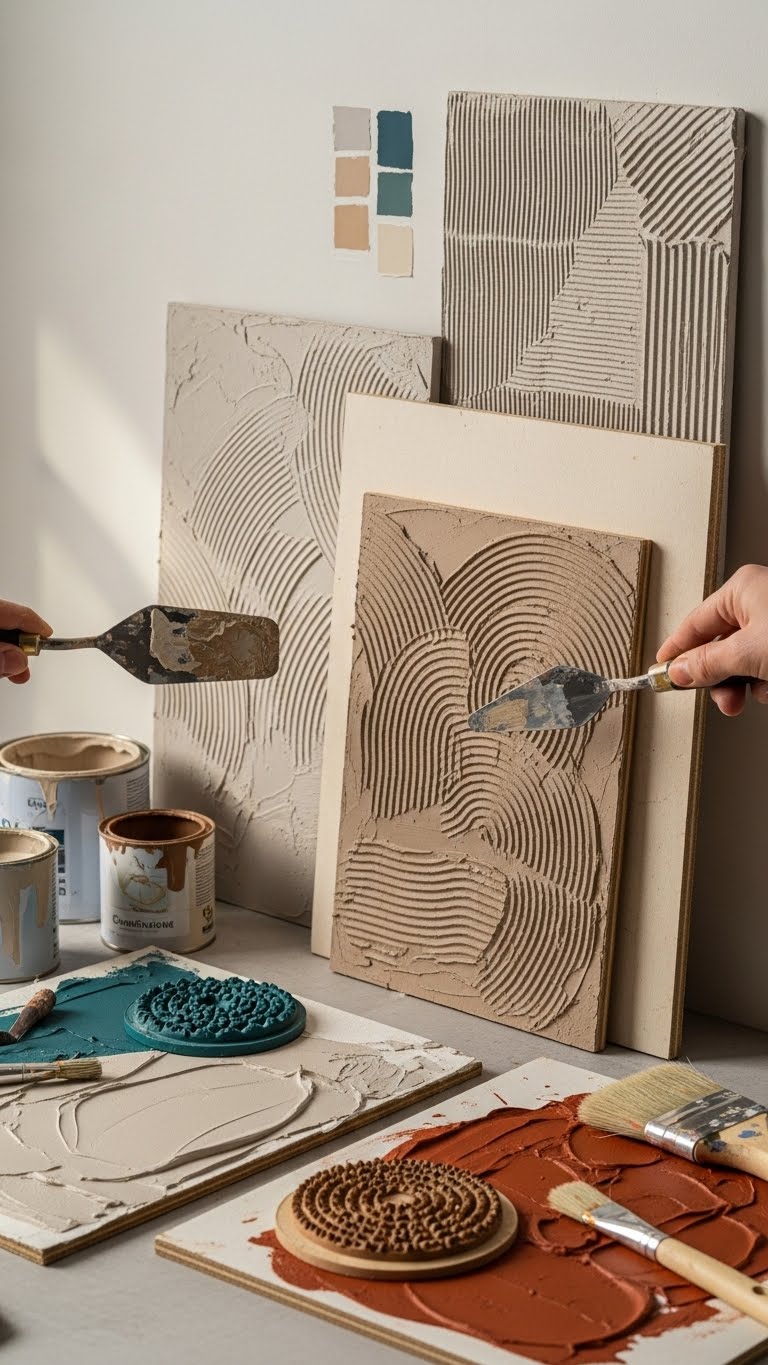
Tools, Tips, and Budget Comparison for Texture Projects
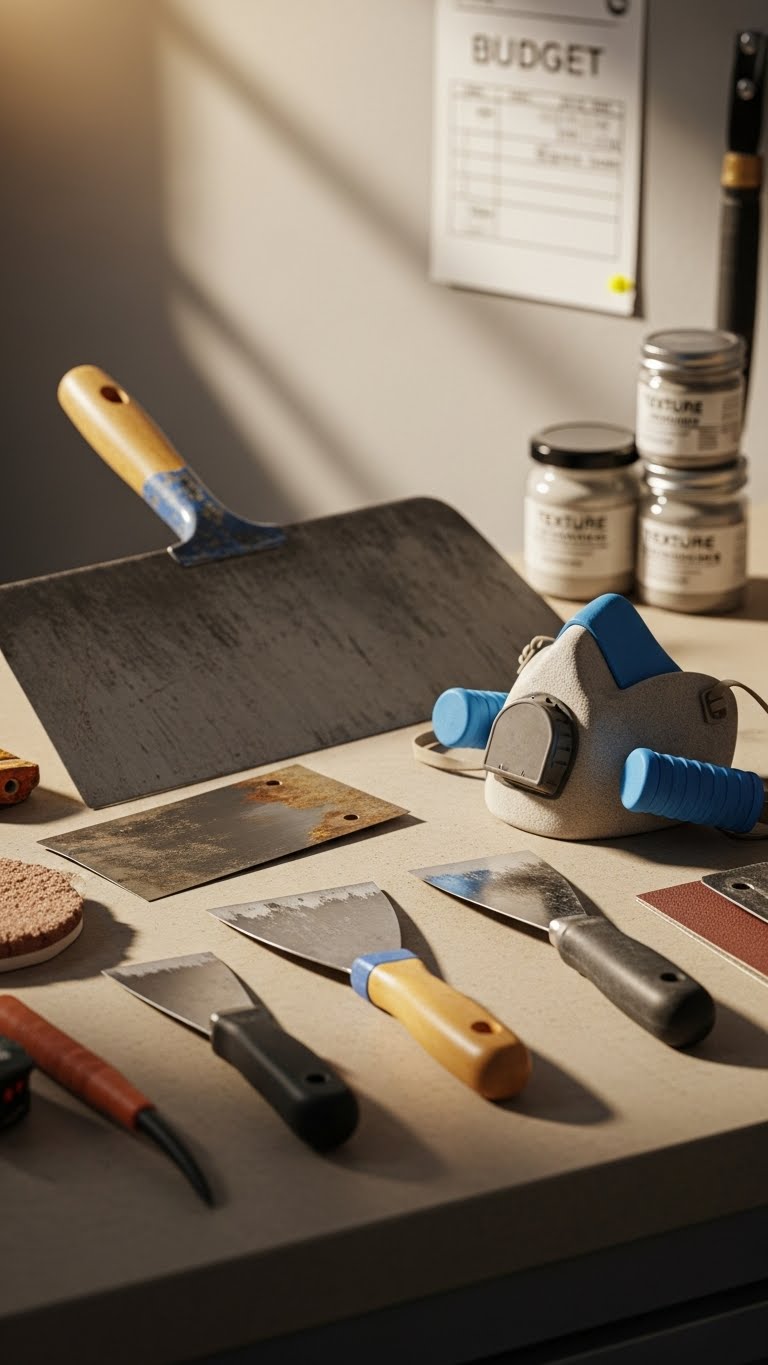
While you’ll need only a handful of basics to get started, choosing the right tools and materials makes texture work faster, cleaner, and more consistent. You’ll want a trowel, assorted scrapers, breathable mask, and sanding pads—prioritize tool safety and ergonomic grips.
Do a budget breakdown: cheap kits for experiments, midrange for control, pro tools for longevity. Enjoy tactile freedom; plan materials and time.